第七章
🚀 Understanding Astro
🚀 了解Astro
By Ohans Emmanuel 作者:Ohans Emmanuel
Chapter 7: Be Audible! (Fullstack Astro Project)
第7章:你是谁?(Fullstack Astro项目)
… People will believe what they see. Let them see.
人们会相信他们所看到的。让他们看看
― Henry David Thoreau
- -亨利·大卫·梭罗
In this chapter, I’ll employ you to see beyond static apps and build fullstack applications with Astro.
在本章中,我将让你超越静态应用程序,使用Astro构建全栈应用程序。
What you’ll learn 您将学到的内容
- The ability to add authentication to an Astro application.
向Astro应用程序添加身份验证的能力。 - An understanding of setting up a backend for an Astro application.
了解如何为Astro应用程序设置后端。 - A working knowledge of handling form submissions without dedicated API routes.
在没有专用API路线的情况下处理表单提交的工作知识。 - Hands-on experience uploading and retrieving data in an Astro application.
在Astro应用程序中上传和检索数据的实践经验。 - An understanding of the kind of apps you can build with Astro.
了解您可以使用Astro构建的应用程序类型。
Project setup 项目设置
We’ve seen how to build static sites with Astro. So, to make this section laser-focused on scripting and Astro features, I’ve set up a static site for us to work on in this chapter.
我们已经看到了如何用Astro构建静态站点。因此,为了使这一节集中于脚本和Astro特性,我为我们在这一章中的工作建立了一个静态站点。
The site has been stripped of any relevant functionality. We will build those step-by-step together.
该网站已被剥夺了任何相关功能。我们将一步一步地共同建设这些目标。
Start by cloning the project:
首先克隆项目:
git clone https://github.com/understanding-astro/fullstack-astro
Change directories: 更改目录:
cd fullstack-astro
You should be on the clean-slate branch by default. Otherwise, check out to clean-slate.
默认情况下,您应该在 clean-slate 分支上。否则,请查看 clean-slate 。
Next, install dependencies and start the application:
接下来,安装依赖项并启动应用程序:
npm install && npm run start
The application should successfully run on one of the local server ports.
应用程序应在其中一个本地服务器端口上成功运行。
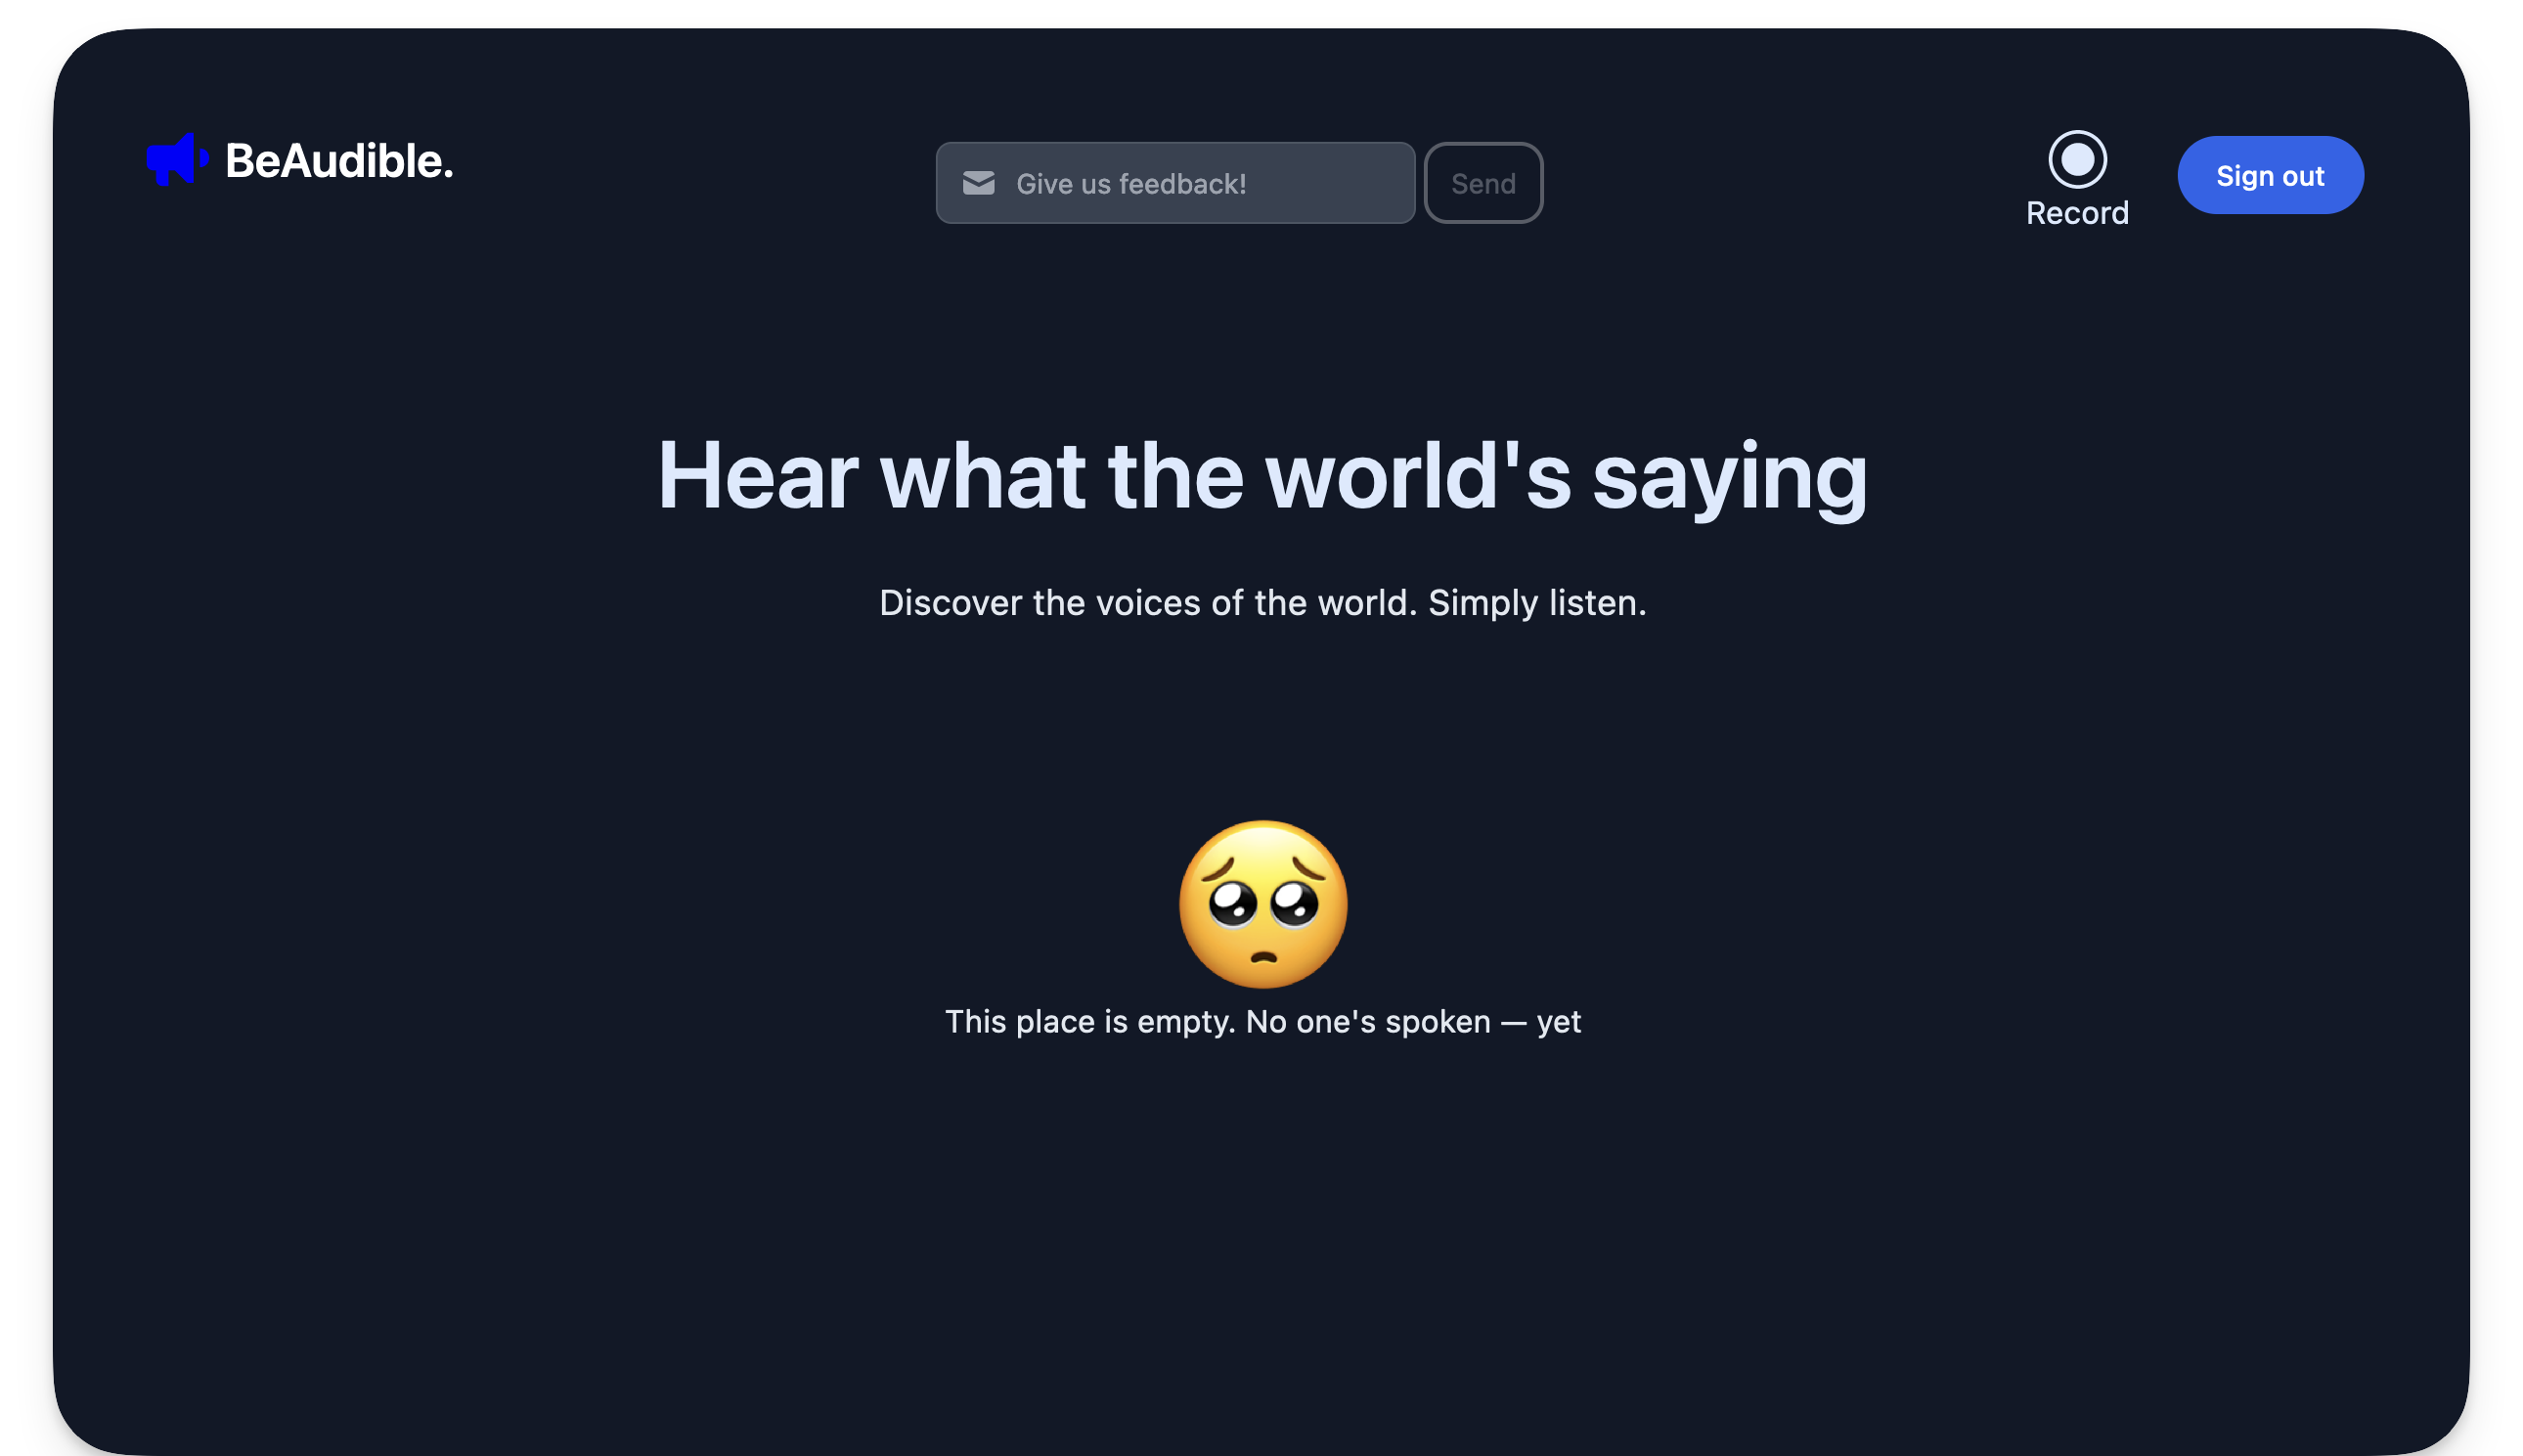
The BeAudible app initialised.
BeAudible应用程序已初始化。
Project overview 项目概况
Our application is for a hypothetical startup, BeAudible, whose mission is to discover the voices of the world.
我们的申请是一个假设的初创公司BeAudible,其使命是发现世界的声音。
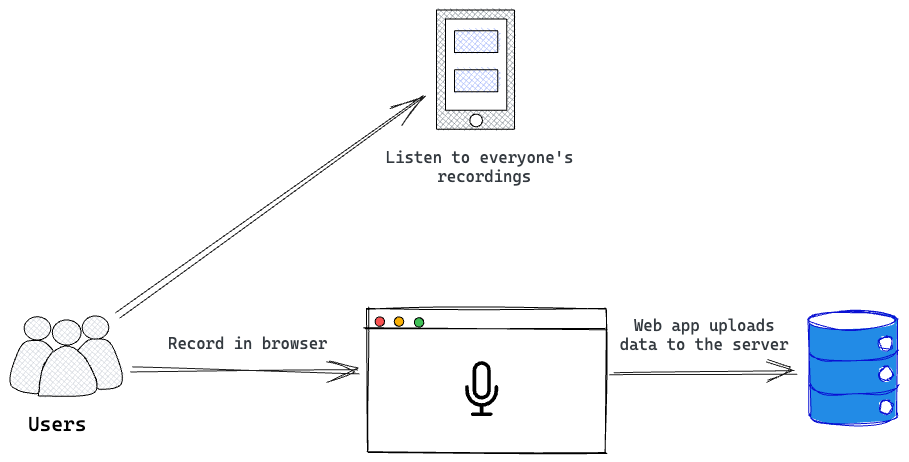
In technical terms, BeAudible lets authorised users create audio recordings, upload them to their servers, and have a timeline where people can listen to everyone’s recordings.
在技术上,BeAudible允许授权用户创建音频记录,将其上传到他们的服务器,并有一个时间轴,人们可以收听每个人的录音。
An overview of the BeAudible application.
BeAudible应用程序概述。
The project we just cloned will receive and upload a user’s recording and eventually display every recording on a shared timeline.
我们刚刚克隆的项目将接收并上传用户的录音,并最终在共享时间轴上显示每个录音。
Let’s explore the pages in the project.
让我们浏览项目中的页面。
The homepage 主页
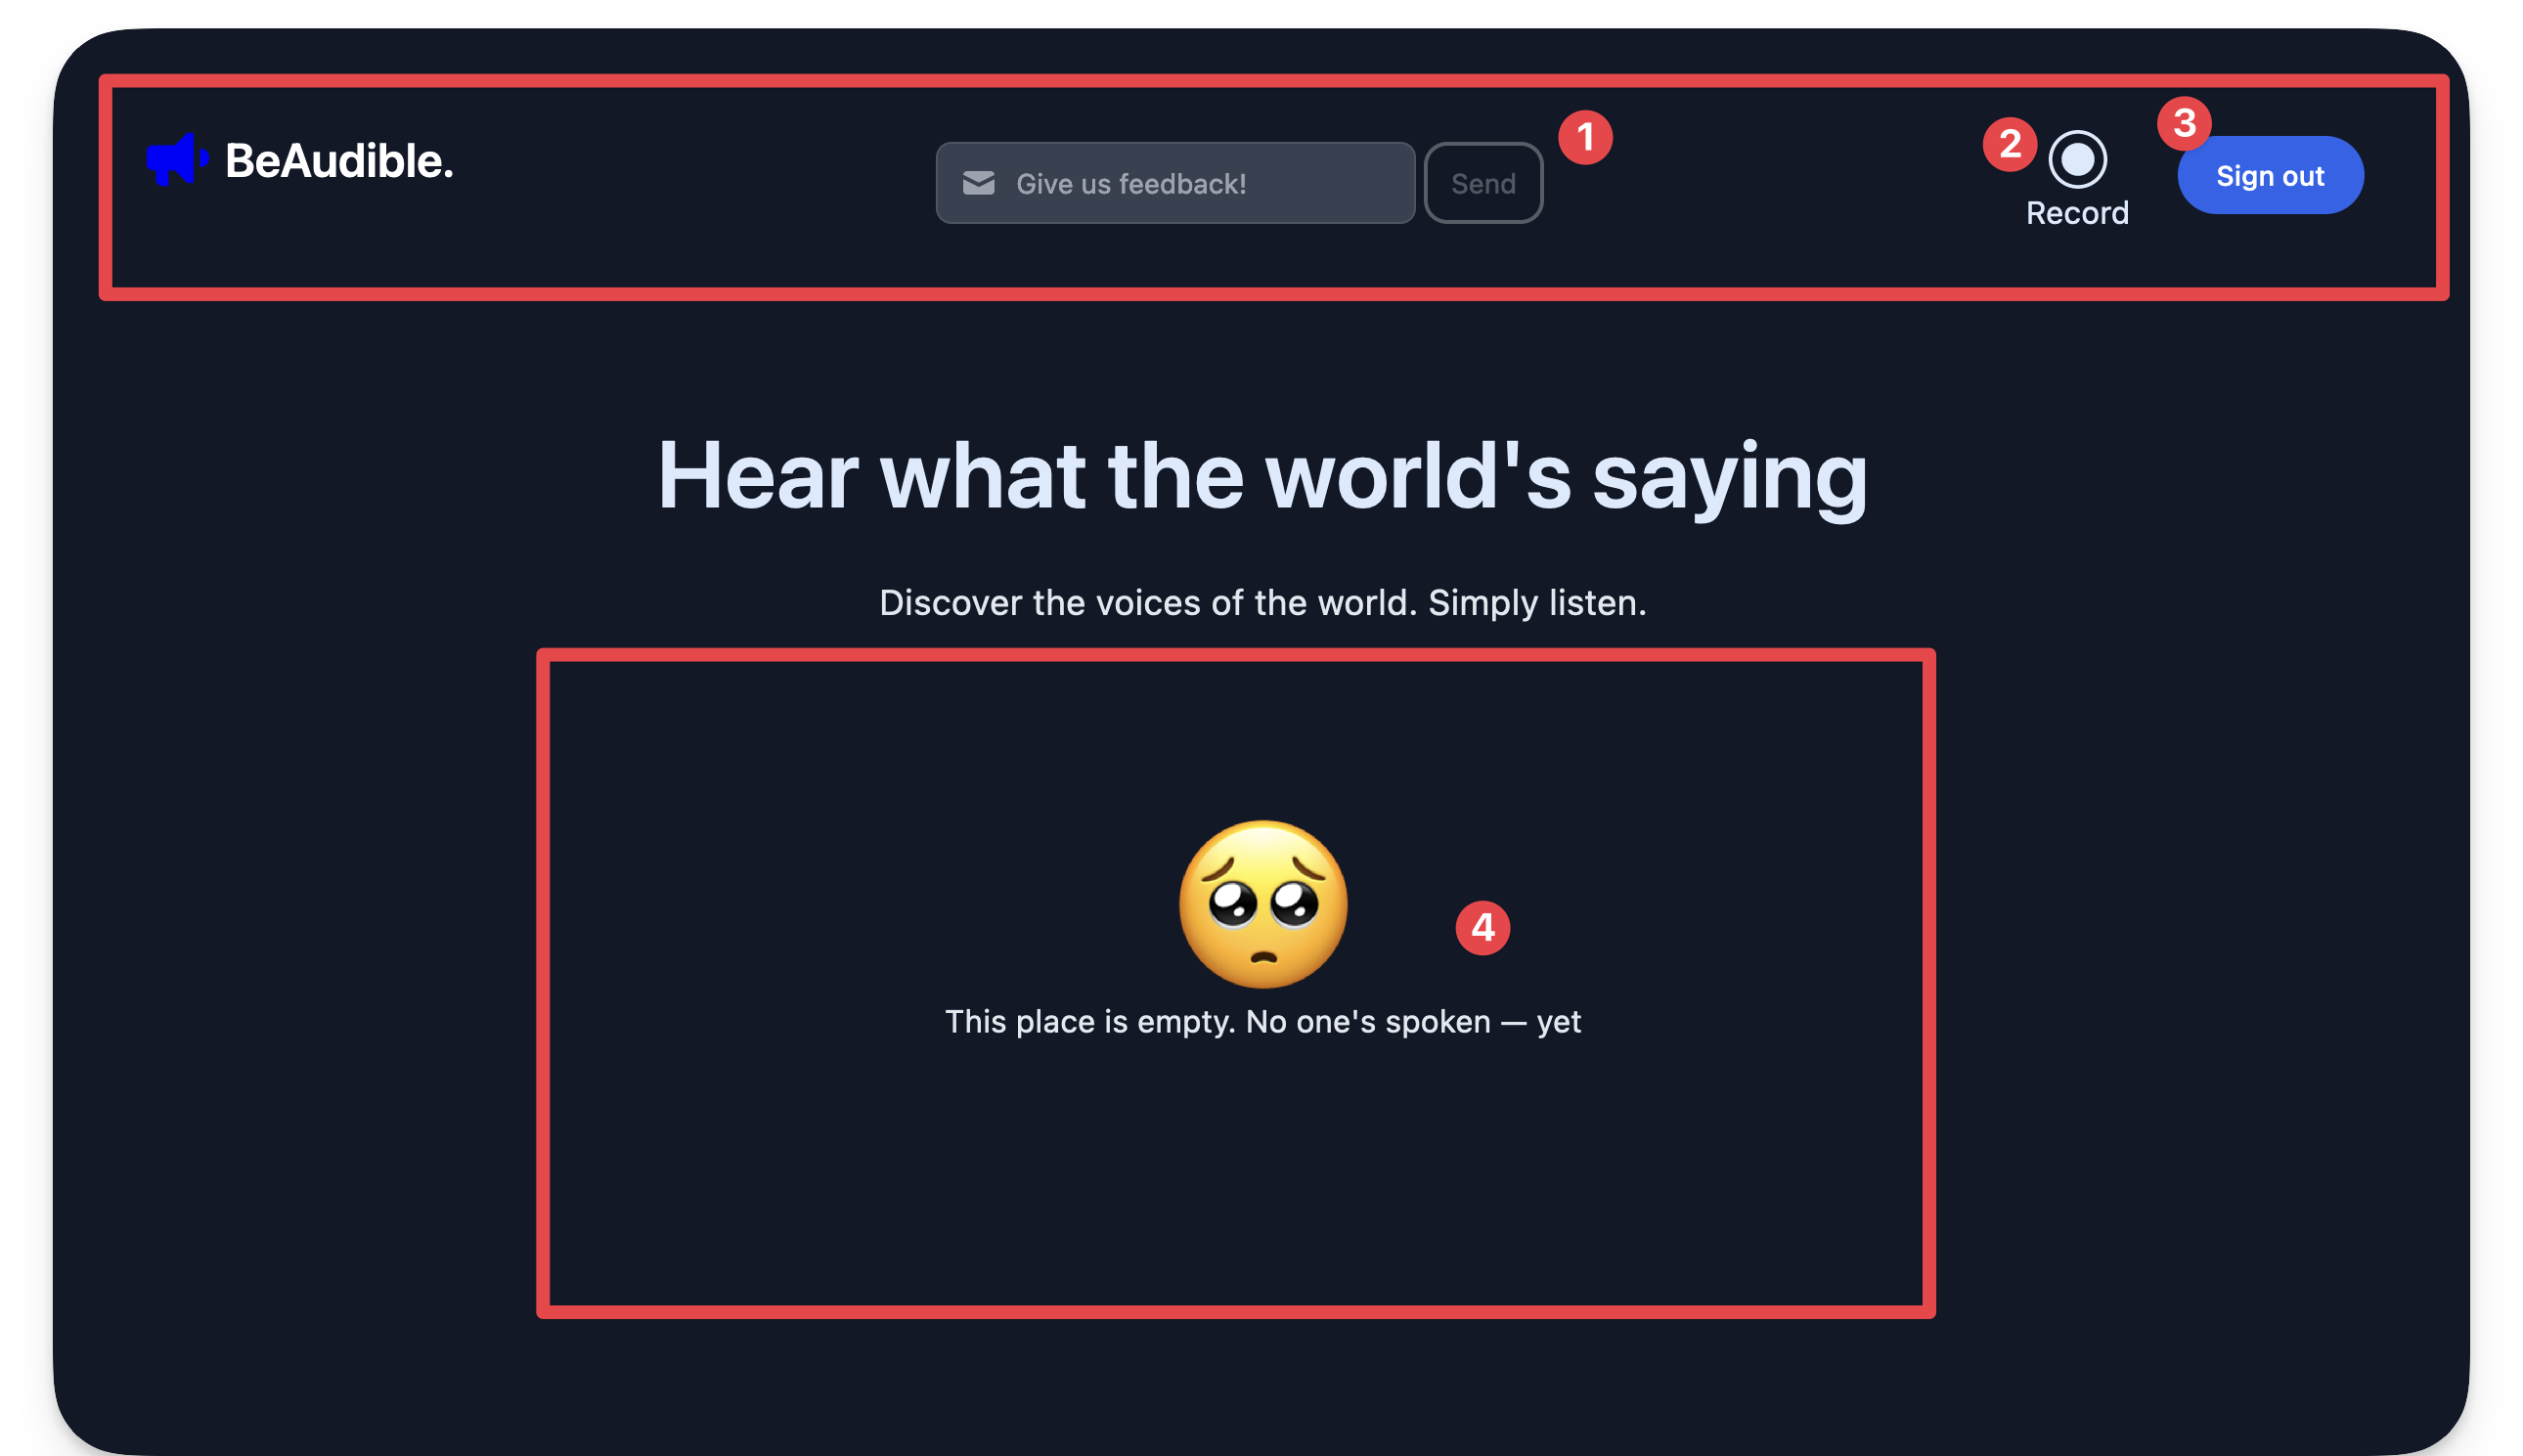
Firstly, consider the homepage, i.e., the base route /.
首先,考虑主页,即,基本路线 / 。
The sections of the BeAudible application.
BeAudible应用程序的部分。
- The navigation bar holds a feedback form for users to send their thoughts.
导航栏保存了一个反馈表单,供用户发送他们的想法。 - The navigation bar includes a record link to navigate to a dedicated page for recording a user’s audio.
导航条包括记录链接,以导航到用于记录用户音频的专用页面。 - The navigation bar contains a sign-out button. By implication, the homepage should be protected, i.e., only authenticated users should land here.
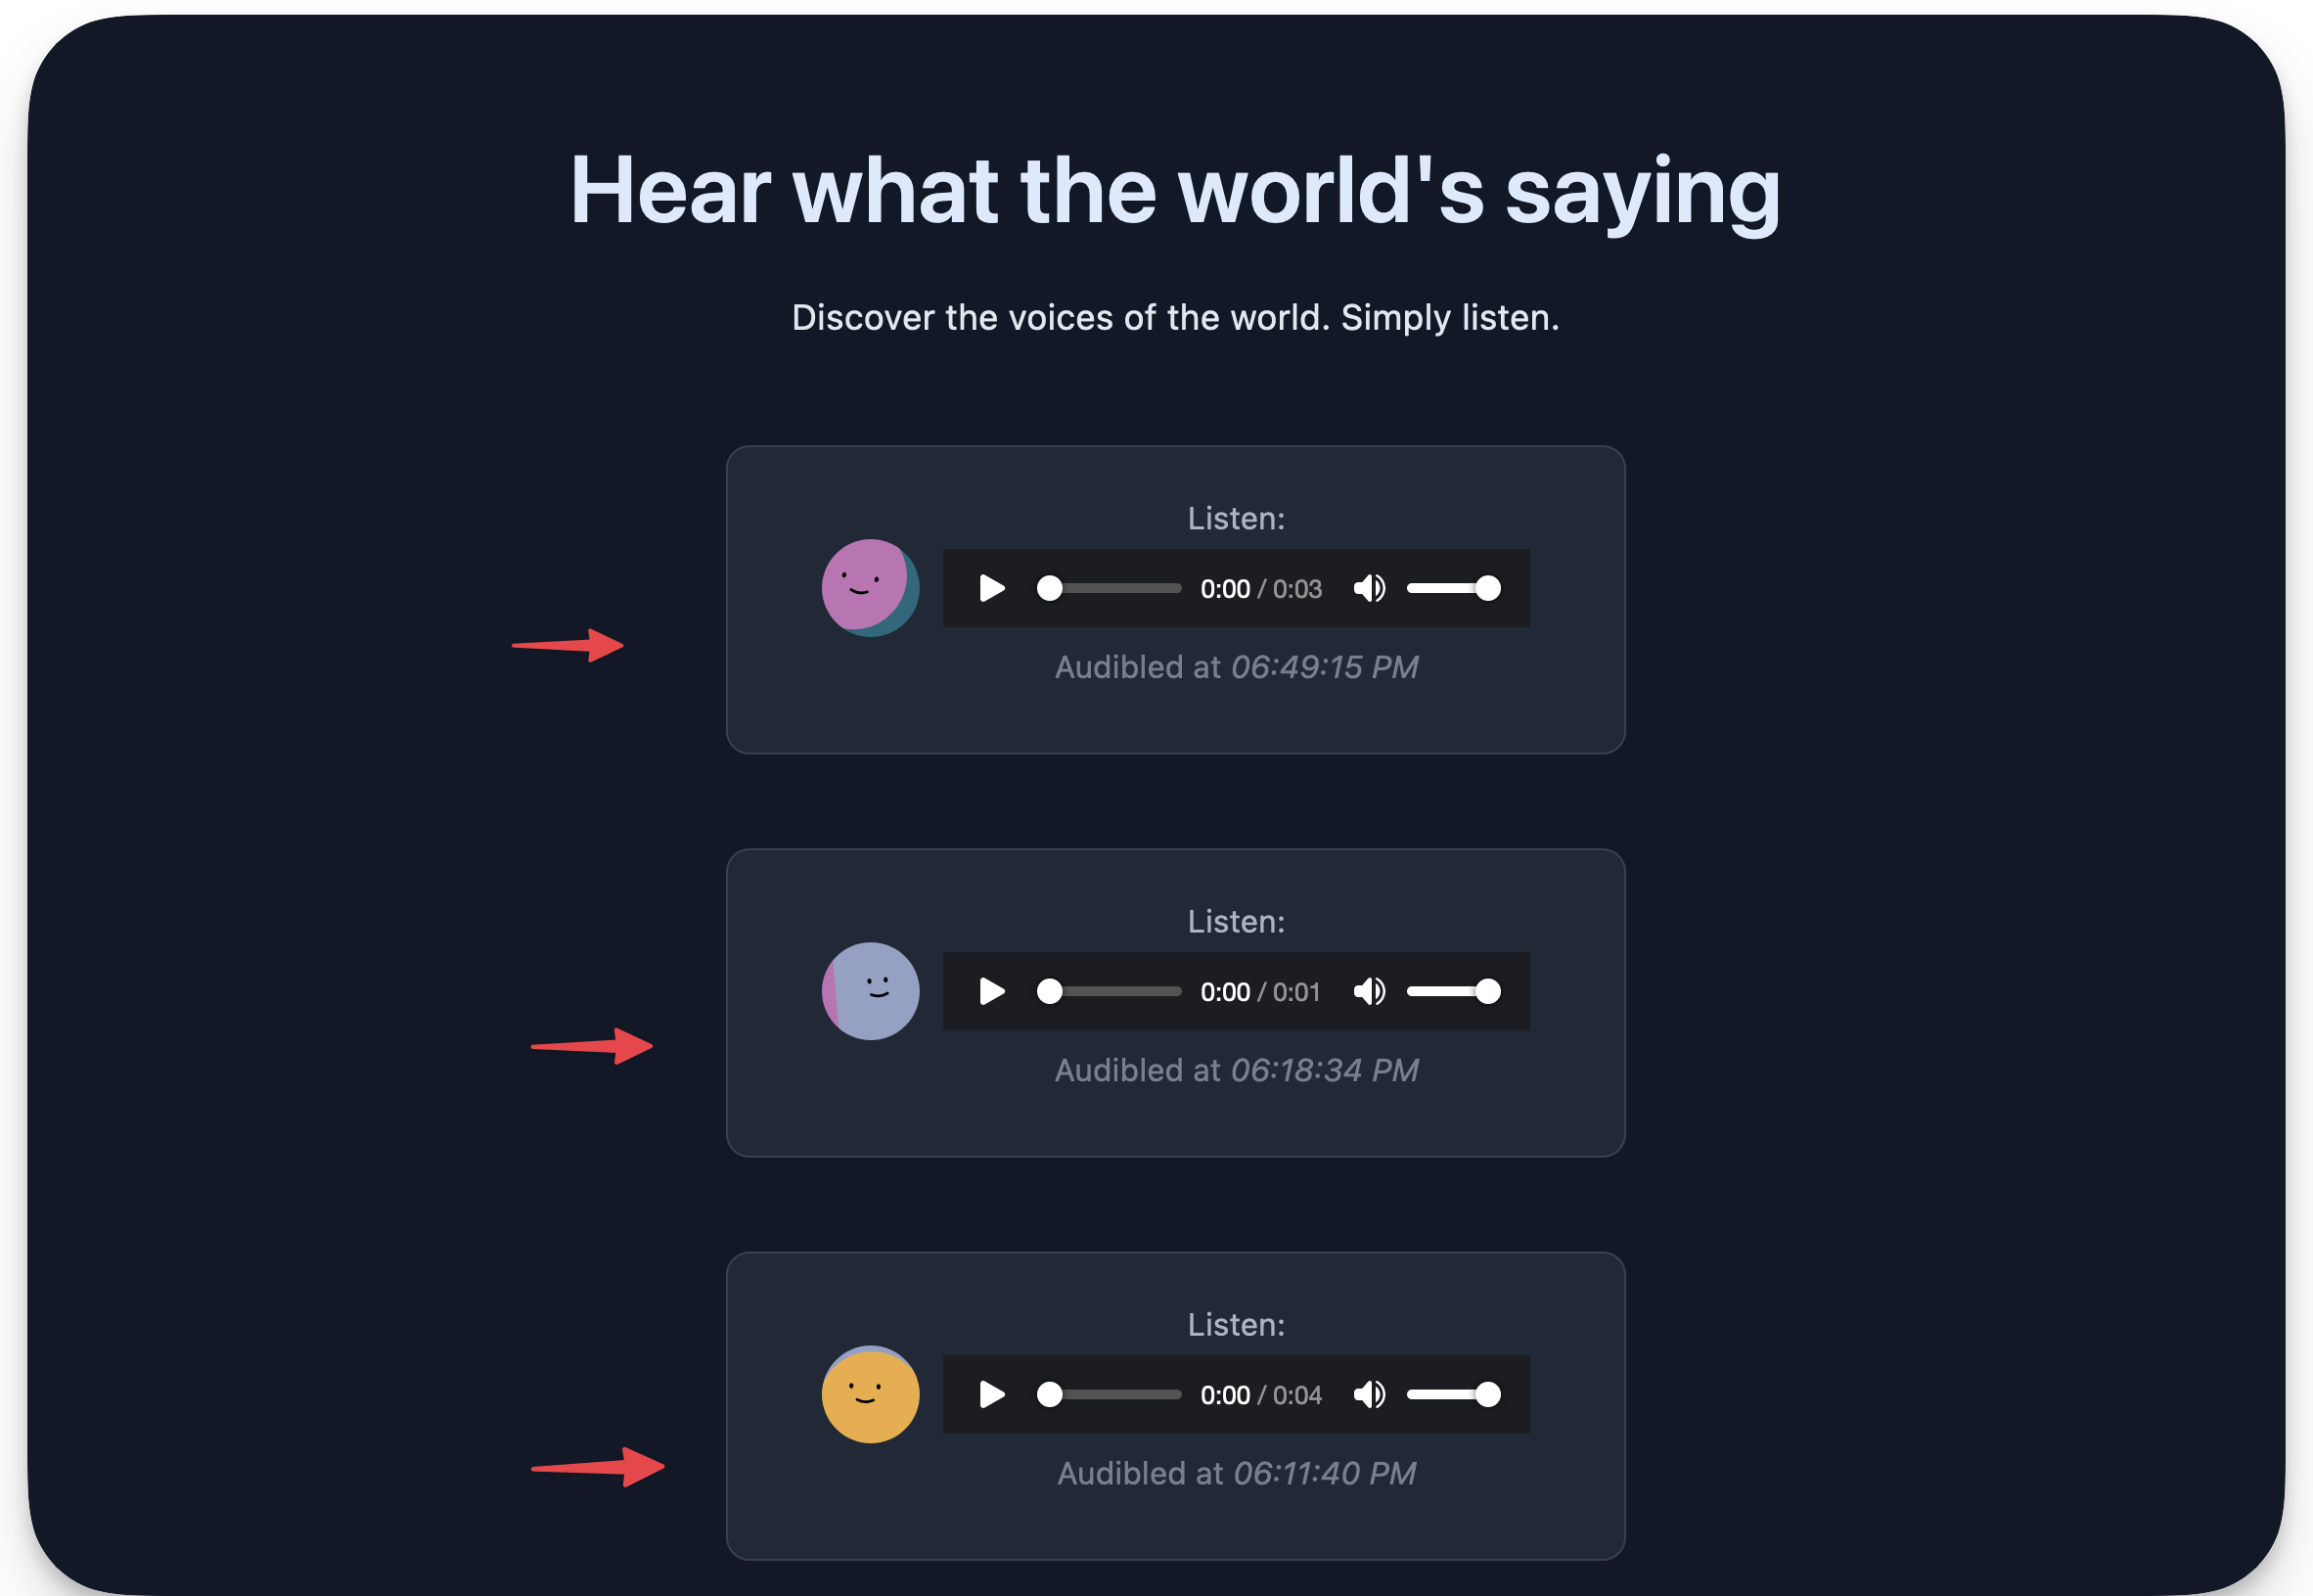
导航栏包含注销按钮。这意味着,主页应该受到保护,即,只有经过认证的用户才能登陆这里。 - Finally, in the centre of the page lies the timeline that should list all users’ recordings.
最后,在页面的中心是时间轴,应该列出所有用户的录音。
The record page 记录页
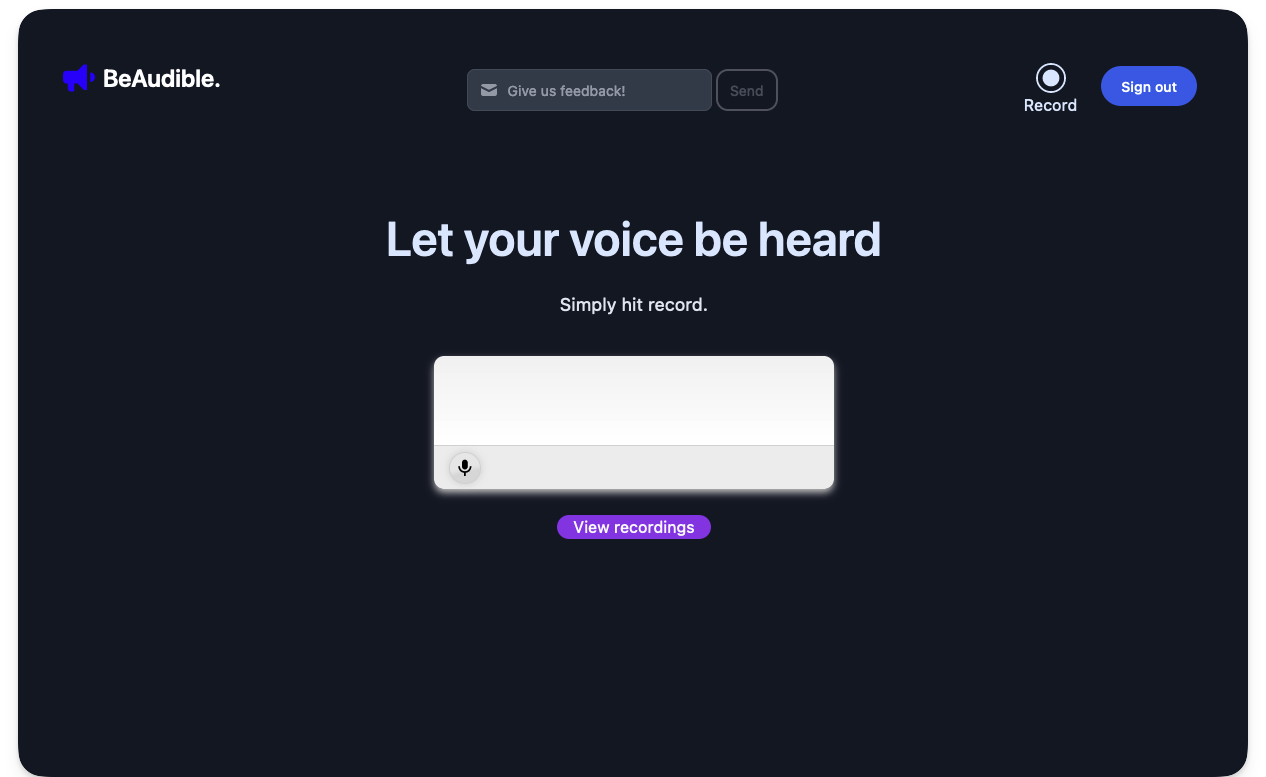
If you click “Record” from the navigation bar, you will be navigated to the /record route where a user can record their audio.
如果您在导航栏中单击“录制”,您将被导航到 /record 路径,用户可以在那里录制音频。
The record page. 记录页。
A React component hydrated in the Astro application powers the recording user interface element.
Astro应用程序中水合的React组件为记录用户界面元素提供动力。
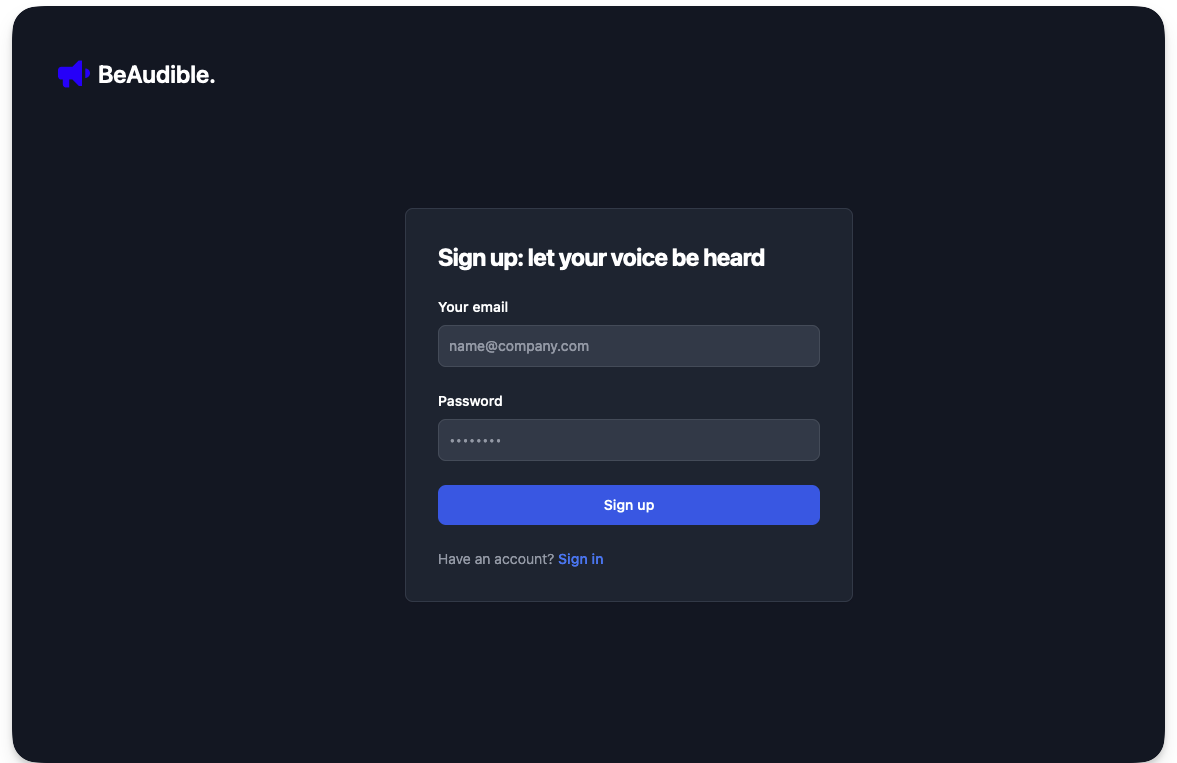
The signup page 注册页面
Now, go to the /signup route.
现在,走到 /signup 路线。
The sign up page.
注册页面。
This is the page to sign up users to BeAudible!
您访问的页面不存在!
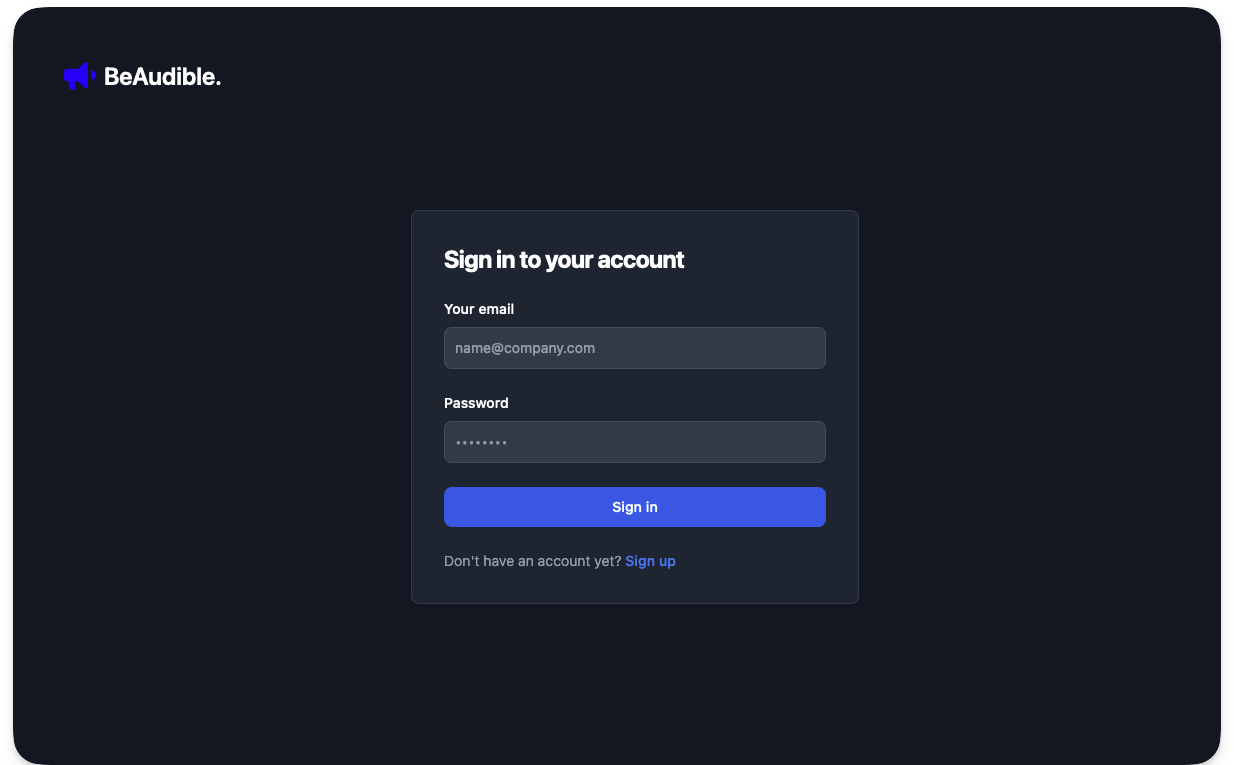
The sign-in page 登录页面
Finally, visit the /signin route.
最后,参观 /signin 路线。
The signin page. 登录页面。
This is the page for previously authenticated users to log in to the application.
这是以前通过身份验证的用户登录应用程序的页面。
Go ahead and kill the running application from the terminal. Then, we’ll continue with some setup.
继续从终端终止正在运行的应用程序。然后,我们将继续一些设置。
Helper components and utilities
帮助程序组件和实用程序
To ensure our focus remains on Astro, I created UI components and stored them in the src/components folder. We will import and use these components to develop our solution as we proceed.
为了确保我们的重点仍然是Astro,我创建了UI组件并将它们存储在 src/components 文件夹中。我们将导入并使用这些组件来开发我们的解决方案。
Similarly, constants have been stored in src/constants and utility scripts in src/scripts. We aim to concentrate on the critical objective of this chapter, which is to build a fullstack application with Astro.
同样,常量存储在 src/constants 中,实用程序脚本存储在 src/scripts 中。我们的目标是集中在本章的关键目标,这是建立一个完整的应用程序与天文。
Technology choices 技术选择
- Firebase as a backend service: we can choose any backend service with Astro, but we’ll use Firebase for simplicity. The principles we’ll discuss work with any other preferred service. We will leverage Firebase’s authentication and cloud storage services.
Firebase作为后端服务:我们可以使用Astro选择任何后端服务,但为了简单起见,我们将使用Firebase。我们将讨论的原则适用于任何其他首选服务。我们将利用Firebase的身份验证和云存储服务。 - Tailwind for styling: Tailwind is famous for styling applications. Instead of writing the styles manually, the project uses Tailwind.
造型顺风:Tailwind以造型应用而闻名。该项目使用Tailwind而不是手动编写样式。 - Astro as the primary web framework: Of course, the web framework of choice for our application is Astro. No questions asked! However, we will also leverage React components for islands of interactivity.
Astro作为主要的Web框架:当然,我们的应用程序选择的Web框架是Astro。不许问问题!但是,我们也将利用React组件来实现交互性。
Backend setup 后端设置
Let’s point our attention to setting up our backend server. Remember, we will use Firebase as our backend service.
让我们将注意力集中到设置后端服务器上。请记住,我们将使用Firebase作为我们的后端服务。
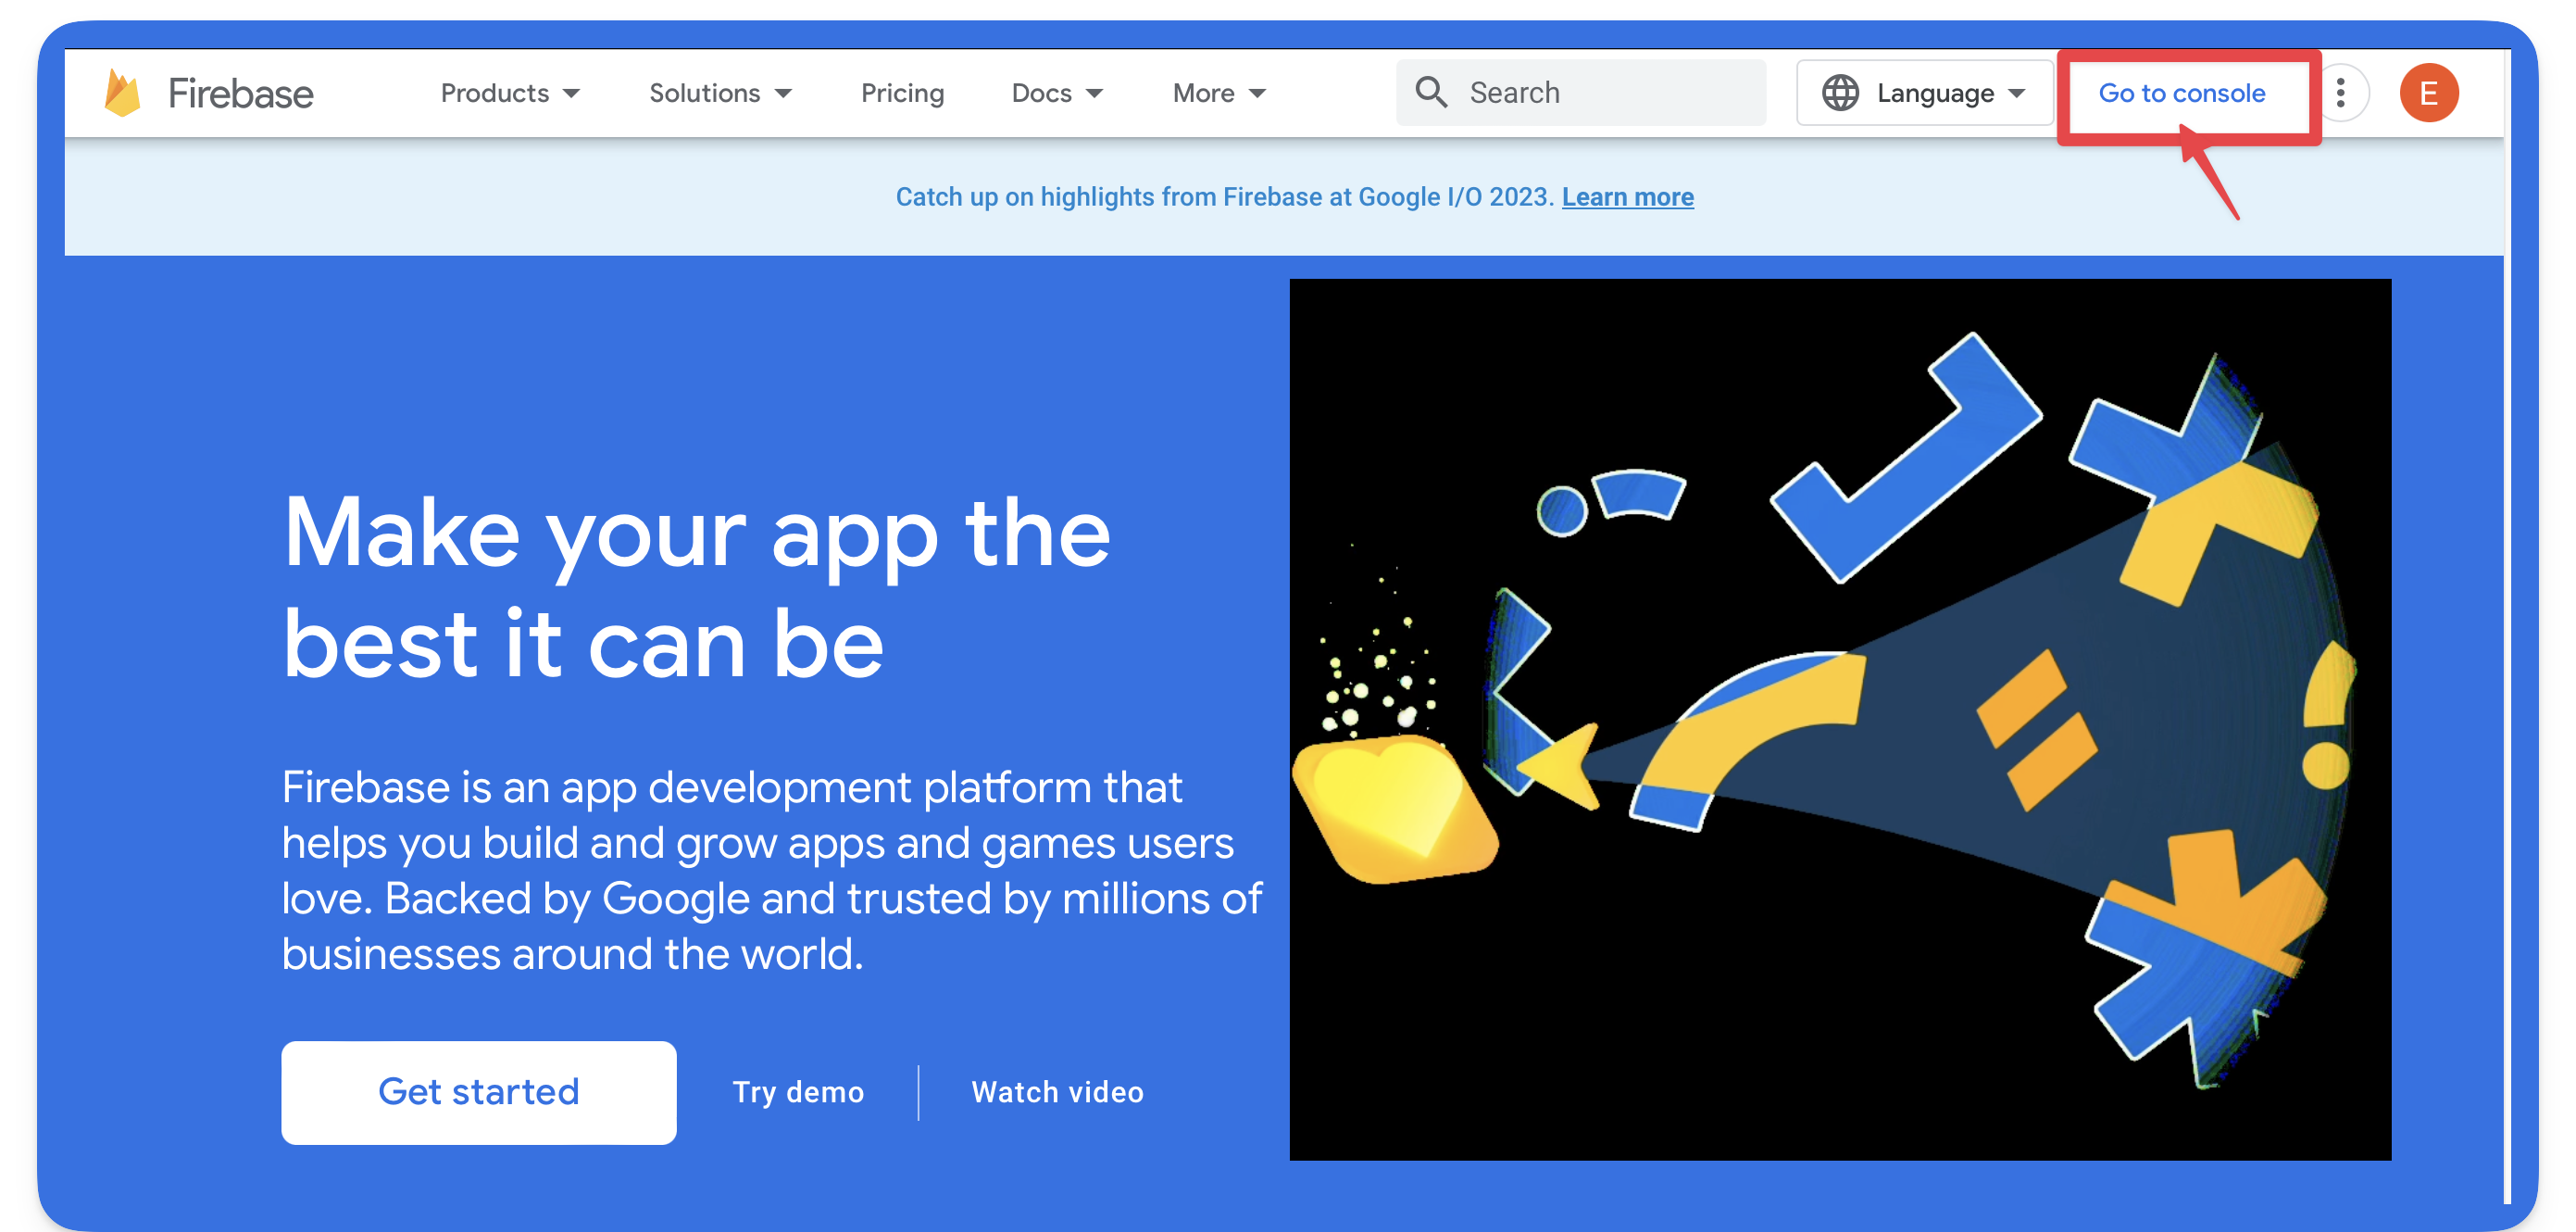
Go to the Firebase homepage and visit the Firebase console.
转到Firebase主页并访问Firebase控制台。
The Firebase homepage. Firebase主页
The process is much smoother if you have (and are signed in to) a Google account (e.g., Gmail).
如果您有(并已登录)Google帐户(例如,Gmail)。
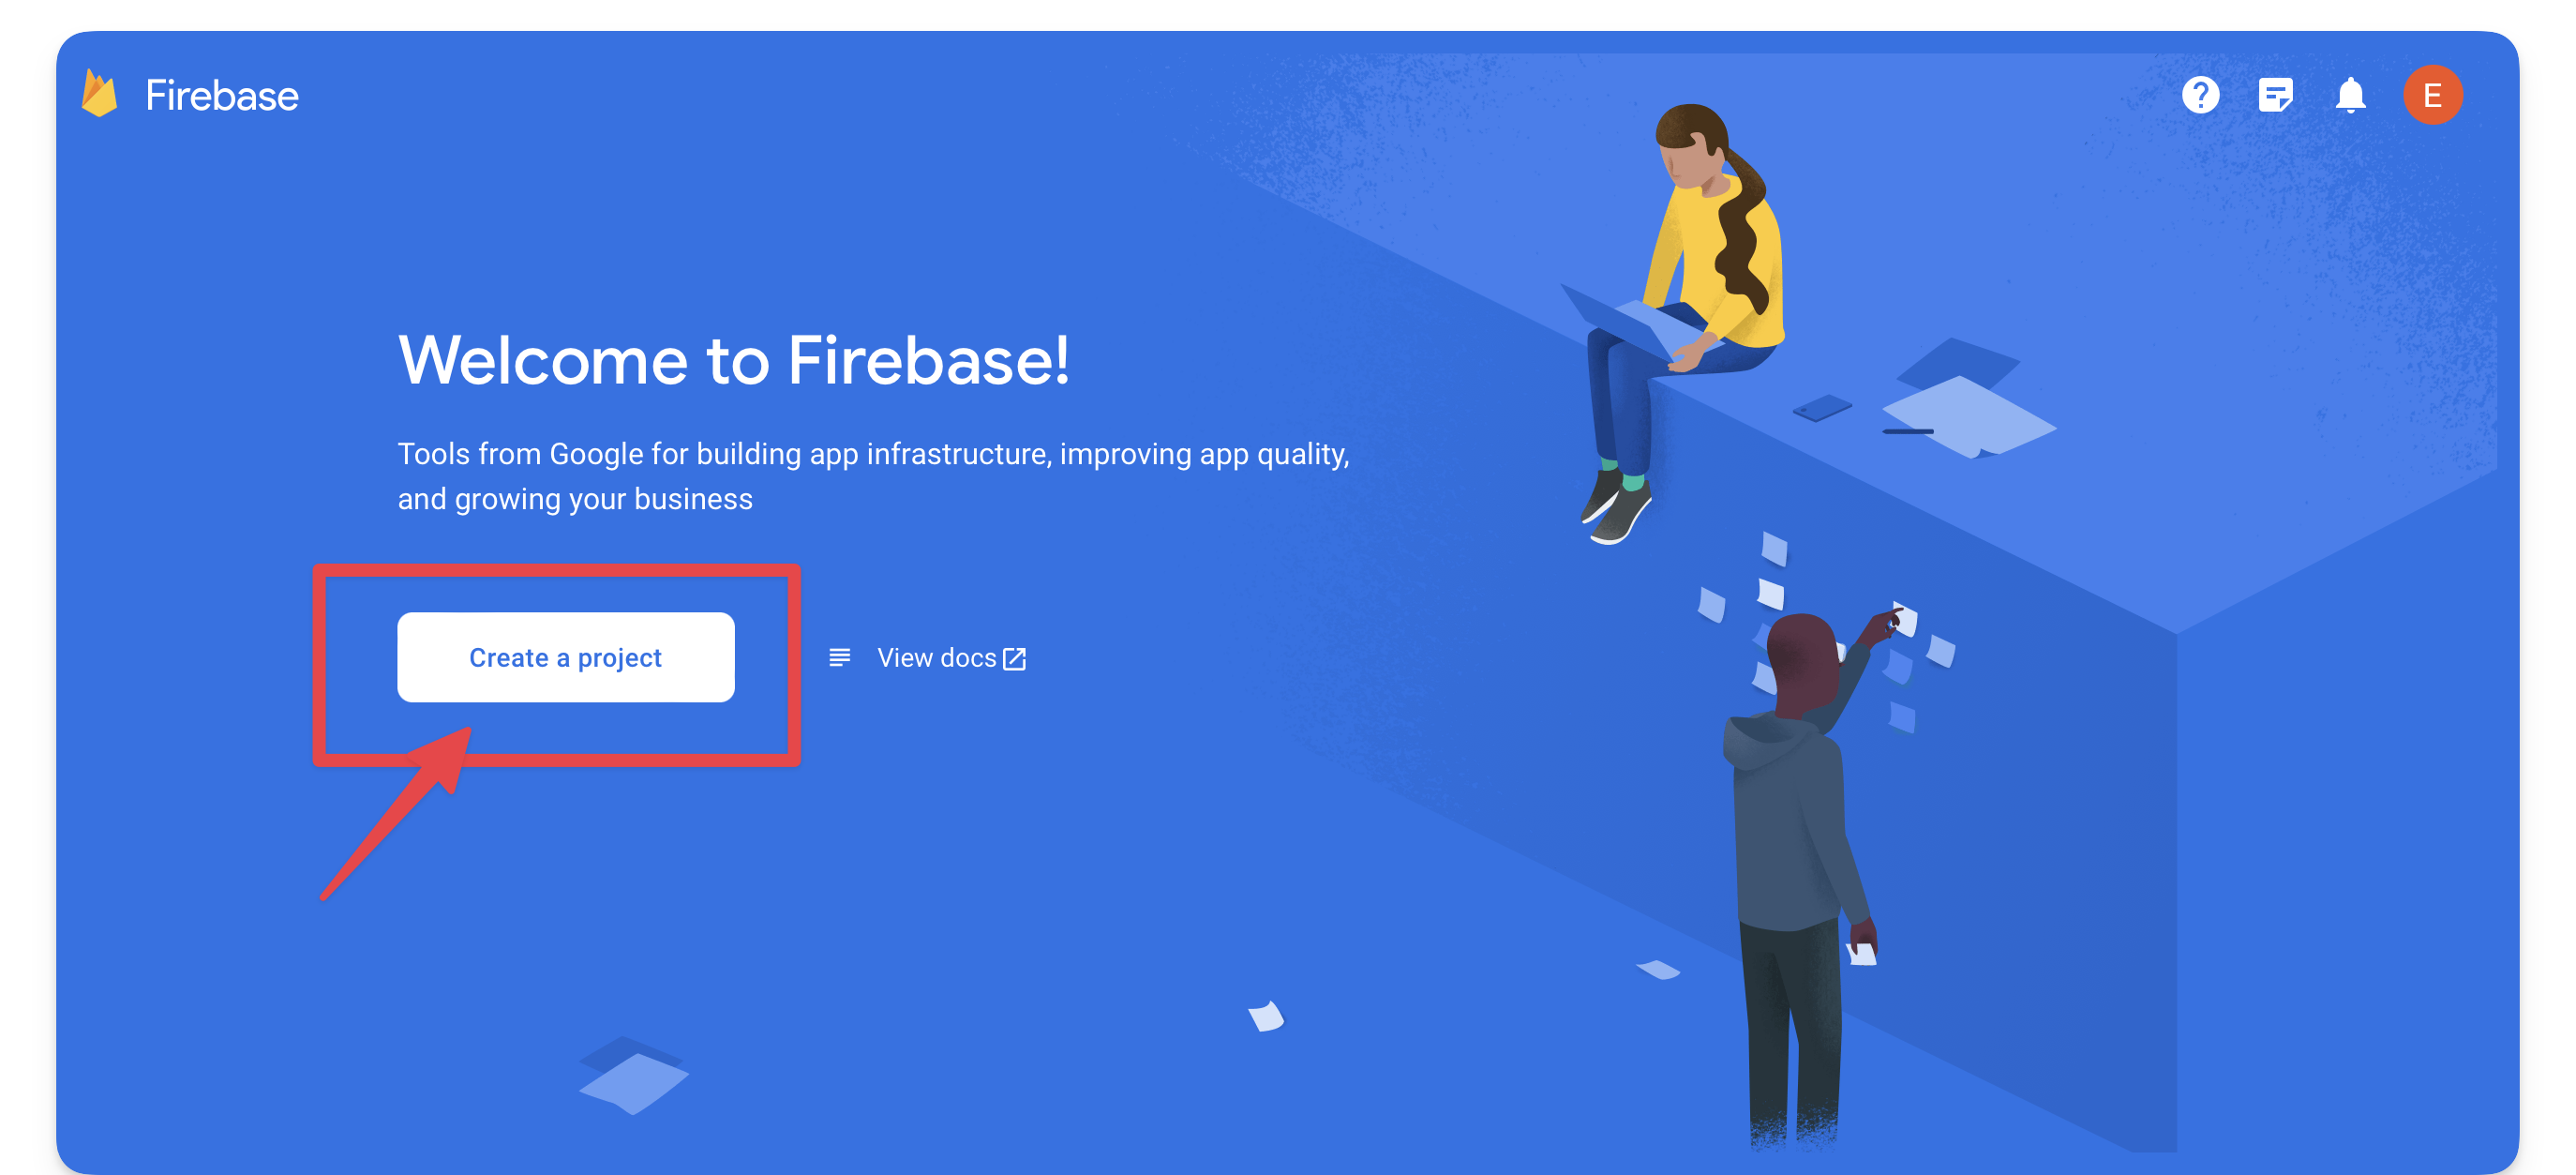
Next, create a new Firebase project.
接下来,创建一个新的Firebase项目。
Creating a new Firebase project.
创建新的Firebase项目。
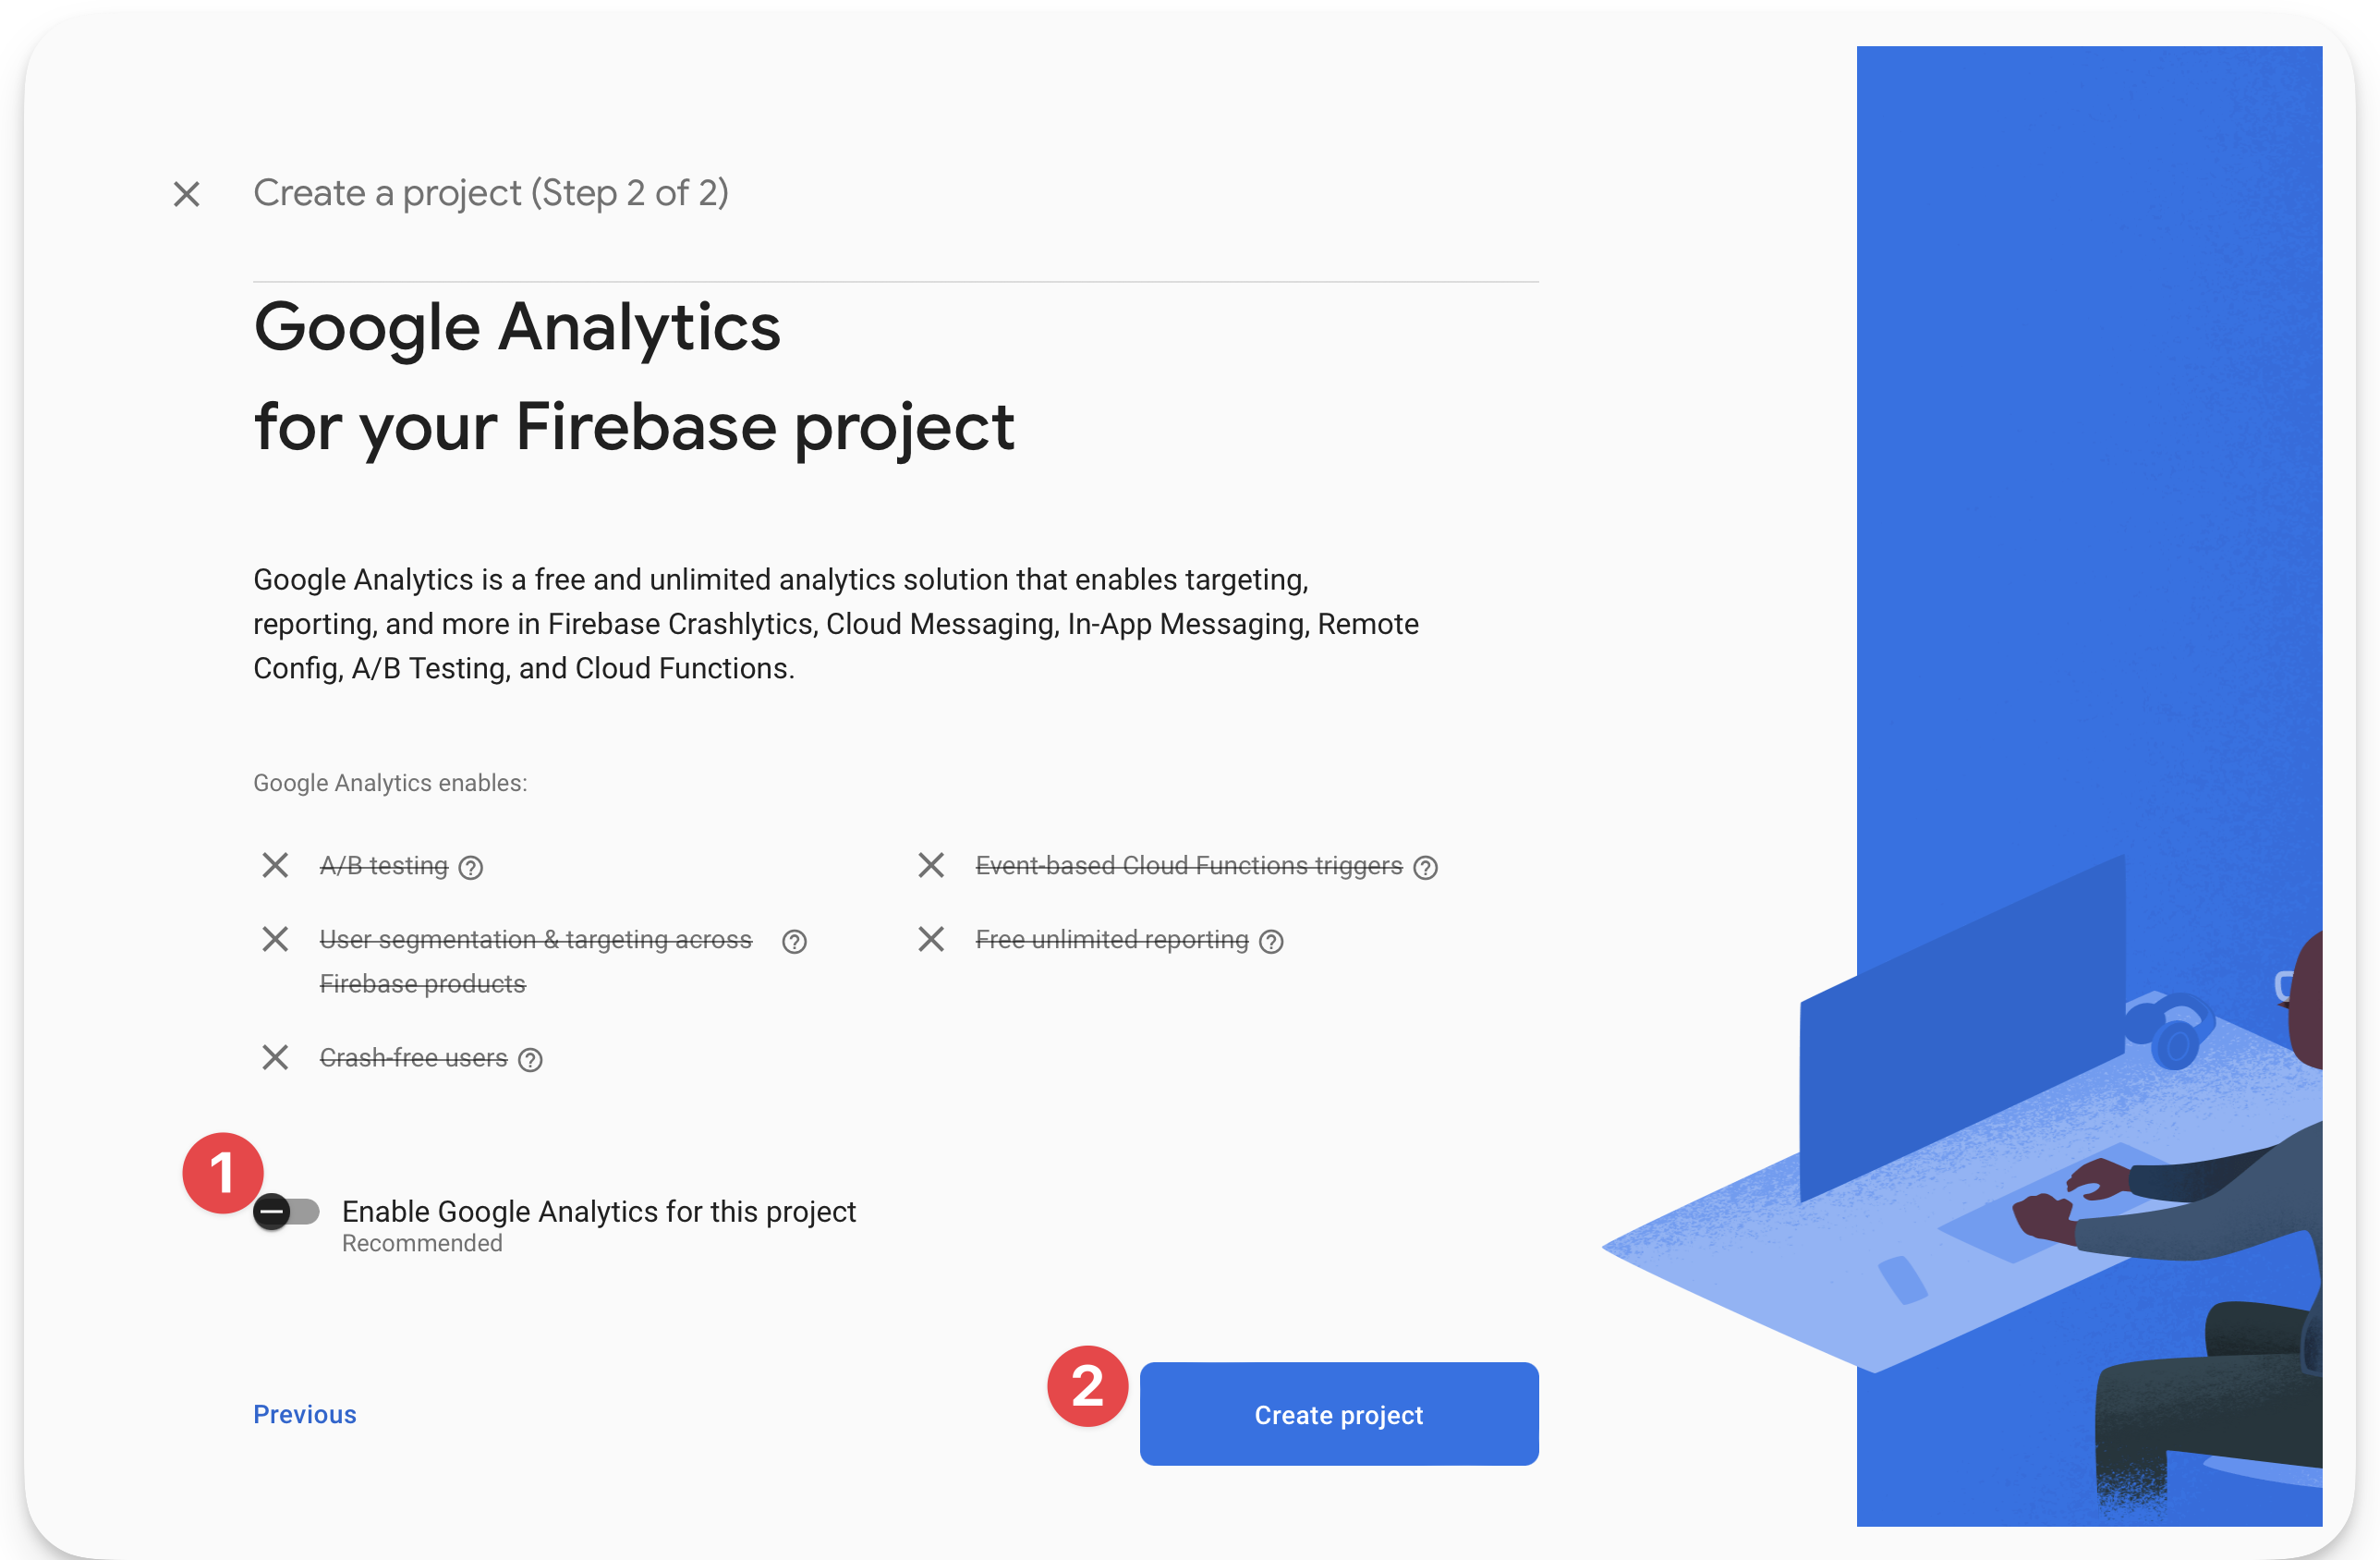
Name the project BeAudible and choose whether to use Google Analytics in the project.
将项目命名为 BeAudible 并选择是否在项目中使用Google Analytics。
Choosing Google analytics and creating the project.
选择Google Analytics并创建项目。
After successfully creating the project, add a web application to the Firebase project.
成功创建项目后,将Web应用程序添加到Firebase项目。
[](/understanding-astro/understanding-astro-book/blob/master/https://raw.githubusercontent.com/wanghaisheng/understanding-astro-zh/main/docs/public/images/ch7/Adding a web application to the Firebase project)
Adding a web application to the Firebase project.
将Web应用程序添加到Firebase项目。
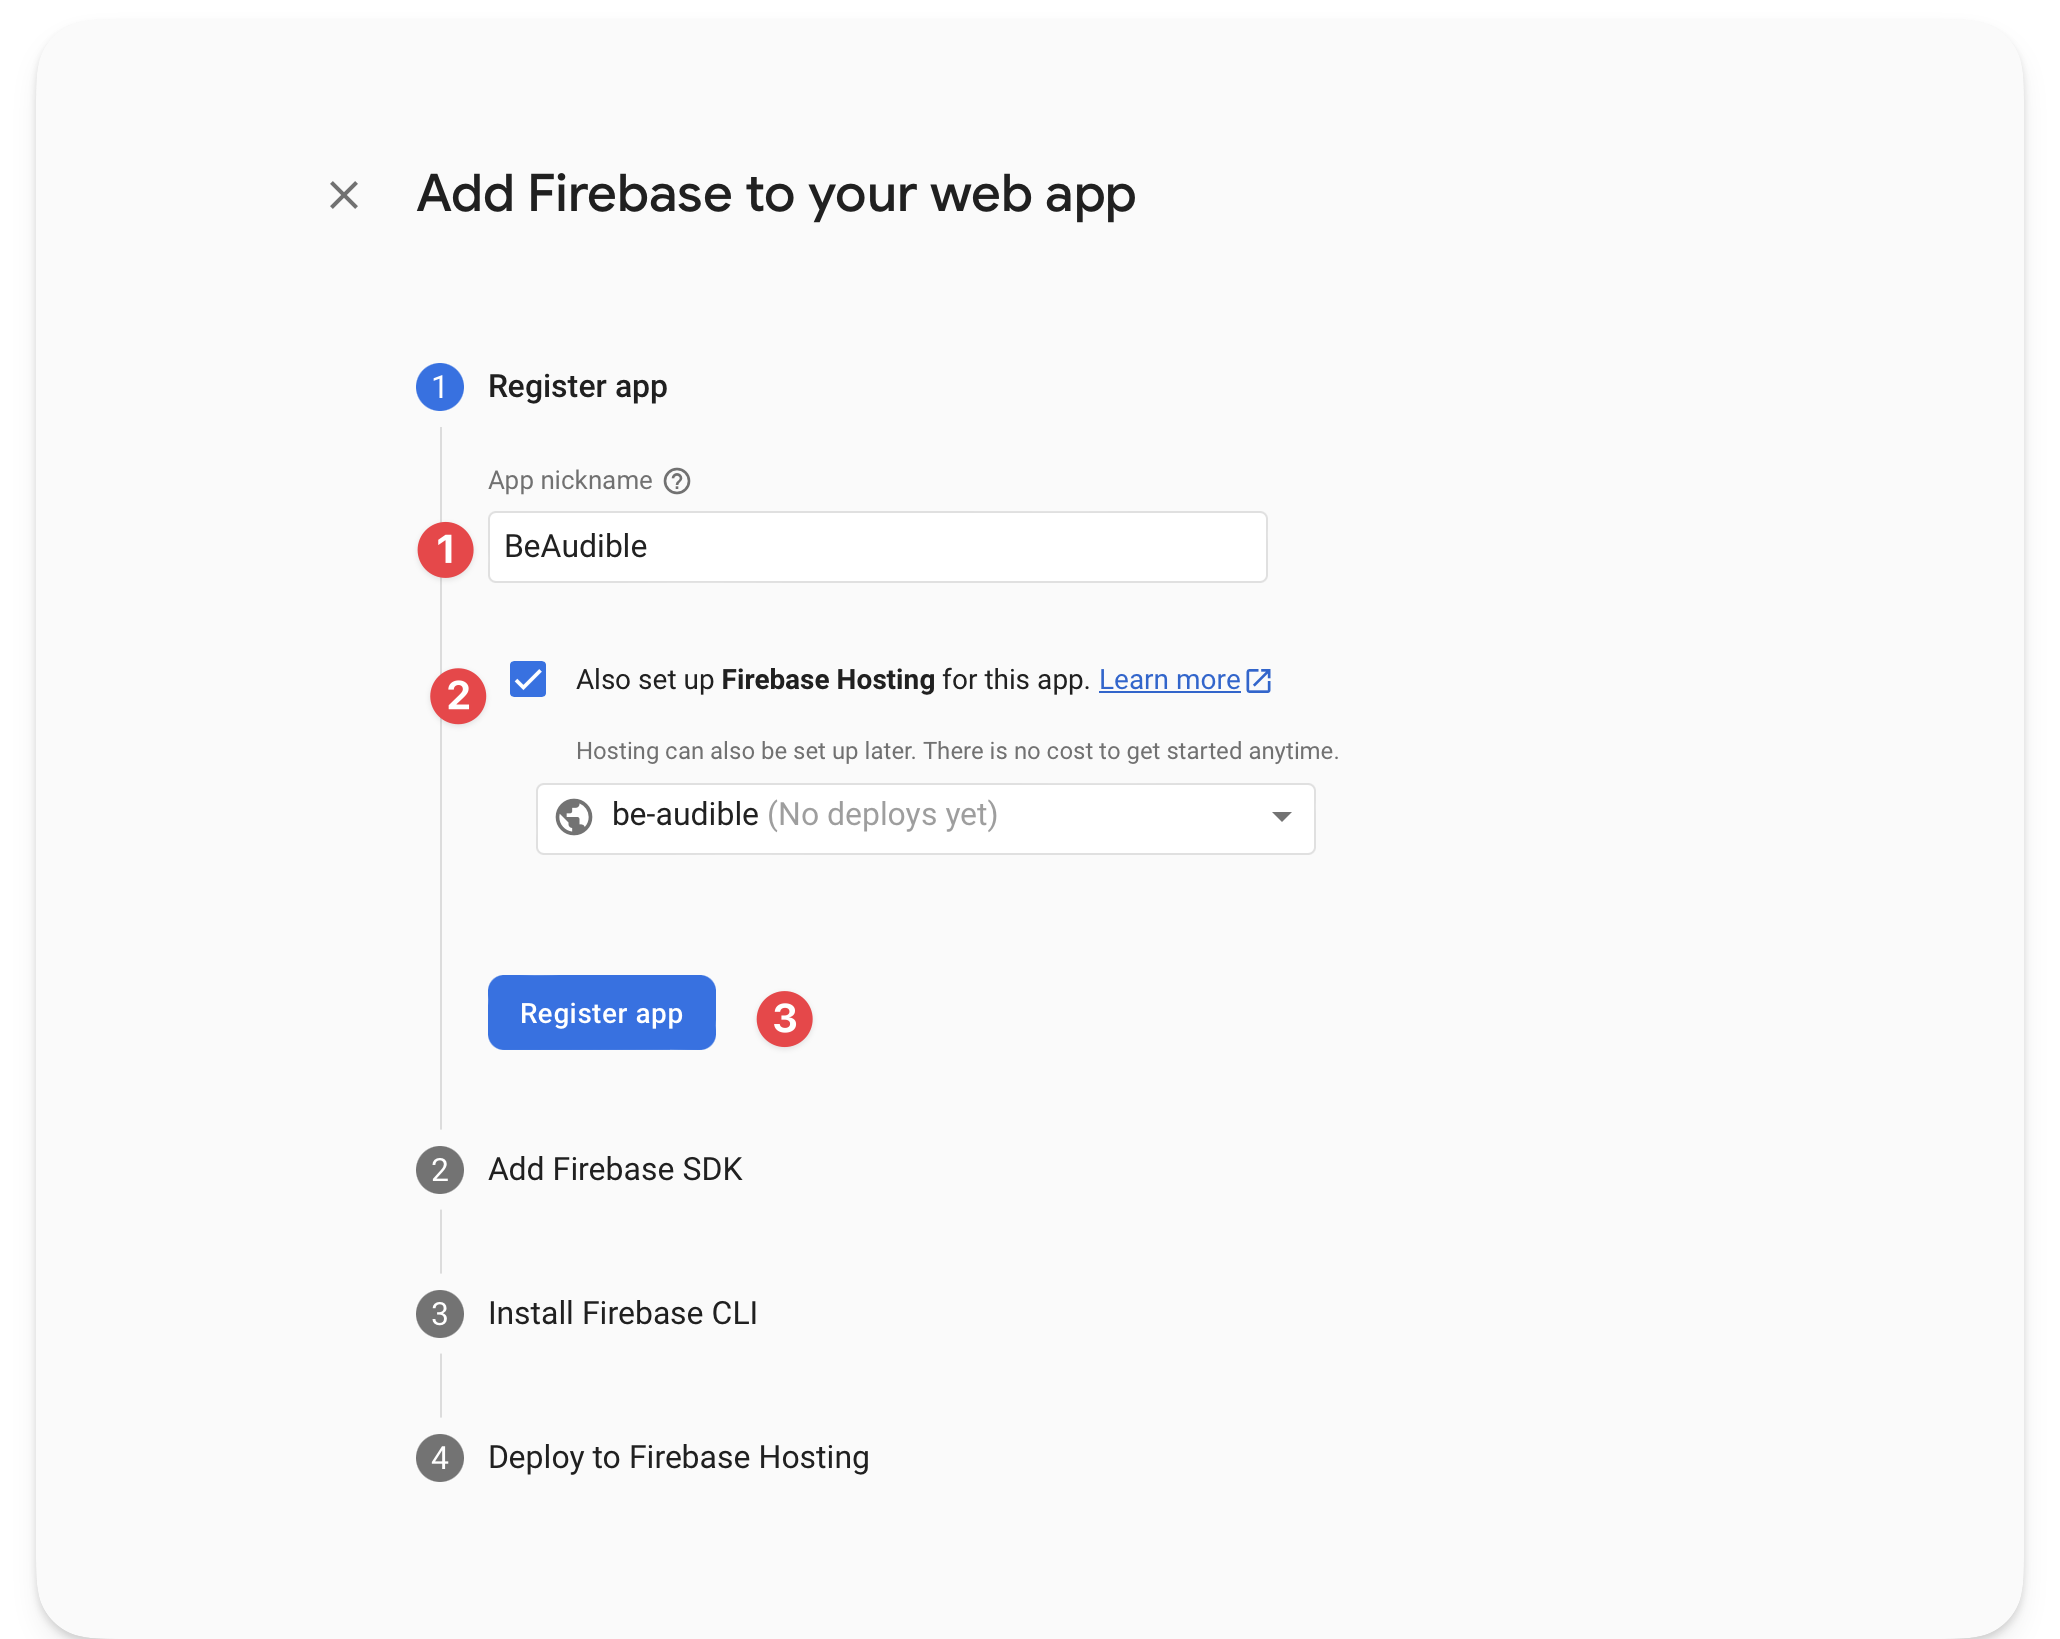
Now, continue the web app set-up process by choosing a name (preferably the same as before), setup Firebase hosting and registering the web application.
现在,继续Web应用程序设置过程,选择名称(最好与之前相同),设置Firebase托管并注册Web应用程序。
Continuing the application set-up.
继续应用程序设置。
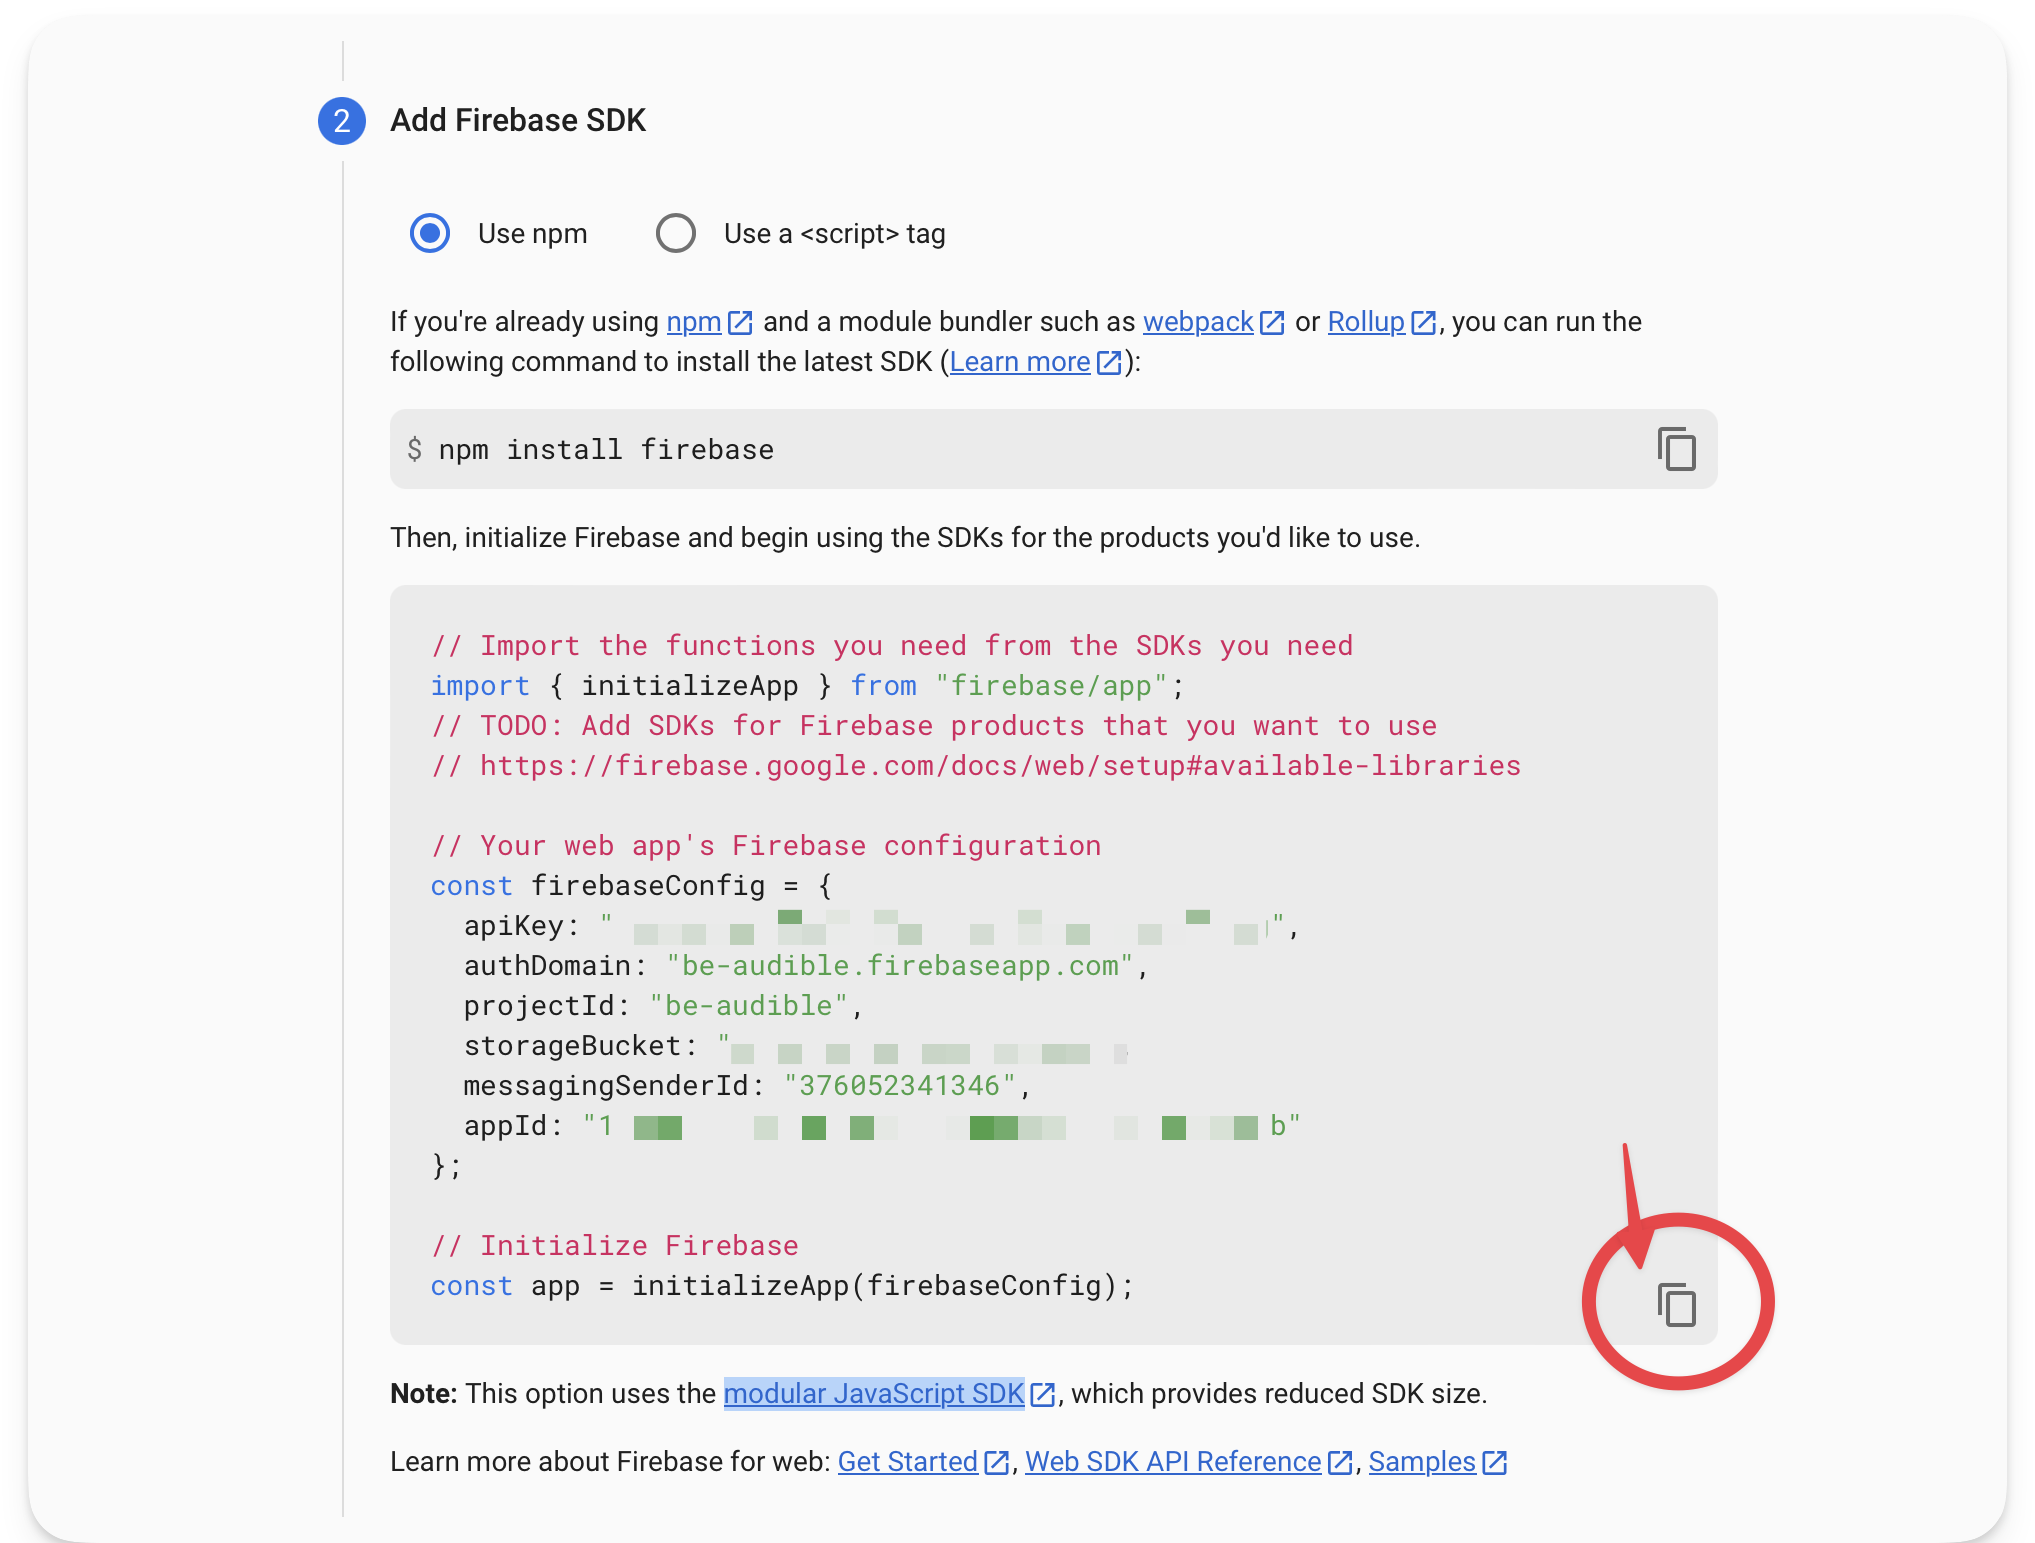
The next step is critical.
下一步至关重要。
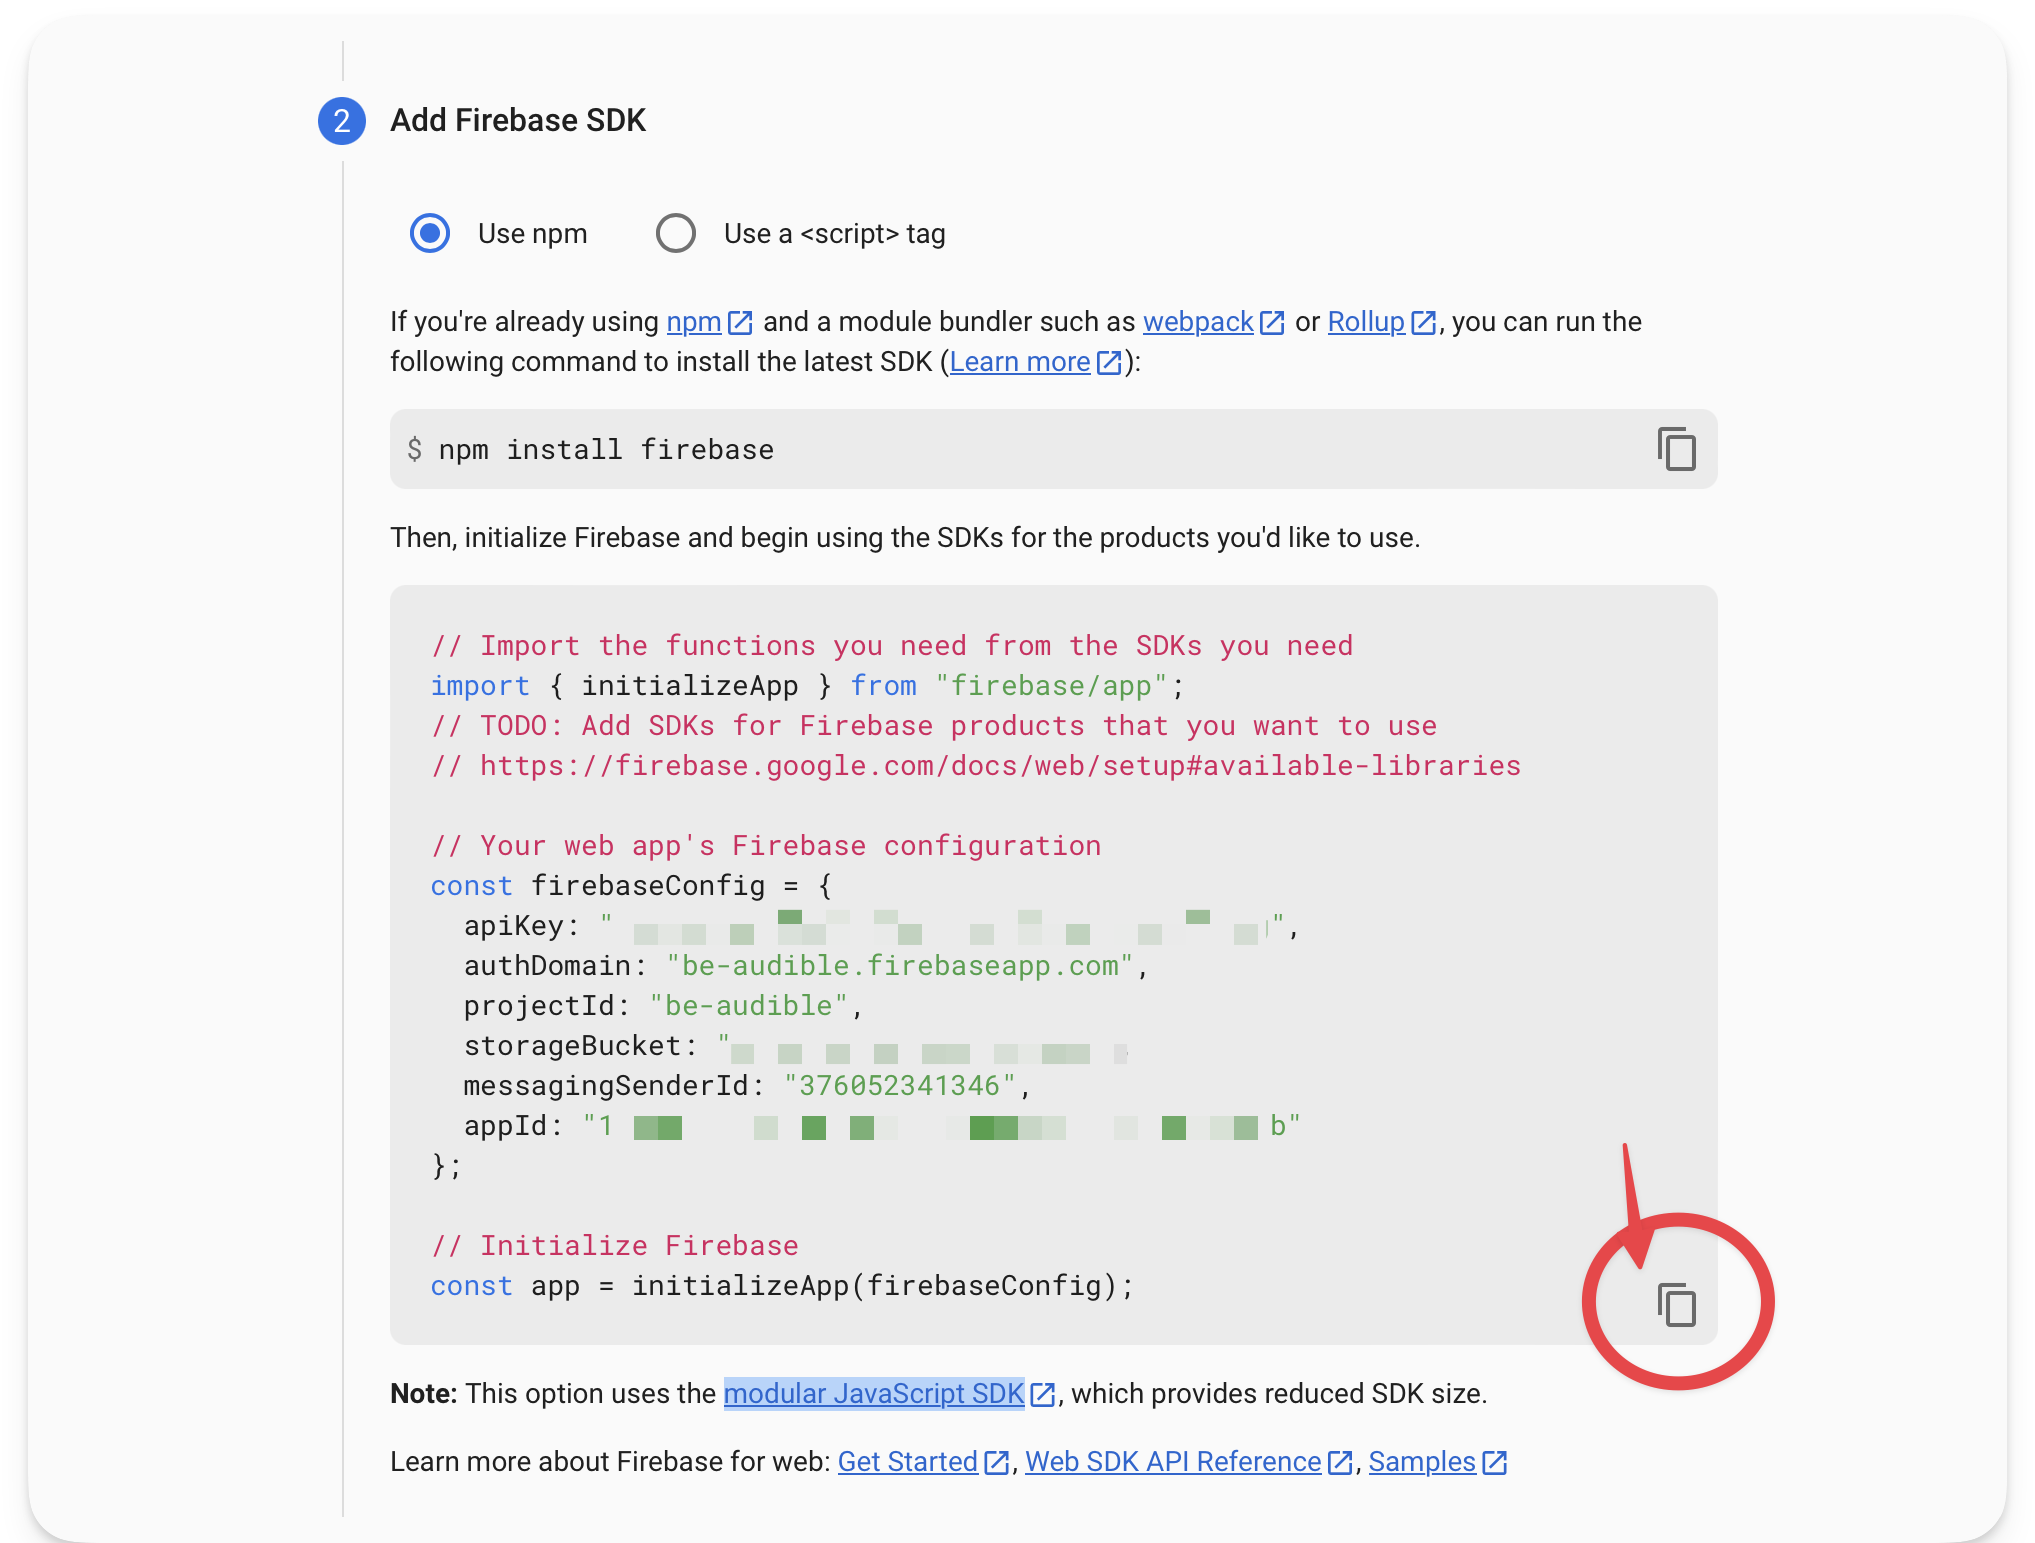
Copy your web app’s Firebase configuration. We’ll use that to initialise the Firebase application client side.
复制Web应用的Firebase配置。我们将使用它来初始化Firebase应用程序客户端。
Copying the Firebase configuration for the client SDK.
正在复制客户端SDK的Firebase配置。
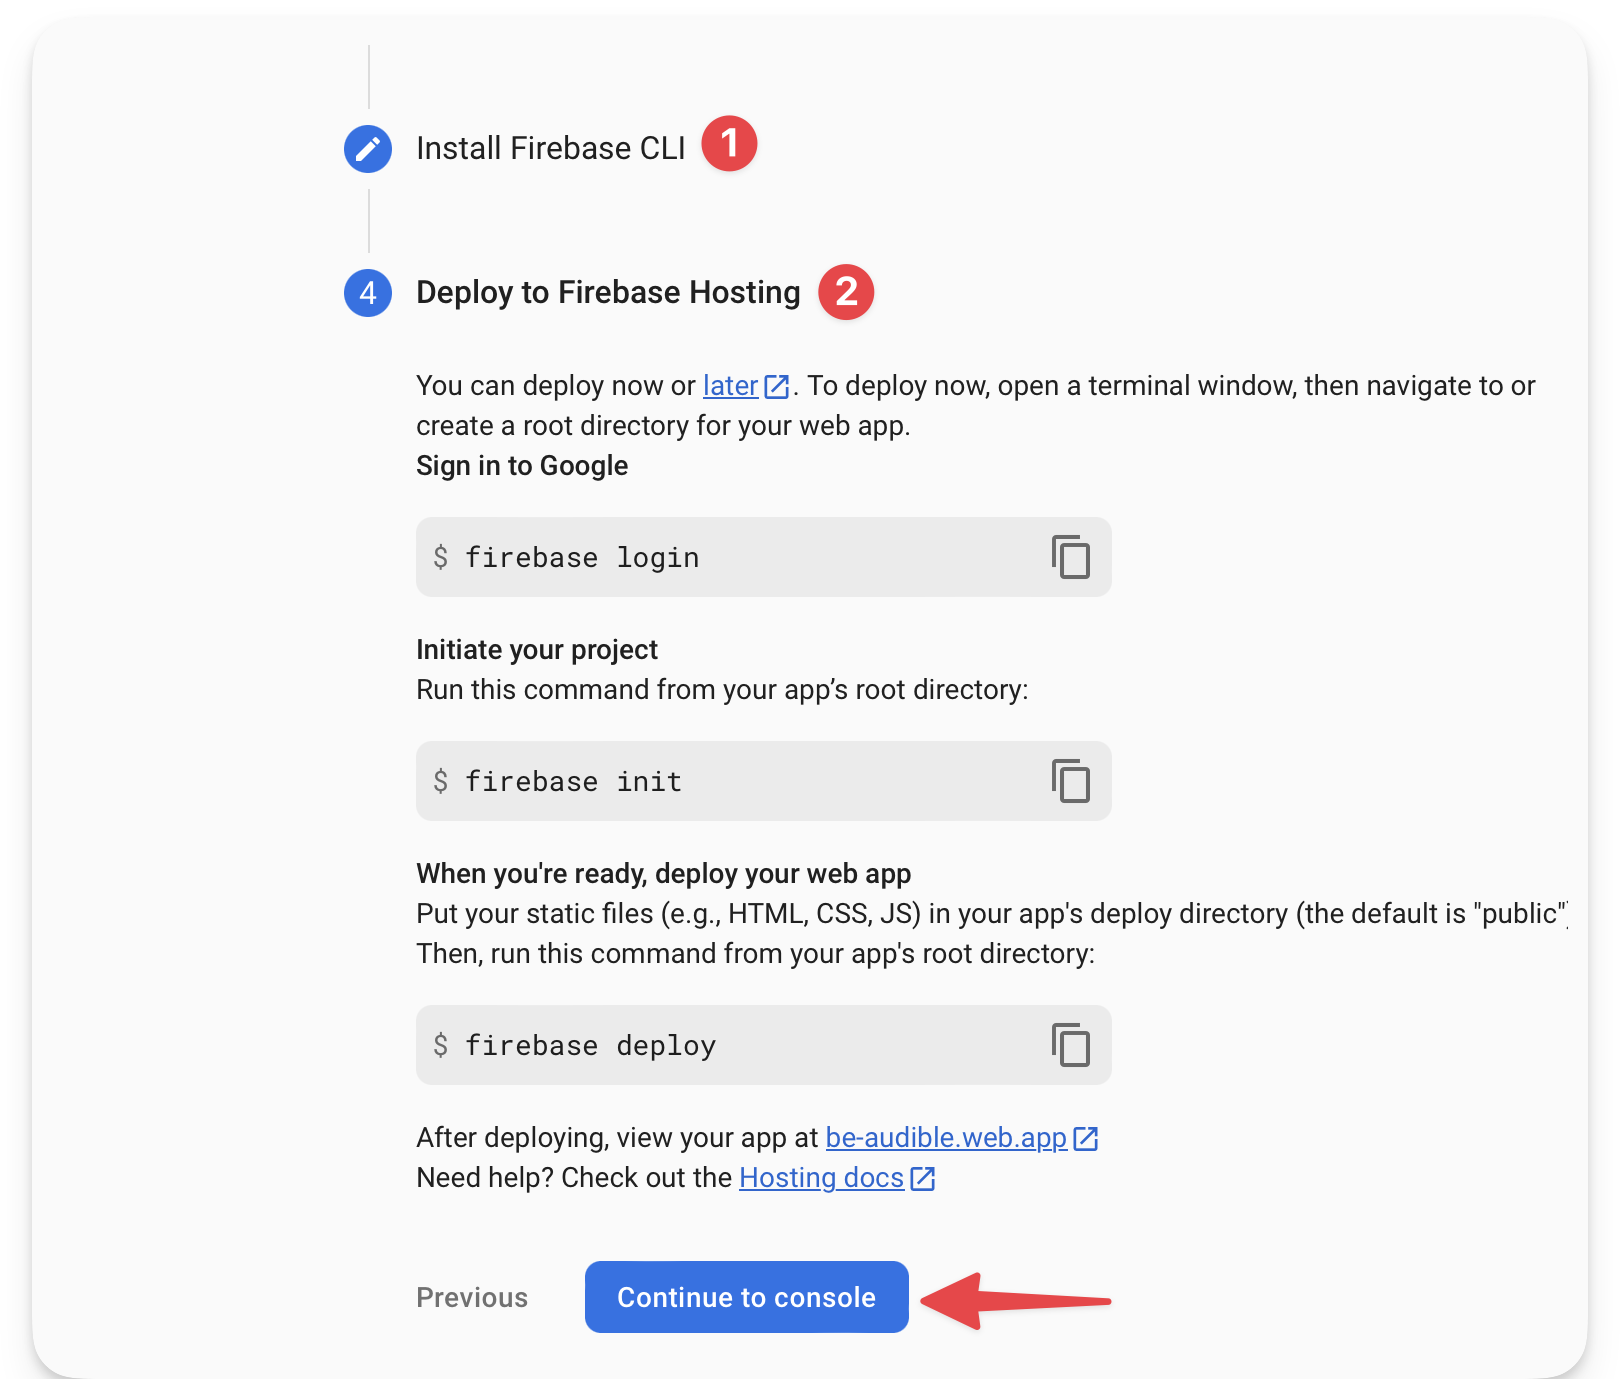
The next steps are optional. Follow the guided prompt from Firebase and continue to the Firebase console.
接下来的步骤是可选的。按照Firebase的指导提示,继续到Firebase控制台。
Following the guided prompt from Firebase.
根据Firebase的引导提示。
Upon completion, we’ll be redirected to the Firebase application dashboard.
完成后,我们将被重定向到Firebase应用程序仪表板。
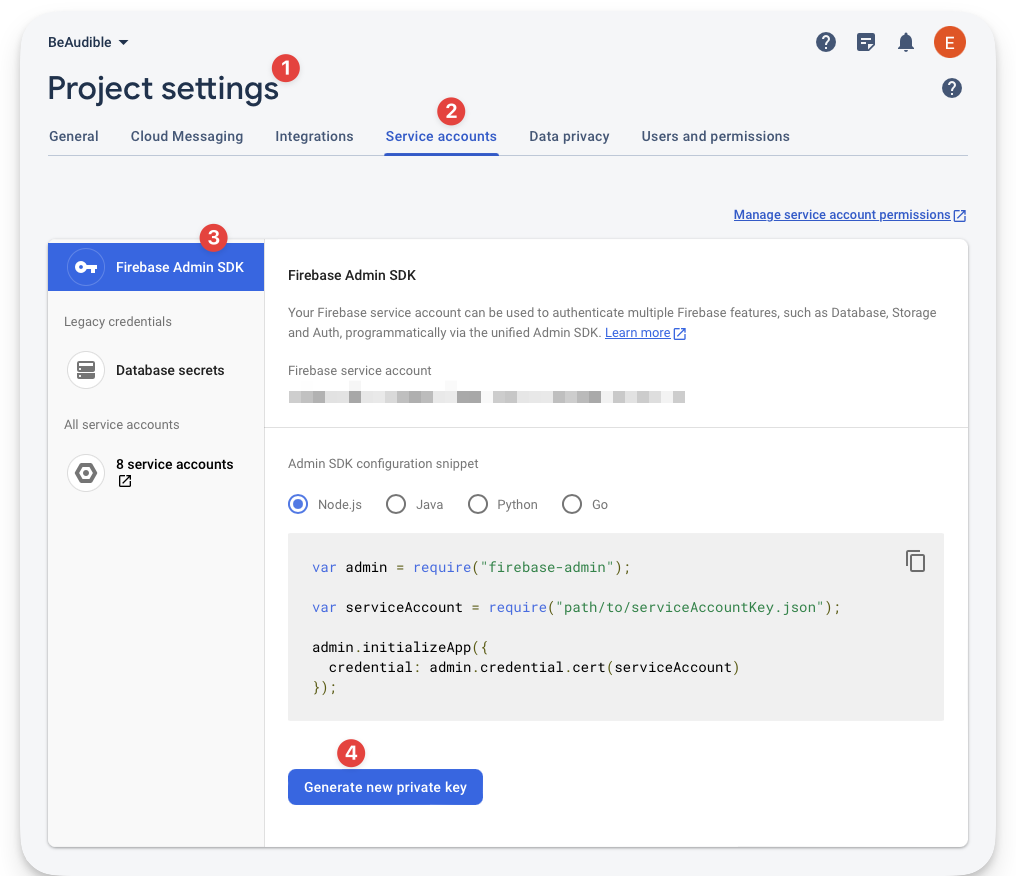
Go to the project settings, find the service account section and generate a new private key we’ll leverage in our server application.
转到项目设置,找到服务帐户部分,并生成一个新的私钥,我们将在服务器应用程序中使用它。
Project overview > Project settings.
项目概述>项目设置。
Generating a new private key.
生成新的私钥。
This will download a JSON file to your machine. Keep it secure as it provides access to Firebase’s service. We will leverage this to access Firebase’s server resources from our application server.
这将下载一个JSON文件到您的计算机。保持它的安全,因为它提供了对Firebase服务的访问。我们将利用它从我们的应用服务器访问Firebase的服务器资源。
Handling authentication 处理身份验证
Generally speaking, authentication is serious business and can take different forms.
一般来说,身份验证是一项严肃的工作,可以采取不同的形式。
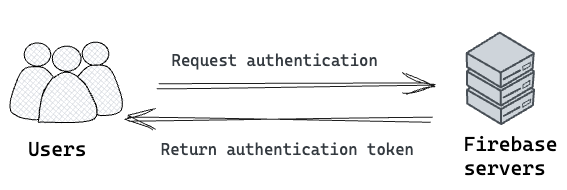
Firebase provides an authentication service, so we will leverage its client libraries to authenticate the user client-side.
Firebase提供了一个身份验证服务,因此我们将利用它的客户端库来验证用户客户端。
Simplified authentication process.
简化身份验证过程。
The client authentication will communicate with Firebase’s servers, but later on, we will look at verifying a user’s authentication token (JWT) on our server.
客户端身份验证将与Firebase的服务器通信,但稍后,我们将研究在服务器上验证用户的身份验证令牌(JWT)。
First, set up the Firebase application to receive client authentication requests.
首先,设置Firebase应用程序以接收客户端身份验证请求。
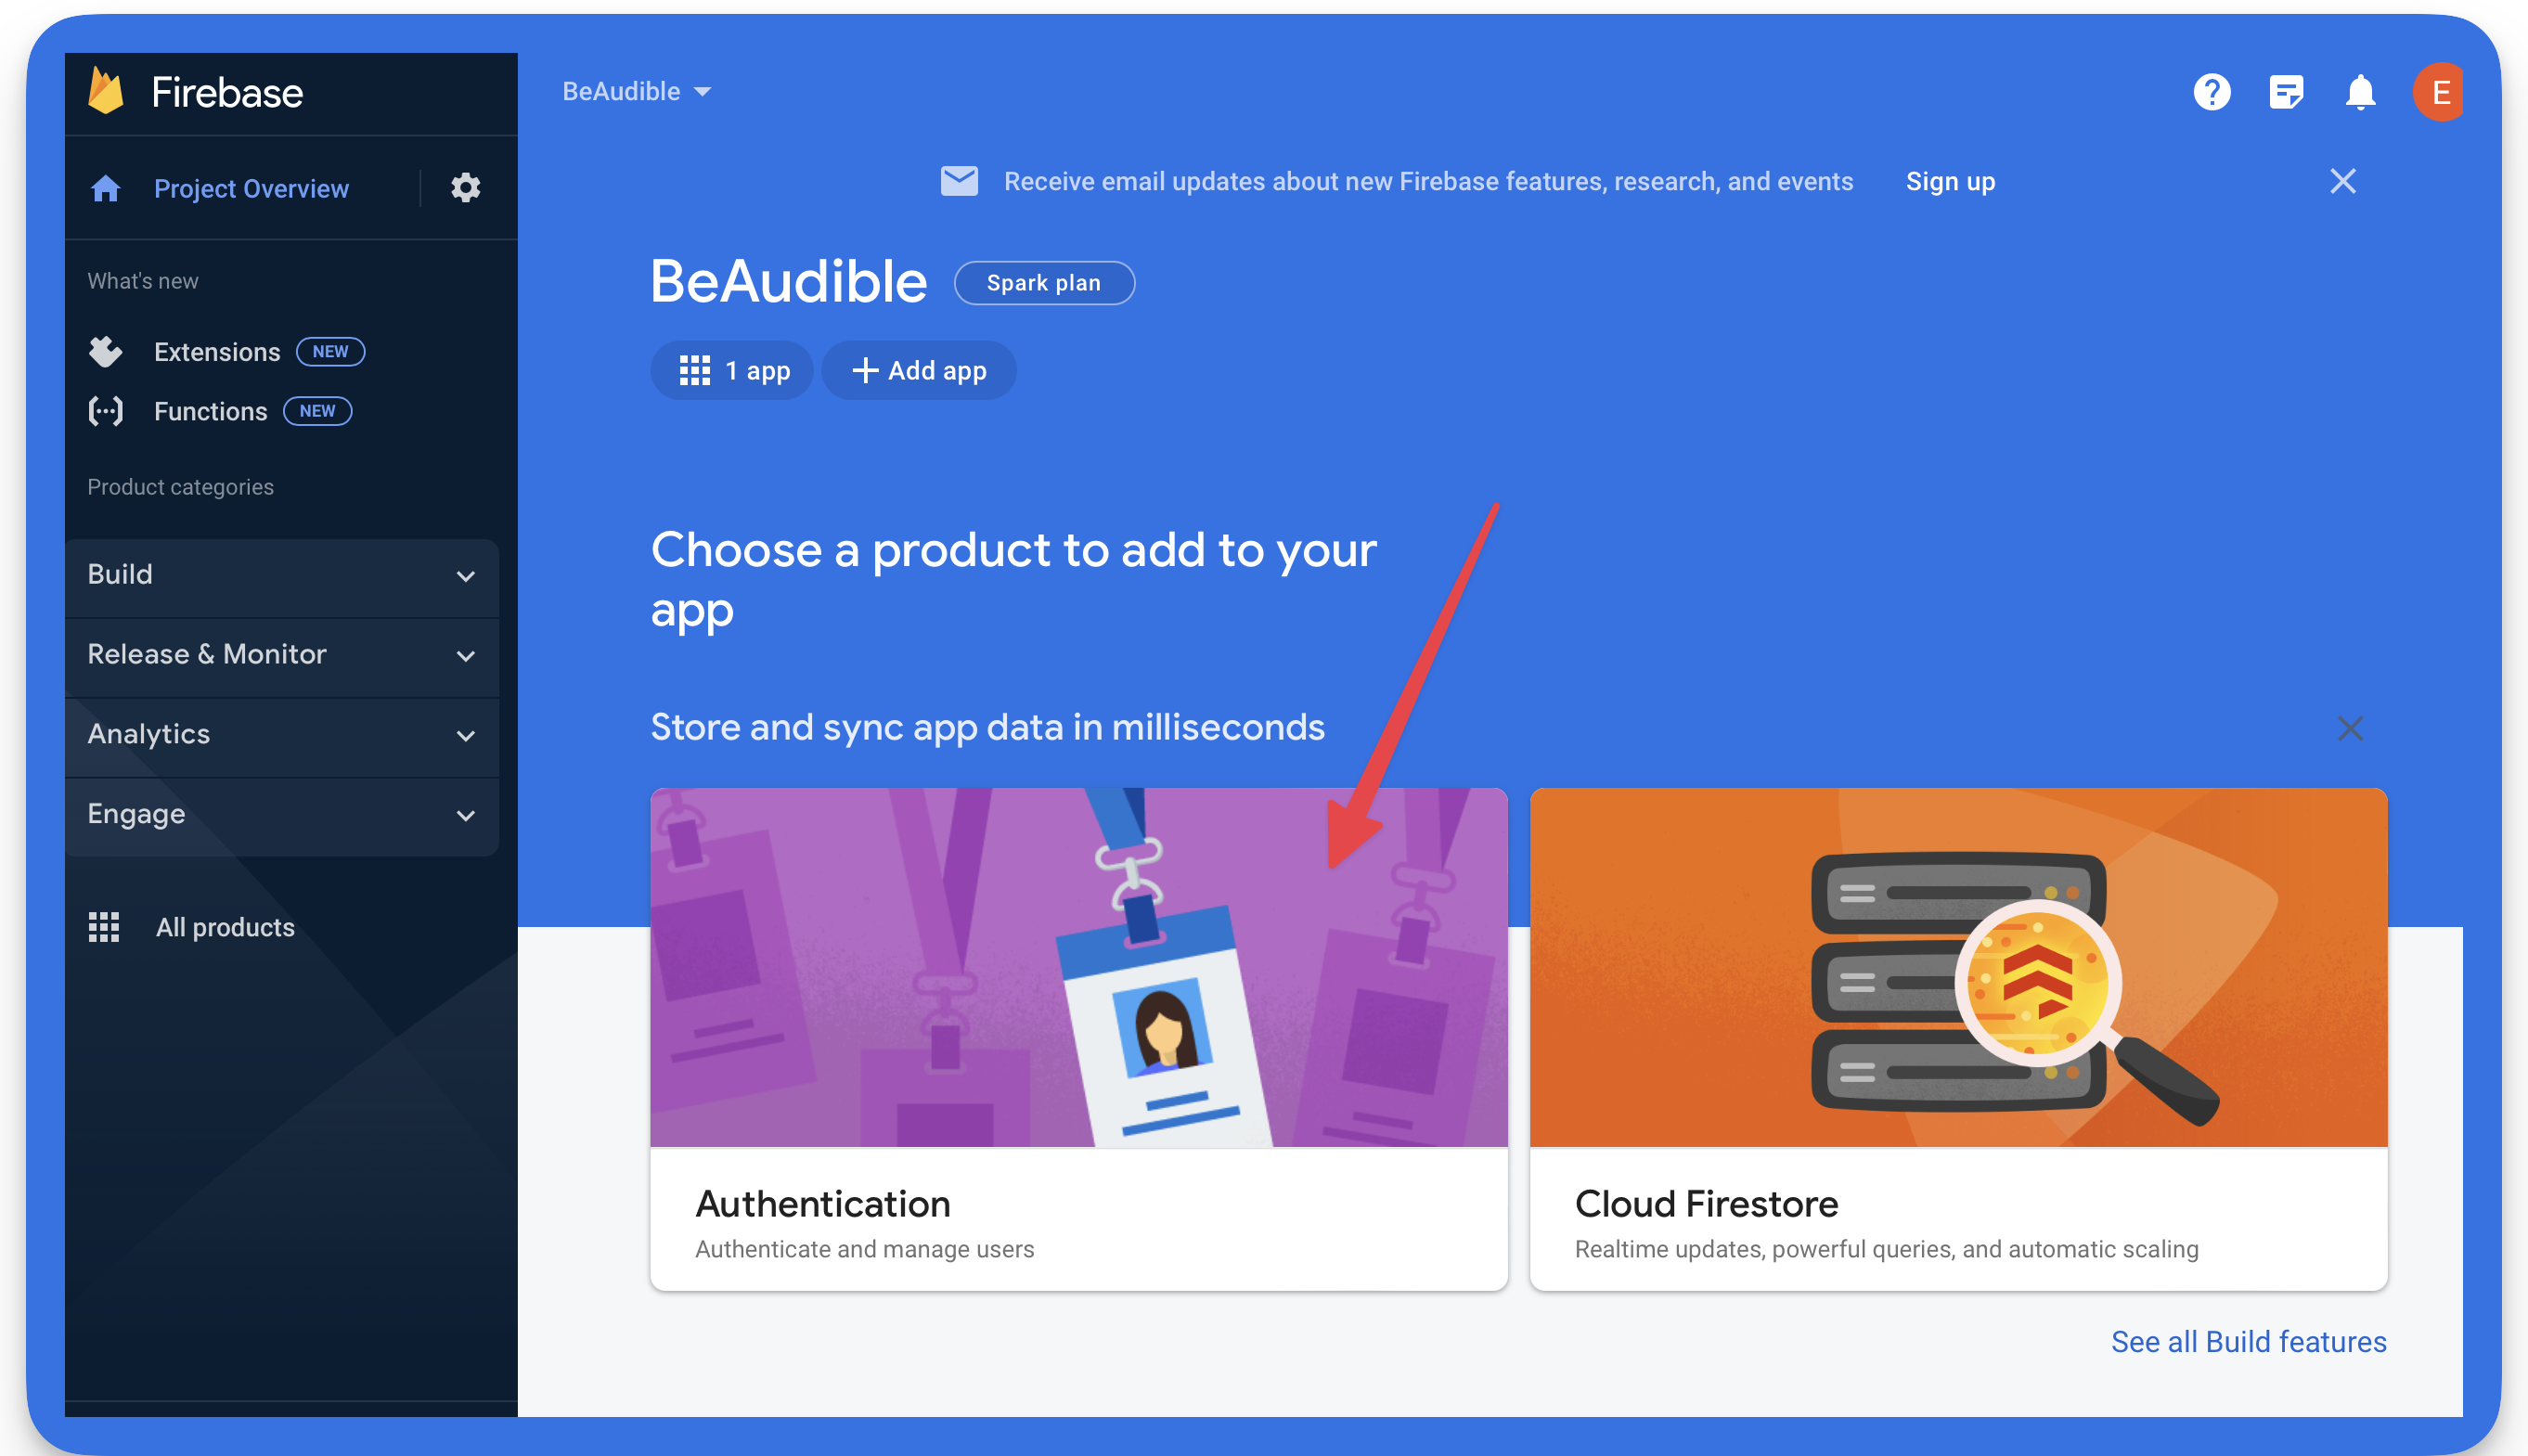
Return to the Firebase console and set up authentication.
返回Firebase控制台并设置身份验证。
Select authentication from the list of provided services.
从提供的服务列表中选择身份验证。
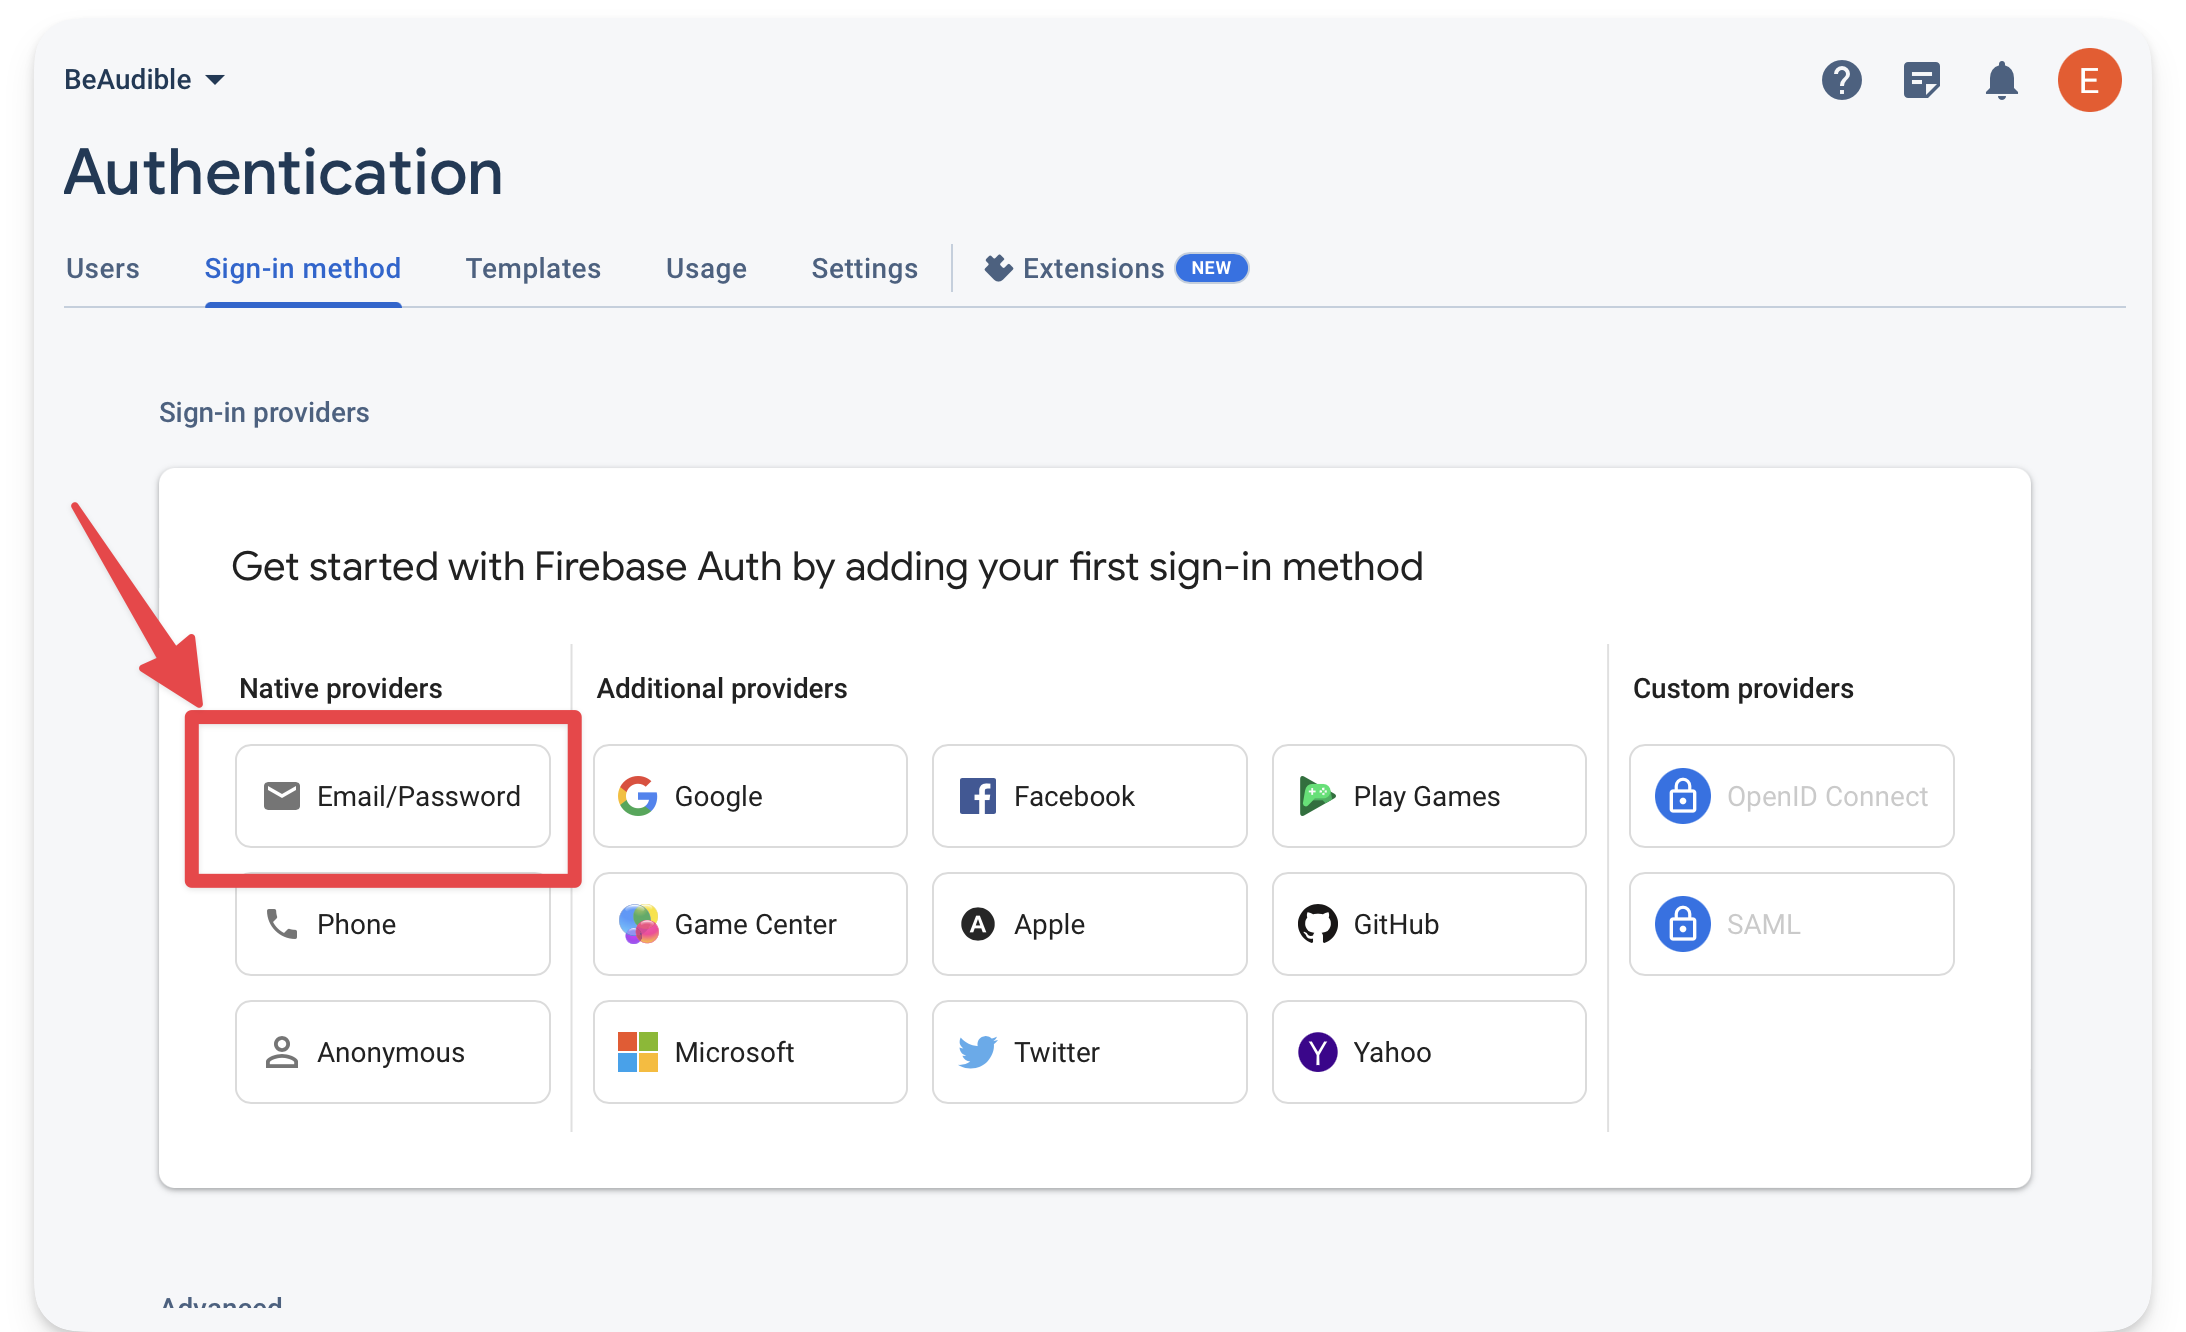
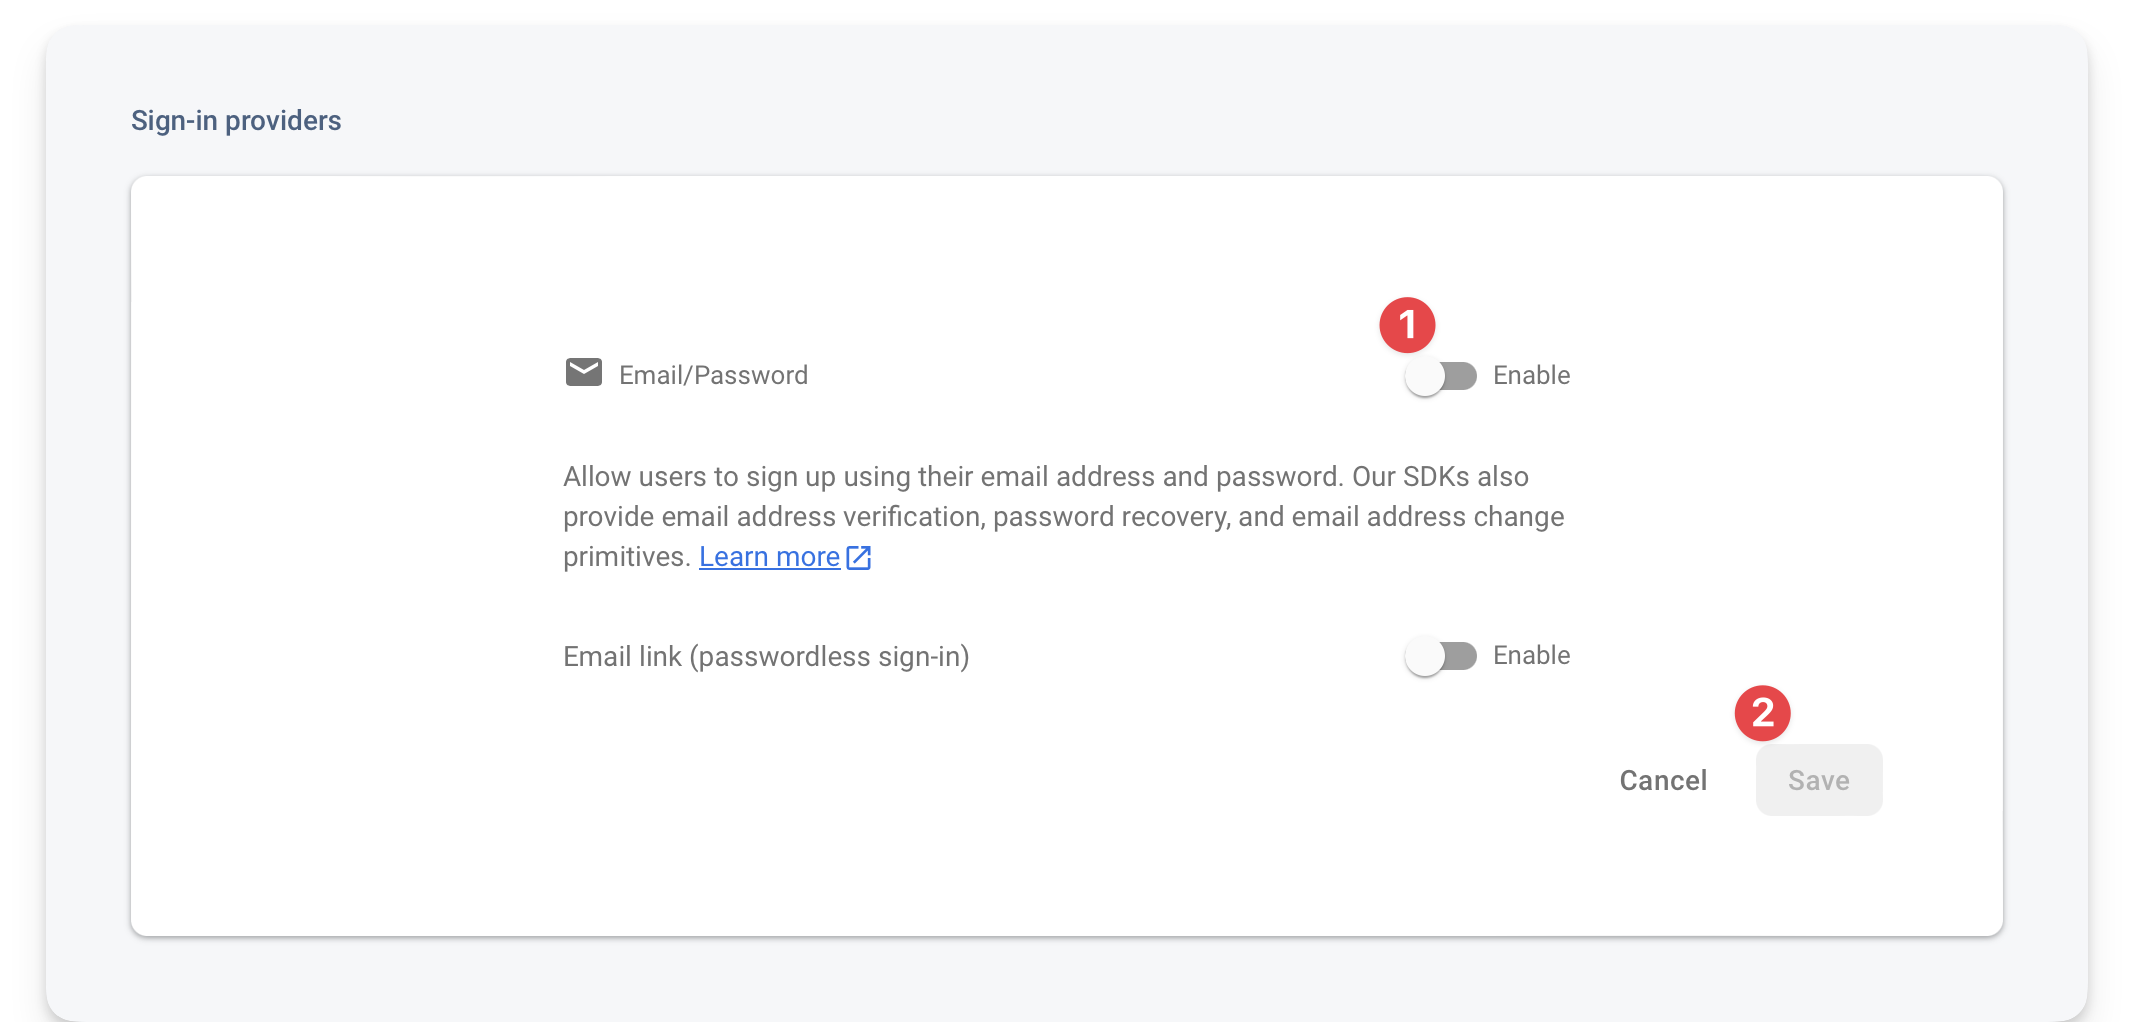
Firebase provides different sign-in methods. Let’s keep this simple. Enable the Email and password method from the Firebase console.
Firebase提供了不同的登录方法。让我们保持简单。从Firebase控制台启用电子邮件和密码方法。
Selecting the email / password sign-in method.
选择电子邮件/密码登录方法。
Make sure to enable the option and hit save.
确保启用该选项并点击保存。
Enabling and saving the Email / Password sign-in method.
启用并保存电子邮件/密码登录方法。
Initialising firebase on the client
正在客户端上初始化Firebase
src/scripts/firebase/init.ts contains the initialisation script for our client application.
src/scripts/firebase/init.ts 包含我们客户端应用程序的初始化脚本。
The code responsible for initialising the application is shown below:
负责初始化应用程序的代码如下所示:
// … // 📂 src/scripts/firebase/init.ts export const app = initializeApp(firebaseConfig); export const auth = getAuth(app);
The script exports the initialised application via app and the authentication client module via auth where initializeApp and getAuth are methods imported from the Firebase SDK.
脚本通过 app 导出初始化的应用程序,通过 auth 导出身份验证客户端模块,其中 initializeApp 和 getAuth 是从Firebase SDK导入的方法。
We must now replace the firebaseConfig variable with the object copied while initialising the firebase application.
我们现在必须用初始化firebase应用程序时复制的对象替换 firebaseConfig 变量。
The firebase client configuration.
firebase客户端配置。
Once this is done, we should have the Firebase client rightly initialised.
完成后,我们应该正确初始化Firebase客户端。
Using the Firebase emulators
使用Firebase模拟器
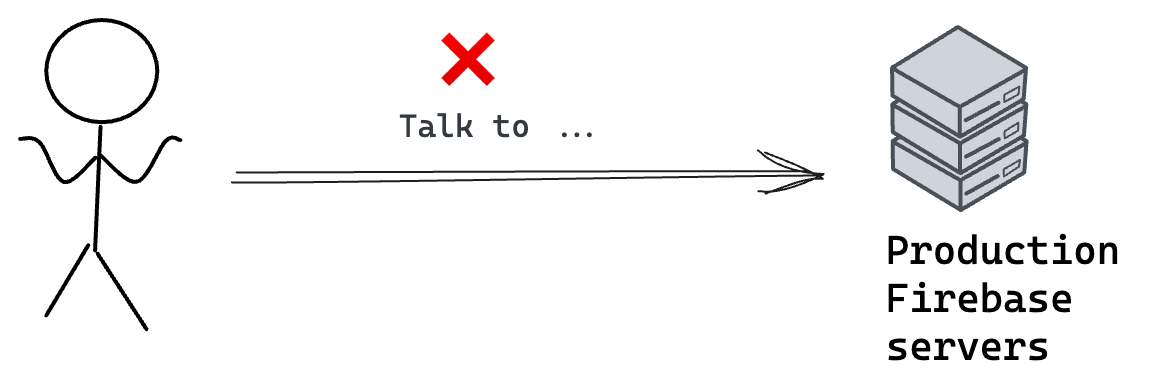
Talking to the production firebase services while testing and developing locally is rather silly.
在本地测试和开发时与生产firebase服务交谈是相当愚蠢的。
Sending requests to the production Firebase servers while developing locally.
在本地开发时向生产Firebase服务器发送请求。
Instead, we can use the Firebase Emulator Suite while developing locally. The emulator suite will intercept our Firebase service requests and provide a testing ground locally without hitting the production services.
相反,我们可以在本地开发时使用Firebase Emulator Suite。模拟器套件将拦截我们的Firebase服务请求,并在不影响生产服务的情况下提供本地测试场。
I’ve set up the project to use the Firebase emulators. So let’s get it running.
我已经将项目设置为使用Firebase模拟器。让我们开始吧。
Make sure you have the Firebase CLI tools installed. If you don’t, install the CLI via the following command:
请确保已安装Firebase CLI工具。如果没有,请通过以下命令安装CLI:
npm install -g firebase-tools
Assuming you have the application running in one tab of your terminal, open another tab and run the firebase emulators script to start the firebase emulators:
假设您在终端的一个选项卡中运行了应用程序,打开另一个选项卡并运行firebase emulators 脚本来启动firebase模拟器:
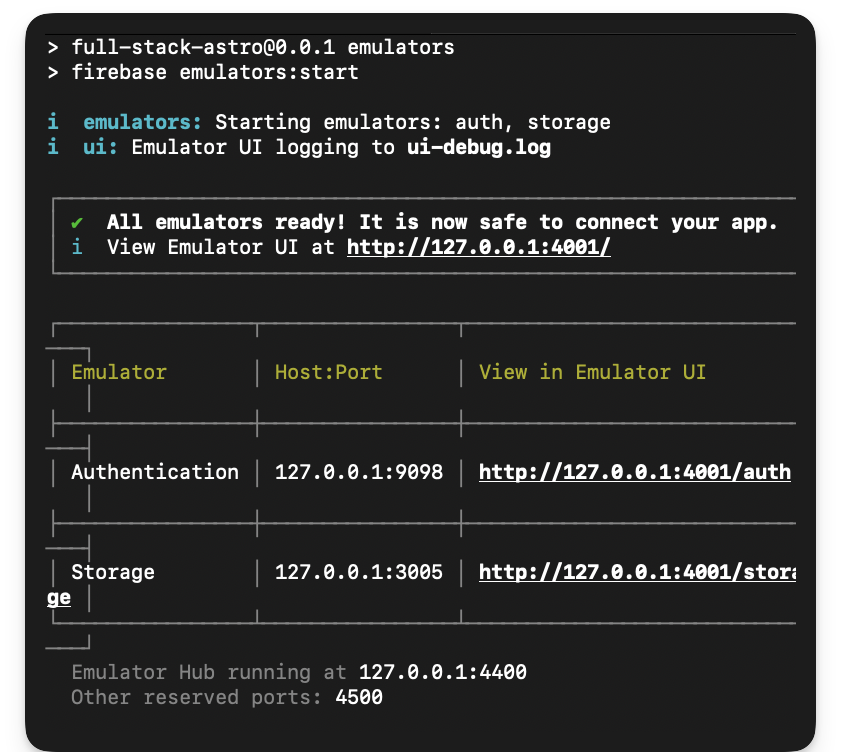
npm run emulators
This will start the authentication and storage emulators with a user interface running on localhost:4001. We can view the development data in the emulator user interface, e.g., application user signups and uploaded recordings.
这将使用在 localhost:4001 上运行的用户界面启动身份验证和存储模拟器。我们可以在仿真器用户界面中查看开发数据,例如,应用程序用户注册和上传的录音。
Starting the Firebase emulators.
启动Firebase模拟器。
Handling user signups 处理用户注册
So, how are we going to handle user signups?
那么,我们将如何处理用户注册?
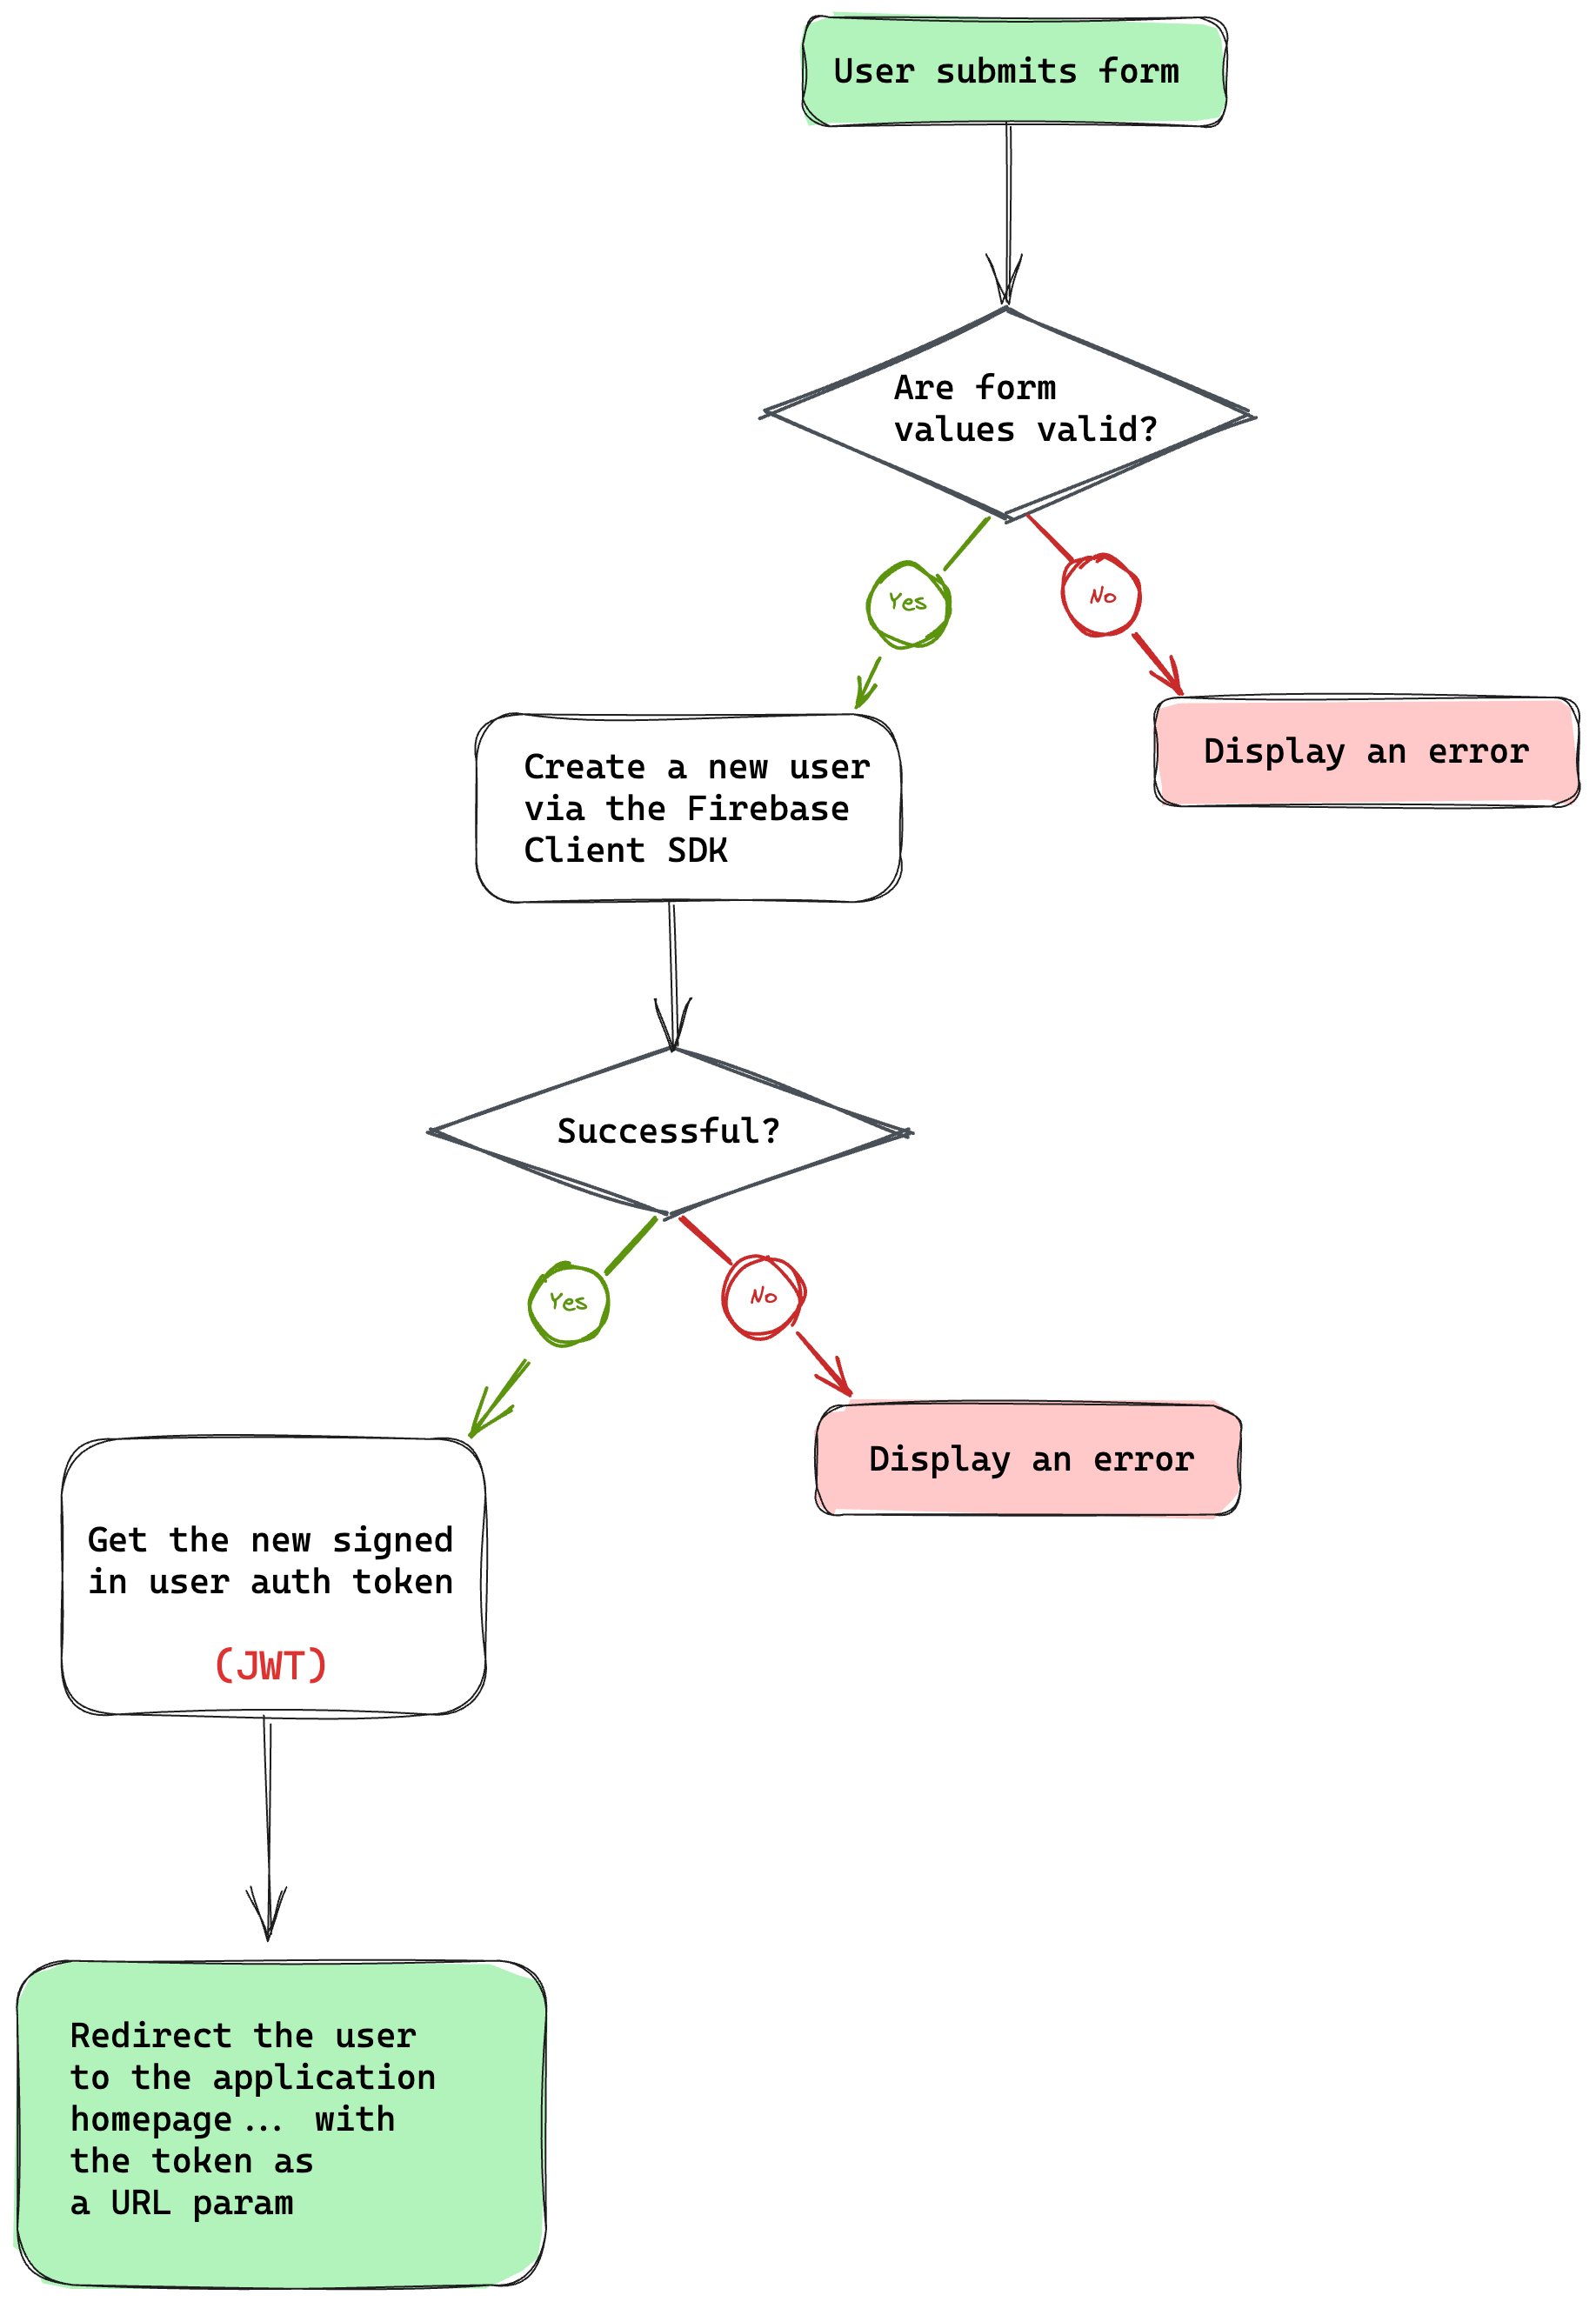
Please consider the overall flow diagram below:
请考虑以下总体流程图:
The signup flow. 注册流程。
- The flow kicks off with the user submitting the signup form.
流程从用户提交注册表单开始。 - Then check if the submitted email and password are valid.
然后检查提交的电子邮件和密码是否有效。 - If the form values are invalid, display an error.
如果表单值无效,则显示错误。 - Create a new user via the
createUserWithEmailAndPasswordmethod of the Firebase auth module.
通过Firebase auth模块的createUserWithEmailAndPassword方法创建新用户。 - If the new user creation fails, display an error.
如果新用户创建失败,则显示错误。 - Otherwise, our new user is now in a signed-in state.
否则,我们的新用户现在处于登录状态。 - Grab the user auth token (this is called ID token in Firebase lingo and represents a JSON Web Token (JWT))1.
获取用户auth令牌(在Firebase术语中称为ID令牌,表示JSON Web令牌(JWT)) 1 。 - Redirect the user to the homepage with the token as a URL parameter, i.e.,
/?token=${USER_AUTH_TOKEN}.
以令牌作为URL参数将用户重定向到主页,即,#0号。
Before delving into the code for how to do this, I’d like to point out that the project has module aliasing set up to prevent pesky relative imports. e.g.,
在深入研究如何做到这一点的代码之前,我想指出的是,该项目设置了模块别名,以防止讨厌的相对导入。例如,
// This … import { auth } from ”../../firebase/init”;
// Becomes this … import { auth } from “@scripts/firebase/init”;
This is achieved by updating the tsconfig.json file to include the alias:
这是通过更新 tsconfig.json 文件以包括别名来实现的:
// 📂 tsconfig.json { // … “baseUrl”: ”.”, “paths”: { “@components/*”: [“src/components/*”], “@layouts/*”: [“src/layouts/*”], “@scripts/*”: [“src/scripts/*”], “@stores/*”: [“src/stores/*”], “@constants/*”: [“src/constants/*”] } } }
We will reference existing modules in the project via the relevant module alias. Now, here is the annotated code for handling the user sign-up:
我们将通过相关的模块别名引用项目中的现有模块。下面是处理用户注册的注释代码:
<script> // import the Validator from the tiny “validator.tool” library import Validator from “validator.tool”; import { createUserWithEmailAndPassword } from “firebase/auth”; // Import the auth module from `src/scripts` import { auth } from “@scripts/firebase/init”; // Import basic form validation rules import { authClientValidationRules } from “@scripts/authClientValidationRules”;
// Type alias for the form values type FormValues = { email?: string; password?: string; };
// Grab the submit button element const submitButton = document.getElementById( “submit-signup-form” ) as HTMLButtonElement | null;
// Grab the form element const form = document.getElementById(“signup-form”) as HTMLFormElement | null;
// Initialise the validatorconst validator = new Validator({ form, // Pass in basic rules already existing in the project rules: authClientValidationRules, });
if (validator.form) { // Attach a submit event handler on the form validator.form.onsubmit = async (evt) => { evt.preventDefault();
   const errors \= validator.errorMessages;
   const values \= validator.getValues() as FormValues;

   //Check for errors
   if (Object.keys(errors).length \> 0) {
     const errorMessages \= Object.values(errors).join("...and...");
     return alert(errorMessages);
   }

   const { email, password } \= values as Required<FormValues\>;

   if (!submitButton) {
     return alert("Missing form button");
   }

   try {
     // Show submitting state
     submitButton.innerText \= "Submitting";
     submitButton.disabled \= true;

     // Create the new user
     const { user } \= await createUserWithEmailAndPassword(
       auth,
       email,
       password
     );

	// redirect the user to the homepage with their token
     const token \= await user.getIdToken();
     window.location.href \= \`/?token=${token}\`;
   } catch (error) {
     submitButton.innerText \= "Signup";
     submitButton.disabled \= false;

     alert(error);
   }
 };
} </script>
In the solution above, we’re handling form validation via validator.js but could have used any other library. Another minimal framework agnostic library that makes a good choice is Felte.
在上面的解决方案中,我们通过validator.js处理表单验证,但可以使用任何其他库。另一个与框架无关的最小库是Felte。
Handling user sign in
处理用户登录
With user signup handled, the process for user signup is the same except for one change. Instead of calling the createUserWithEmailAndPassword method, we’ll use the signInWithEmailAndPassword firebase auth method.
处理了用户注册后,用户注册的过程除了一个变化之外是相同的。我们将使用 signInWithEmailAndPassword firebase auth方法,而不是调用 createUserWithEmailAndPassword 方法。
Notice how the flow is identical in the code below:
请注意下面代码中的流程是如何相同的:
<script> import { signInWithEmailAndPassword } from “firebase/auth”; import Validator from “validator.tool”; import { auth } from “@scripts/firebase/init”; import { authClientValidationRules } from “@scripts/authClientValidationRules”;
type FormValues = { email?: string; password?: string; };
const form = document.getElementById(“signin-form”) as HTMLFormElement | null; const submitButton = document.querySelector( “#signin-form button[type=‘submit’]” ) as HTMLButtonElement | null;
const validator = new Validator({ form, rules: authClientValidationRules, });
if (validator.form) { validator.form.onsubmit = async (evt) => { evt.preventDefault();
  const errors \= validator.errorMessages;
  const values \= validator.getValues() as FormValues;

  if (Object.keys(errors).length \> 0) {
    const errorMessages \= Object.values(errors).join("...and...");
    return alert(errorMessages);
  }

  const { email, password } \= values as Required<FormValues\>;

  if (!submitButton) {
    return alert("Missing form button");
  }

  try {
    submitButton.innerText \= "Submitting";
    submitButton.disabled \= true;

    const { user } \= await signInWithEmailAndPassword(
      auth,
      email,
      password
    );

    const token \= await user.getIdToken();
    window.location.href \= \`/?token=${token}\`;
  } catch (error) {
    submitButton.innerText \= "Signin";
    submitButton.disabled \= false;

    alert(error);
  }
};
} </script>
With these in place, we’ve got authentication handled!
有了这些,我们就可以进行身份验证了!
However, a question that may remain in your heart is, why exactly are we sending the user token in the homepage redirect URL?
但是,您可能会有一个问题,为什么我们要在主页重定向URL中发送用户令牌?
Implementing protected pages
实现受保护的页面
Every page in our application is statically generated except for index.astro I.e., the homepage.
我们应用程序中的每个页面都是静态生成的,除了 index.astro 即:主页。
The homepage is server-side rendered because we want to ensure it’s protected, i.e., only authenticated users ever land here.
主页是服务器端呈现的,因为我们希望确保它受到保护,即,只有经过认证的用户才能登陆这里
We will discuss how we’ll achieve this, but first, we need to write some code that runs on the server here.
我们将讨论如何实现这一点,但首先,我们需要编写一些在服务器上运行的代码。
Initialising Firebase on the server
在服务器上初始化Firebase
During the project initialisation, we downloaded a private key for server access. This is a JSON file in the form:
在项目初始化过程中,我们下载了一个用于服务器访问的私钥。这是一个JSON文件,格式如下:
{ type: ”…”, project_id: ”…” // more properties }
We need these values to initialise our server application. So, create a .env file to store these secrets. Then, we’ll break up the JSON keys into individual environment variables as shown below:
我们需要这些值来初始化服务器应用程序。因此,创建一个 .env 文件来存储这些秘密。然后,我们将JSON键分解为单个环境变量,如下所示:
FIREBASE_PRIVATE_KEY_ID = ”…”; FIREBASE_PRIVATE_KEY = ”…”; FIREBASE_PROJECT_ID = ”…”; FIREBASE_CLIENT_EMAIL = ”…”; FIREBASE_CLIENT_ID = ”…”; FIREBASE_AUTH_URI = ”…”; FIREBASE_TOKEN_URI = ”…”; FIREBASE_AUTH_PROVIDER_CERT_URL = ”…”; FIREBASE_CLIENT_CERT_URL = ”…“;
Save the env file. Without this, we won’t be able to access the application resources from our server.
保存 env 文件。如果没有它,我们将无法从服务器访问应用程序资源。
✨ Fun fact: As discussed in Chapter 5, we’re providing Typescript support for these environment values in
.env.d.ts.
✨ 有趣的事实:正如第5章所讨论的,我们在.env.d.ts中为这些环境值提供了Typescript支持。
Protecting the home page route
保护主页路由
Once a user has successfully signed in, Firebase generates a unique ID token that serves as their unique identifier and provides access to various resources, such as Firebase Cloud Storage.
用户成功登录后,Firebase会生成一个唯一的ID令牌,作为用户的唯一标识符,并提供对各种资源(如Firebase Cloud Storage)的访问。
I have loosely referred to this as auth tokens. We will use this ID token to recognise the user on our server.
我粗略地将其称为auth令牌。我们将使用此ID令牌识别服务器上的用户。
✨ Fun fact: Firebase ID tokens are short-lived and last for an hour.
✨ 有趣的事实:Firebase ID令牌是短暂的,持续一小时。
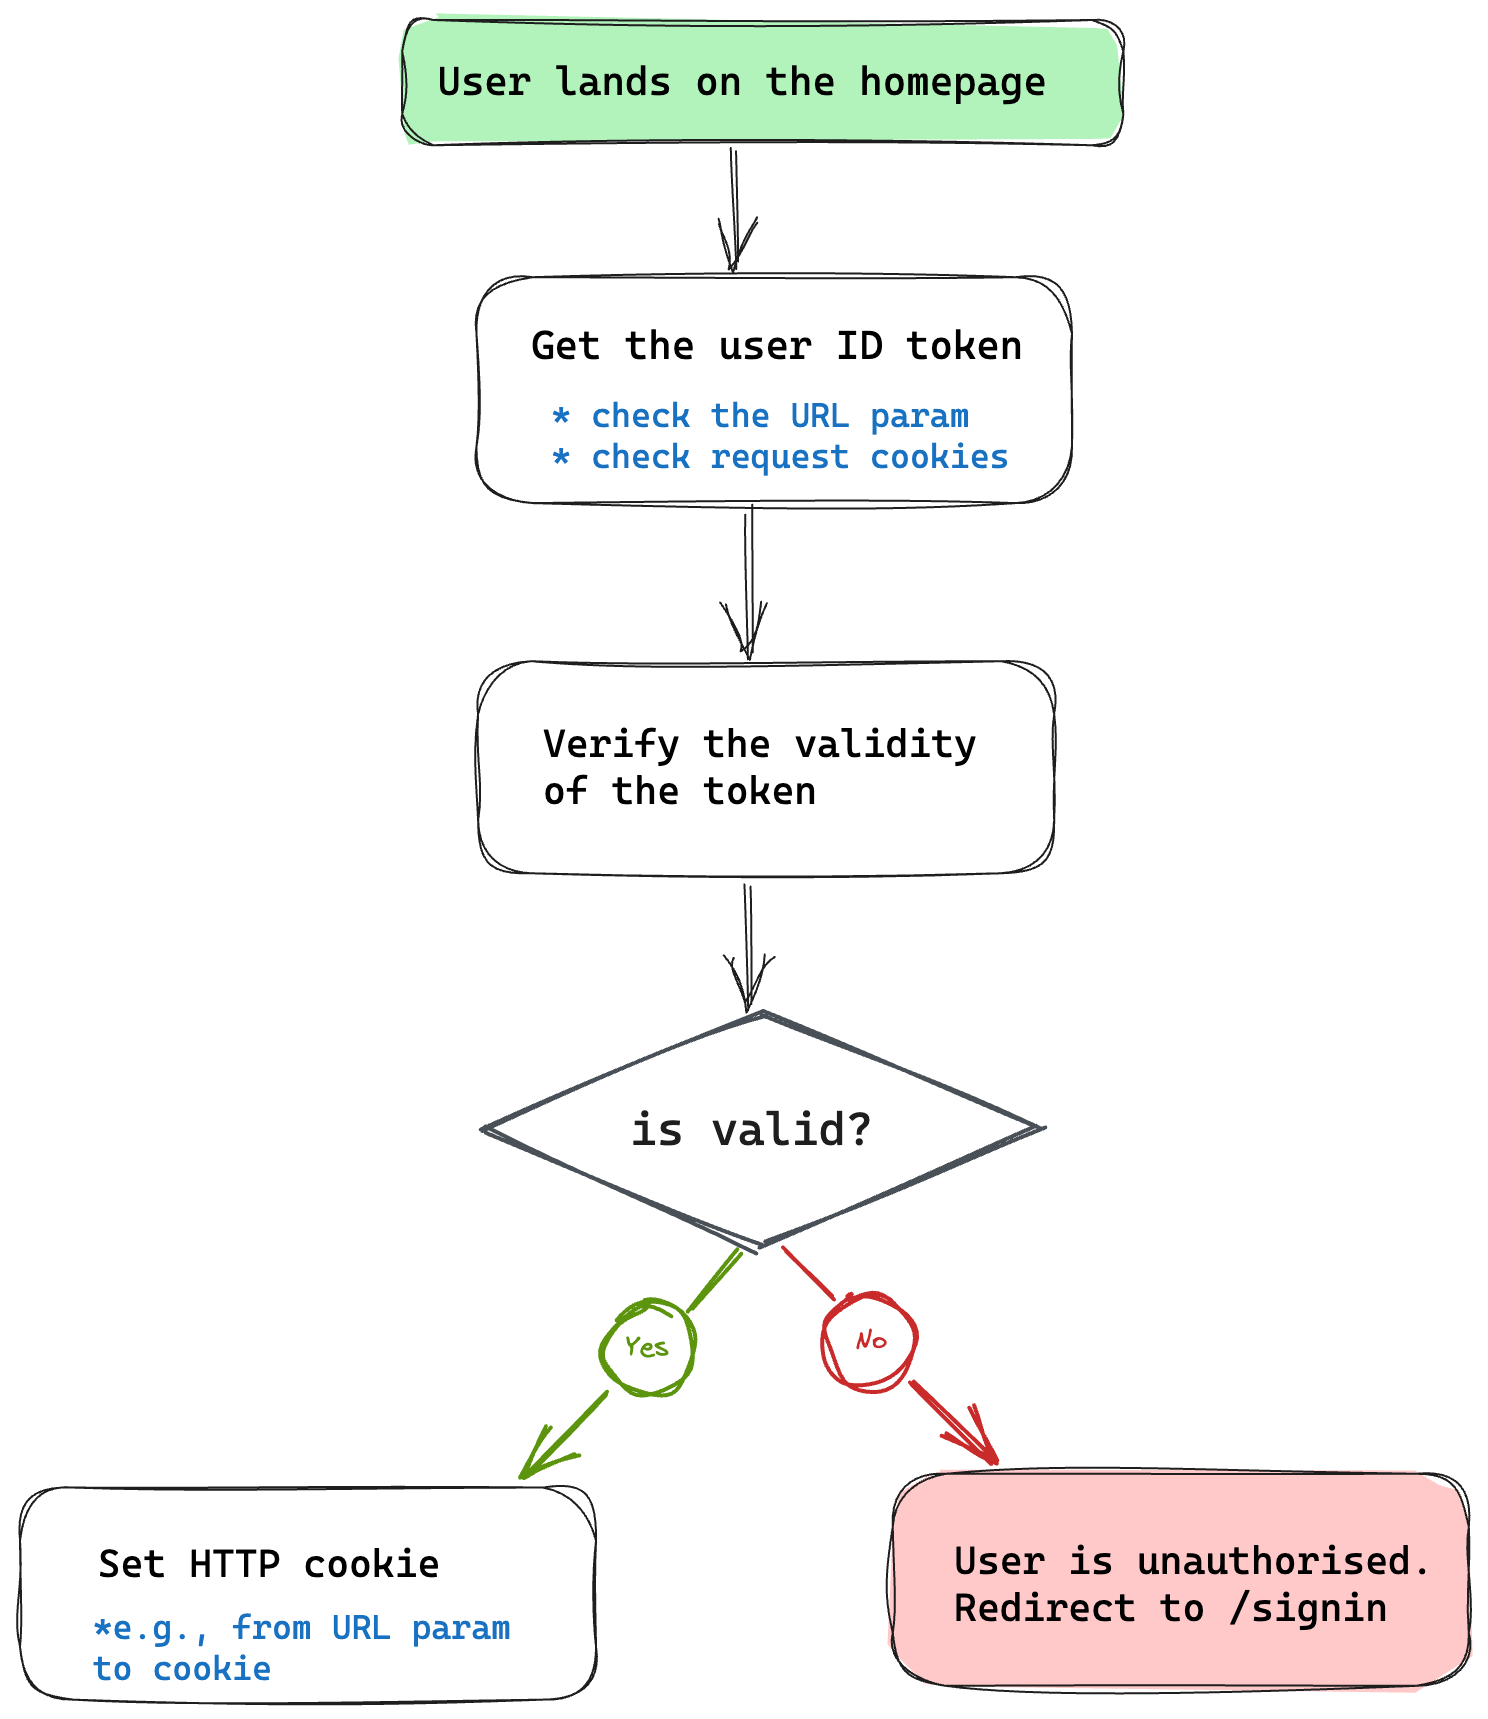
Consider the flow below:
考虑下面的流程:
The protected route flow.
受保护的路由流。
-
The flow kicks off with the user landing on the homepage.
该流程随着用户登陆主页而开始。Note that the following steps are performed on the server, i.e., within the frontmatter section of our server-side rendered page.
注意,在服务器上执行以下步骤,即,在我们的服务器端呈现页面的frontmatter部分中。 -
Then, retrieve the user ID token from the URL (first-time user) or the request cookies (returning user).
然后,从URL(首次用户)或请求cookie(返回用户)检索用户ID令牌。 -
Verify the validity of the token. We will use the Firebase server SDK (Firebase admin) to check this.
验证令牌的有效性。我们将使用Firebase服务器SDK(Firebase admin)来检查这一点。 -
If the token is invalid or doesn’t exist, the user is unauthorised. Redirect them to the
/signinpage.
如果令牌无效或不存在,则用户未经授权。将它们重定向到/signin页。 -
If the token is valid, set the
tokenas a cookie.
如果令牌有效,则将token设置为cookie。
✨Fun fact: by setting the token via cookies, we can remove the token from the URL and refresh without losing the user signed-in state. Every request will send back the cookie to the server, where we can recheck its validity.
✨ 有趣的事实:通过cookie设置令牌,我们可以从URL中删除令牌并刷新,而不会丢失用户登录状态。每个请求都会将cookie发送回服务器,在那里我们可以重新检查它的有效性。
Now, here’s the implementation:
下面是实现:
// 📂 src/pages/index.astro
// … import { serverApp } from “@scripts/firebase/initServer”; import { getAuth } from “firebase-admin/auth”; import { TOKEN } from “@constants/cookies”;
// Get client token from the URL param const url = new URL(Astro.request.url); const urlTokenParam = url.searchParams.get(“token”);
// Get token from cookies const cookieToken = Astro.cookies.get(TOKEN); const token = urlTokenParam || cookieToken.value;
if (!token) { // Unauthorised user. Redirect to sign in return Astro.redirect(“/signin”); }
const auth = getAuth(serverApp);
try { // verify the auth token await auth.verifyIdToken(token);
// set token cookie // Note that the “TOKEN” constant refers to the string “X-Token.” Astro.cookies.set(TOKEN, token, { path: ”/”, httpOnly: true, secure: true, }); } catch (error) { console.error(“Could not decode token”, { fromCookie: !!cookieToken.value, fromUrl: !!urlTokenParam, });
// Error occurred, e.g., invalid token. Redirect to sign in return Astro.redirect(“/signin”); }
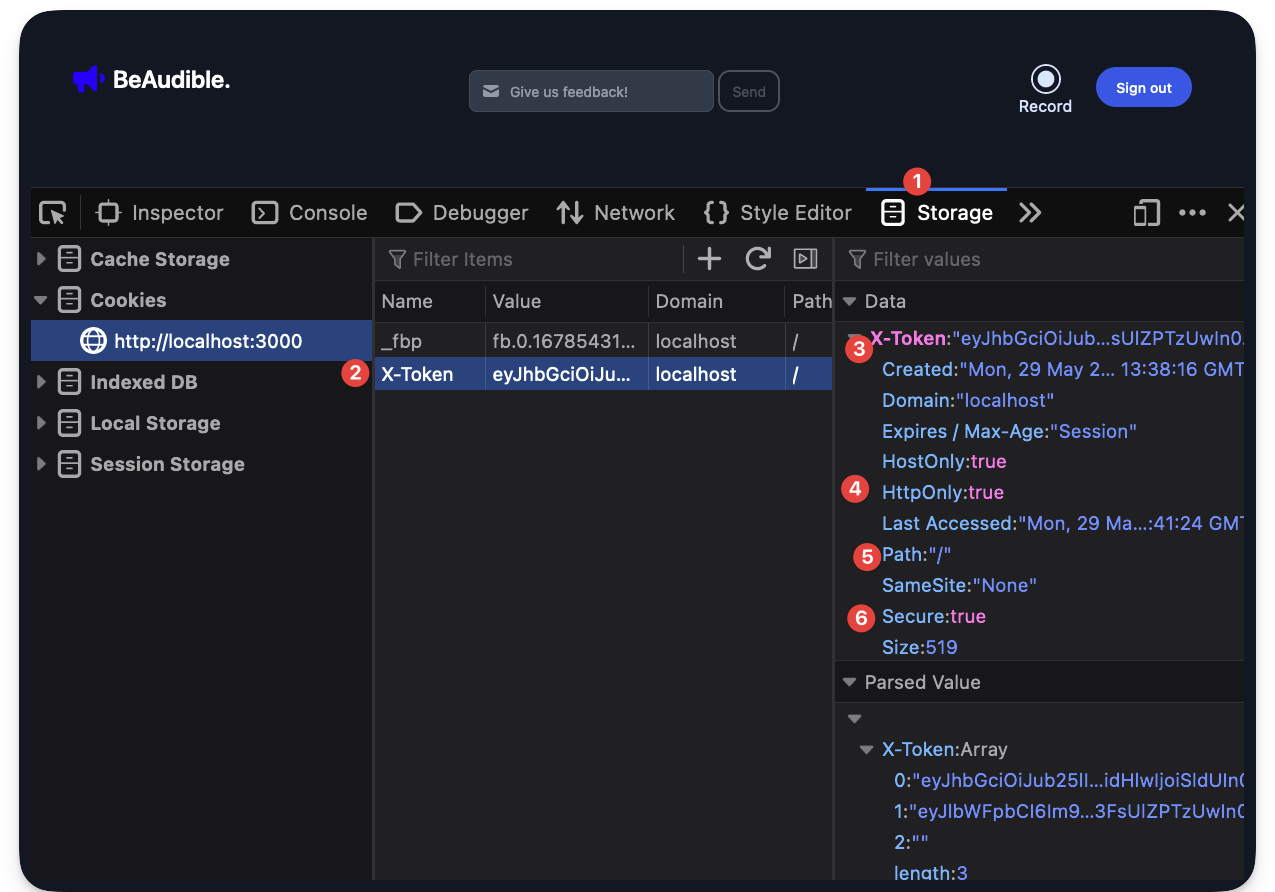
The token cookie set in the browser response.
浏览器响应中设置的令牌cookie。
Updating the redirect URL
更新重定向URL
When a user successfully signs in, the user looks something like localhost:3000/?token=${some-long-string}.
当用户成功登录时,该用户看起来类似于 localhost:3000/?token=${some-long-string} 。
After performing our token validation on the server and returning the protected HTML page, we may update the URL to remove the token parameter.
在服务器上执行令牌验证并返回受保护的 HTML 页面后,我们可以更新URL以删除 token 参数。
// Before localhost:3000/?token=${some-long-string}
// After localhost:3000
This is not necessary, but a nice UX touch.
这不是必要的,但一个很好的UX触摸。
Since we want to do this on the client, our go-to solution is to add a client <script> to the page!
由于我们想在客户端上执行此操作,因此我们的解决方案是将客户端 <script> 添加到页面!
Consider the solution below:
考虑下面的解决方案:
<script> // Enhancement: remove the token from the URL after the page’s parsed. const url = new URL(window.location.href); const urlTokenParam = url.searchParams.get(“token”);
if (urlTokenParam) { // delete the token param from the URL url.searchParams.delete(“token”);
// update history without a refresh with the new URL
window.history.pushState({}, "", url.href);
} </script>
The solution is arguably easy to reason about, with the crux after getting the search parameter being window.history.pushState(...). 2
这个解决方案可以说很容易推理,关键在于获得搜索参数 window.history.pushState(...). 2
Log out a user from the protected page
从受保护的页面注销用户
The top left section of the application’s navigation bar includes a sign-out button. When a user clicks this, we will sign them out of the application.
应用程序导航栏的左上部分包含一个退出按钮。当用户单击此选项时,我们将使其退出应用程序。
To sign out a user, we will use the Firebase client SDK to log a user out of the device.
要注销用户,我们将使用Firebase客户端SDK将用户注销设备。
However, remember that the protected index page checks the token request cookie value.
但是,请记住,受保护的索引页检查 token 请求cookie值。
When we sign out a user using the Firebase client SDK, the issued client token remains valid for up to an hour (depending on when it was issued).
当我们使用Firebase客户端SDK注销用户时,发布的客户端 token 最多保持一小时的有效期(取决于发布时间)。
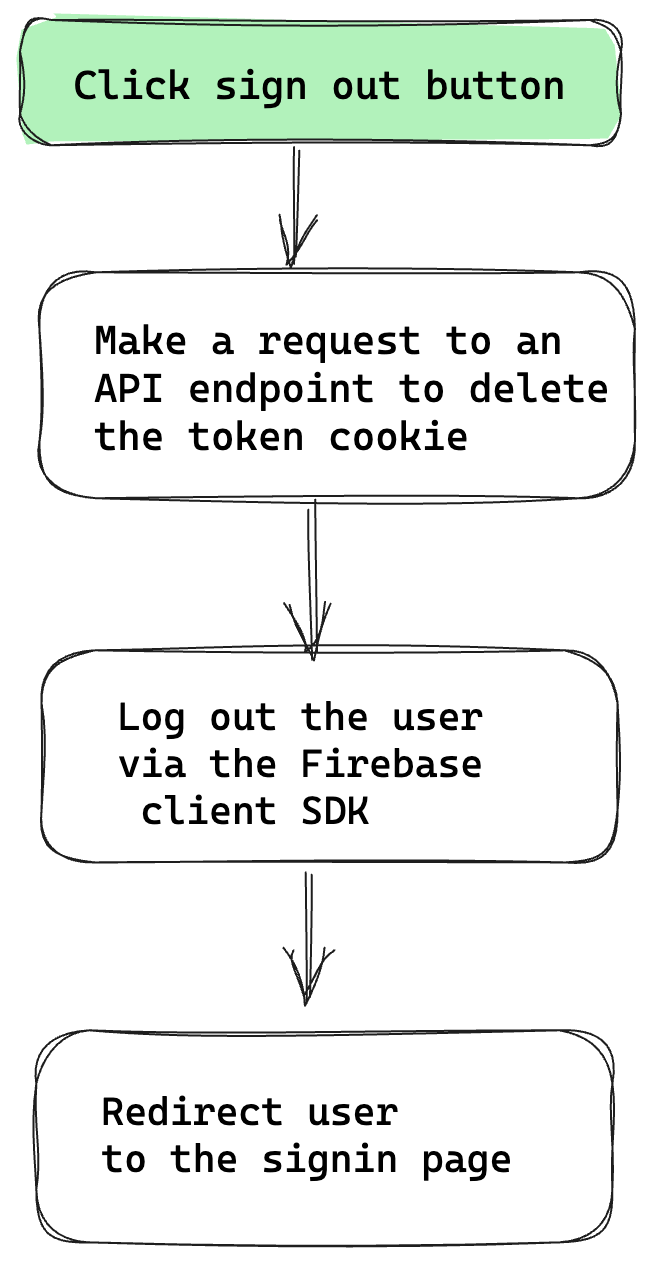
So, consider the flow for our solution below:
因此,考虑下面我们解决方案的流程:
The user sign out flow..
用户注销流程..
Let’s start our implementation by updating the client application to handle the click event on the sign-out button and initiate our flow as shown below:
让我们通过更新客户端应用程序来处理退出按钮上的click事件并启动如下所示的流程来开始我们的实现:
<script> import { auth } from “@scripts/firebase/init”;
// Grab the sign-out button const signoutButton = document.getElementById(“sign-out-button”) as | HTMLButtonElement | undefined;
if (signoutButton) { // Add a click event listener on the button signoutButton.addEventListener(“click”, async () => { try { // Disable the button while we log the user out signoutButton.disabled = true; // Change button text to read “Signing out …” signoutButton.innerText = “Signing out …”; // Invalidate server http cookie const response = await fetch(“/api/auth/signout”, { method: “POST”, });
    if (!response.ok) {
      throw new Error("server signout failed");
    }
/** * sign the user out via the signOut method * on the Firebase auth module */ await auth.signOut (); // Redirect to the signin page window.location.href = “/signin”; } catch (error) { signoutButton.disabled = false; alert(error); } }); } </script>
We’re making a request to /api/auth/signout, but the API route does not exist.
我们正在向 /api/auth/signout 发出请求,但API路由不存在。
Let’s change that with the following code:
让我们用下面的代码来改变它:
// 📂 src/pages/api/auth/signout.ts // …
import { TOKEN } from “@constants/cookies”;
export const post: APIRoute = (ctx) => { ctx.cookies.delete(TOKEN, { path: ”/”, });
return { body: JSON.stringify({ message: “successfully signed out” }), }; };
After successful sign-out, attempt to visit the protected page localhost:3000, and you’ll be automatically redirected to /sign.
成功退出后,尝试访问受保护的页面 localhost:3000 ,您将被自动重定向到 /sign 。
We’re now cooking with gas! 🔥
我们现在用煤气做饭! 🔥
Cloud storage setup 云存储设置
We’ve got a big part of our application functioning — largely the authentication and keeping the index page protected. However, we’re protecting an empty page at the moment. So users cannot record or view other users’ recordings.
我们的应用程序有很大一部分功能-主要是身份验证和保持索引页面的保护。然而,我们目前正在保护一个空页面。因此,用户无法录制或查看其他用户的录音。
Let’s fix this by setting up cloud storage to save user recordings on the server.
让我们通过设置云存储来将用户录音保存在服务器上来解决这个问题。
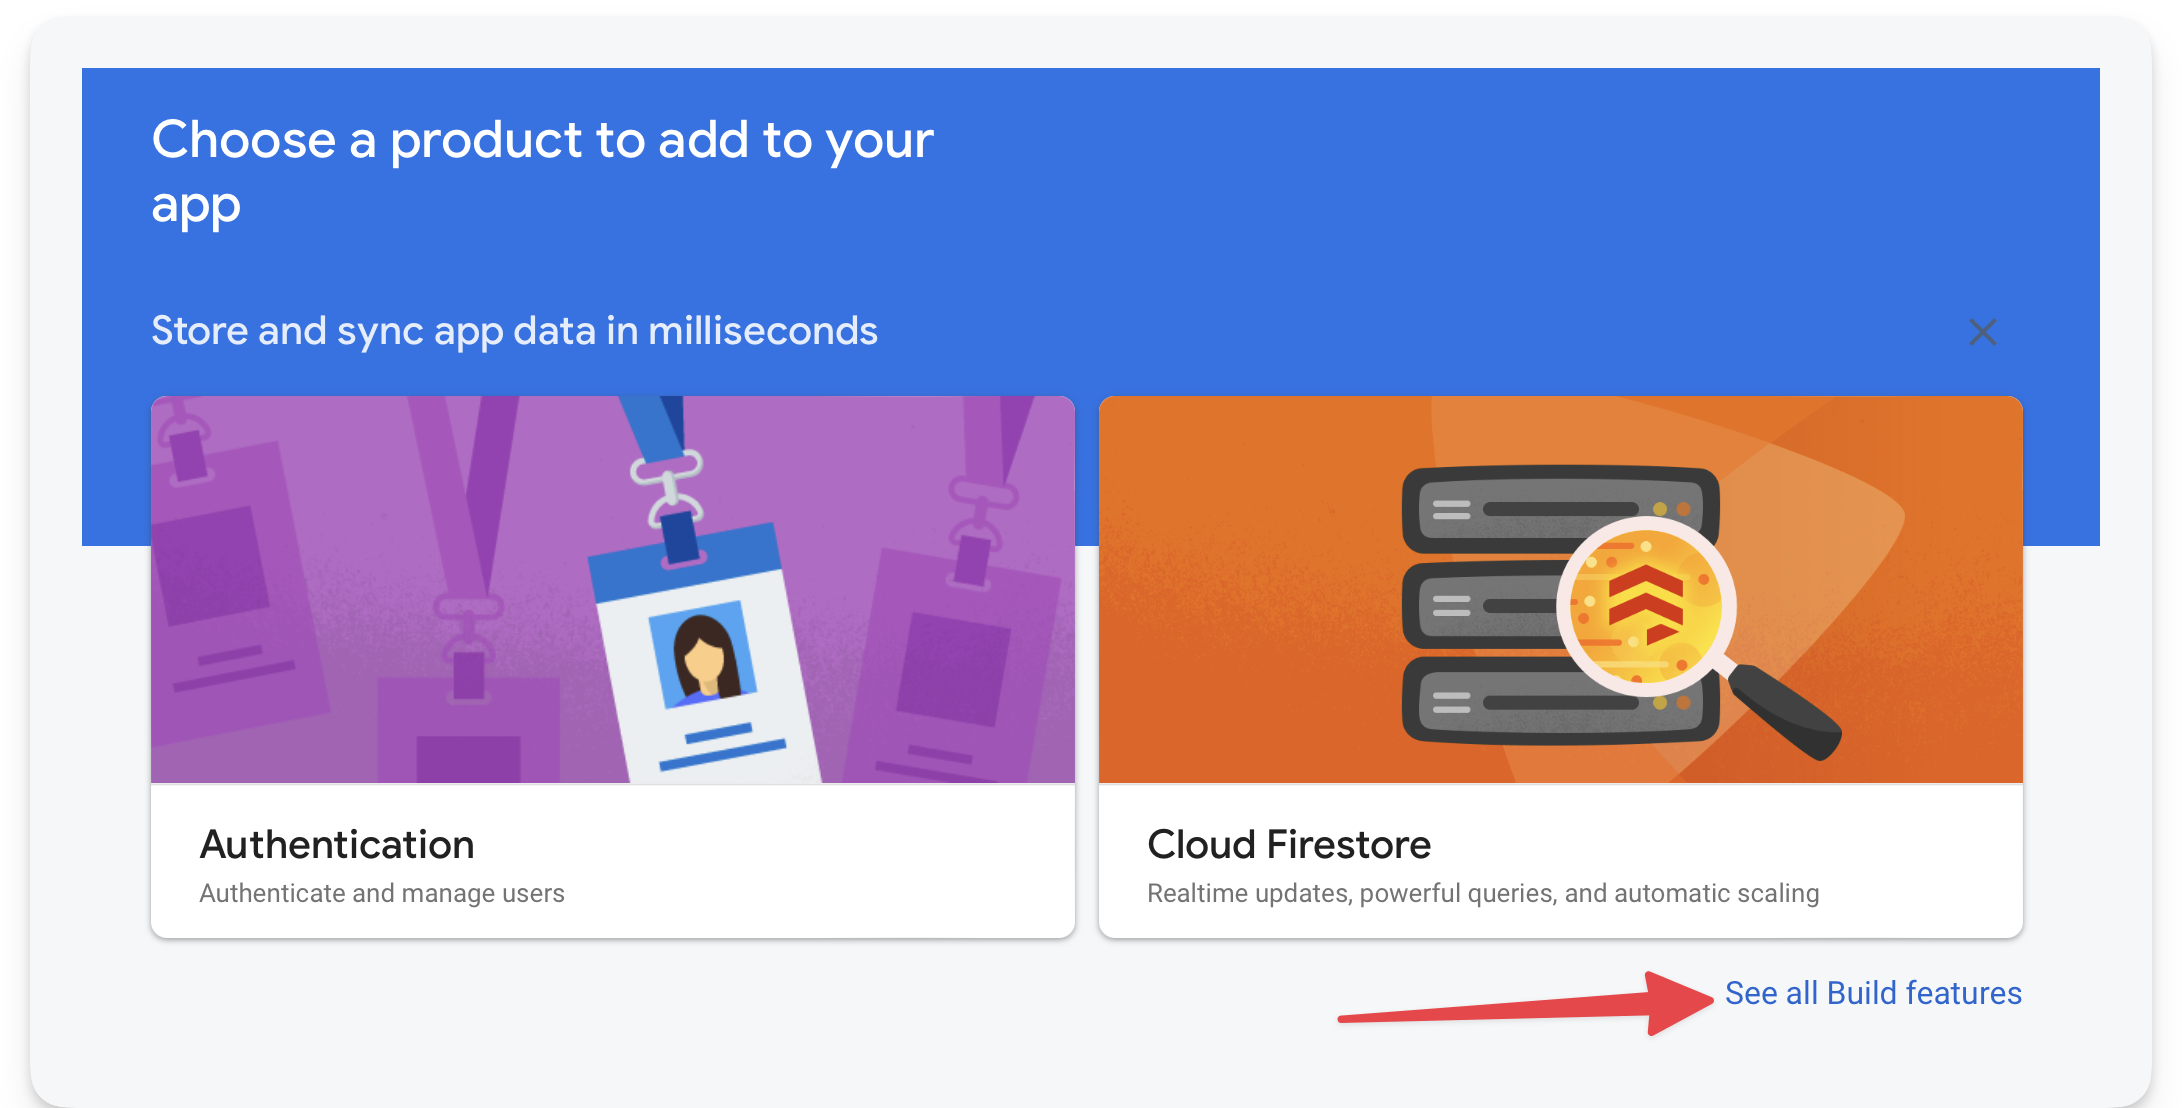
Go to the Firebase console and click “See all build features” to find the cloud storage service.
转到Firebase控制台,单击“查看所有构建功能”以查找云存储服务。
Viewing all build features on the Firebase console.
查看Firebase控制台上的所有构建功能。
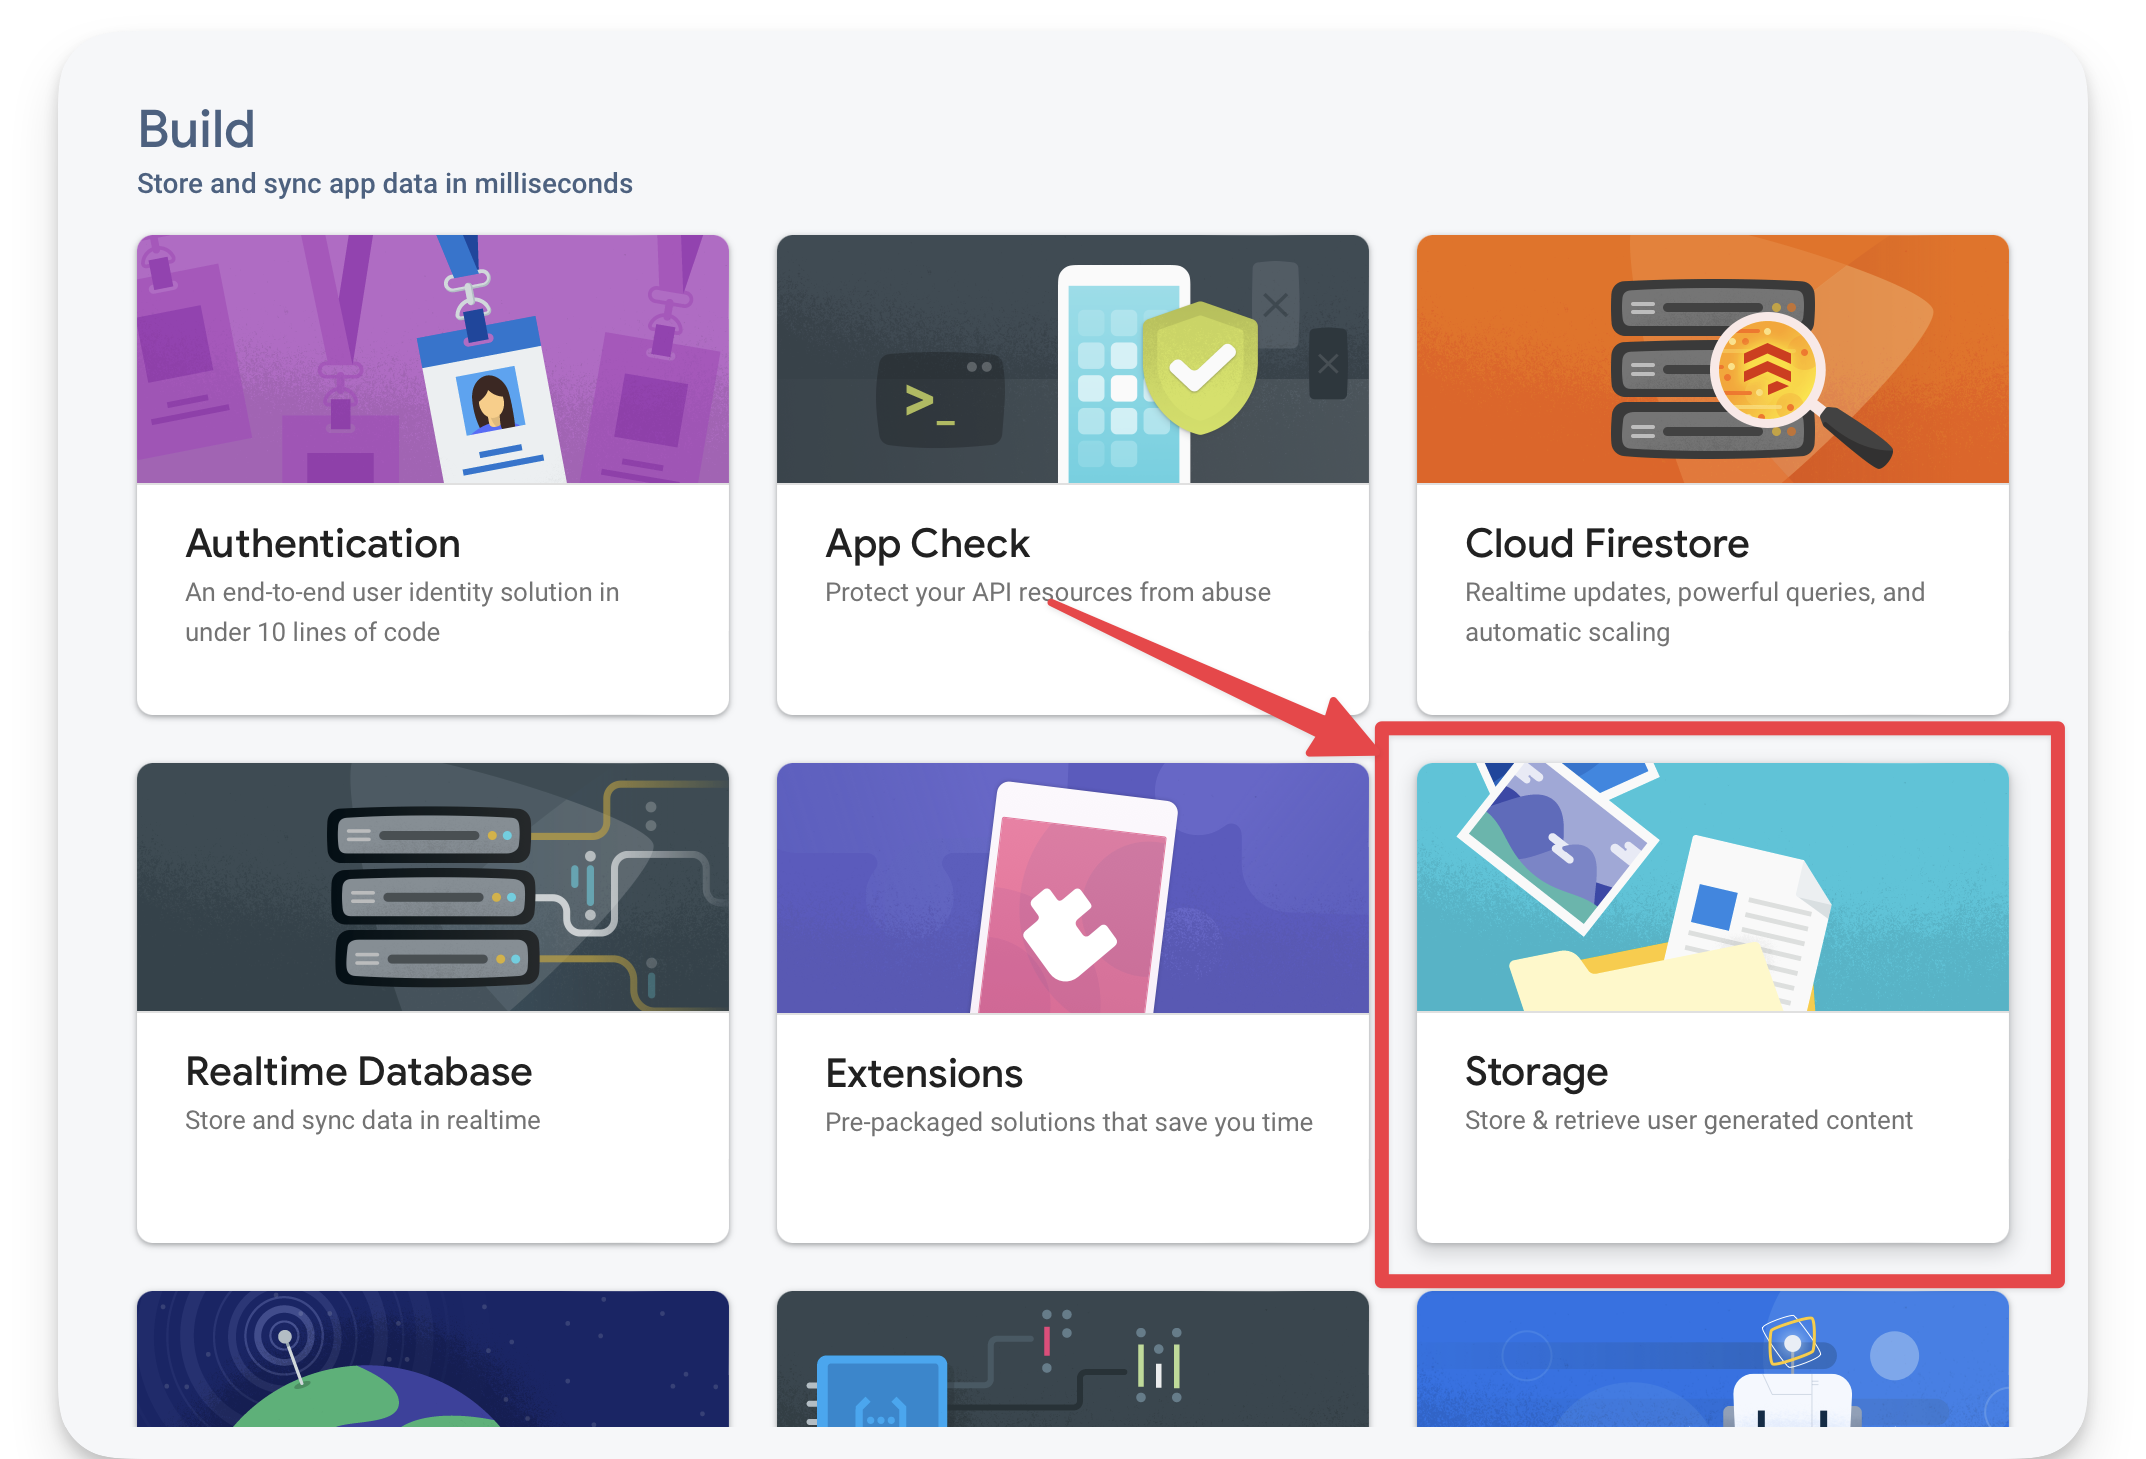
Next, select the Storage service.
接下来,选择存储服务。
Selecting the storage service.
选择存储服务。
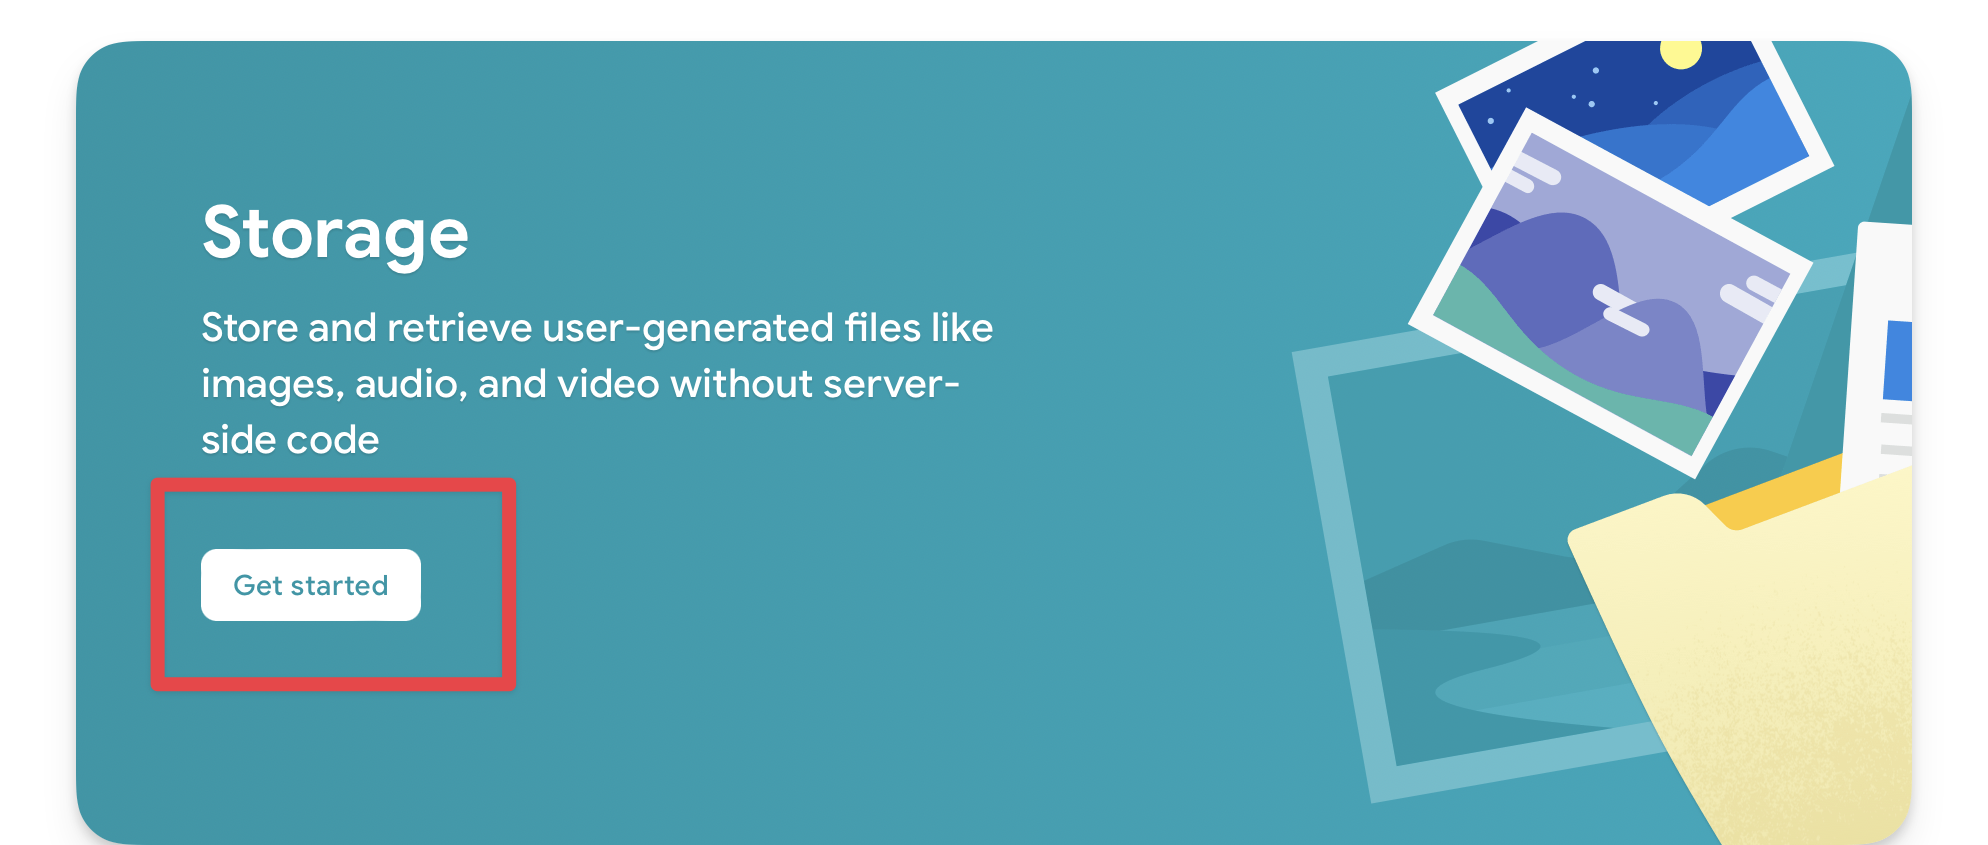
Then begin the setup.
然后开始设置。
Clicking get started on the Storage service page.
单击“存储服务”页面上的“开始”。
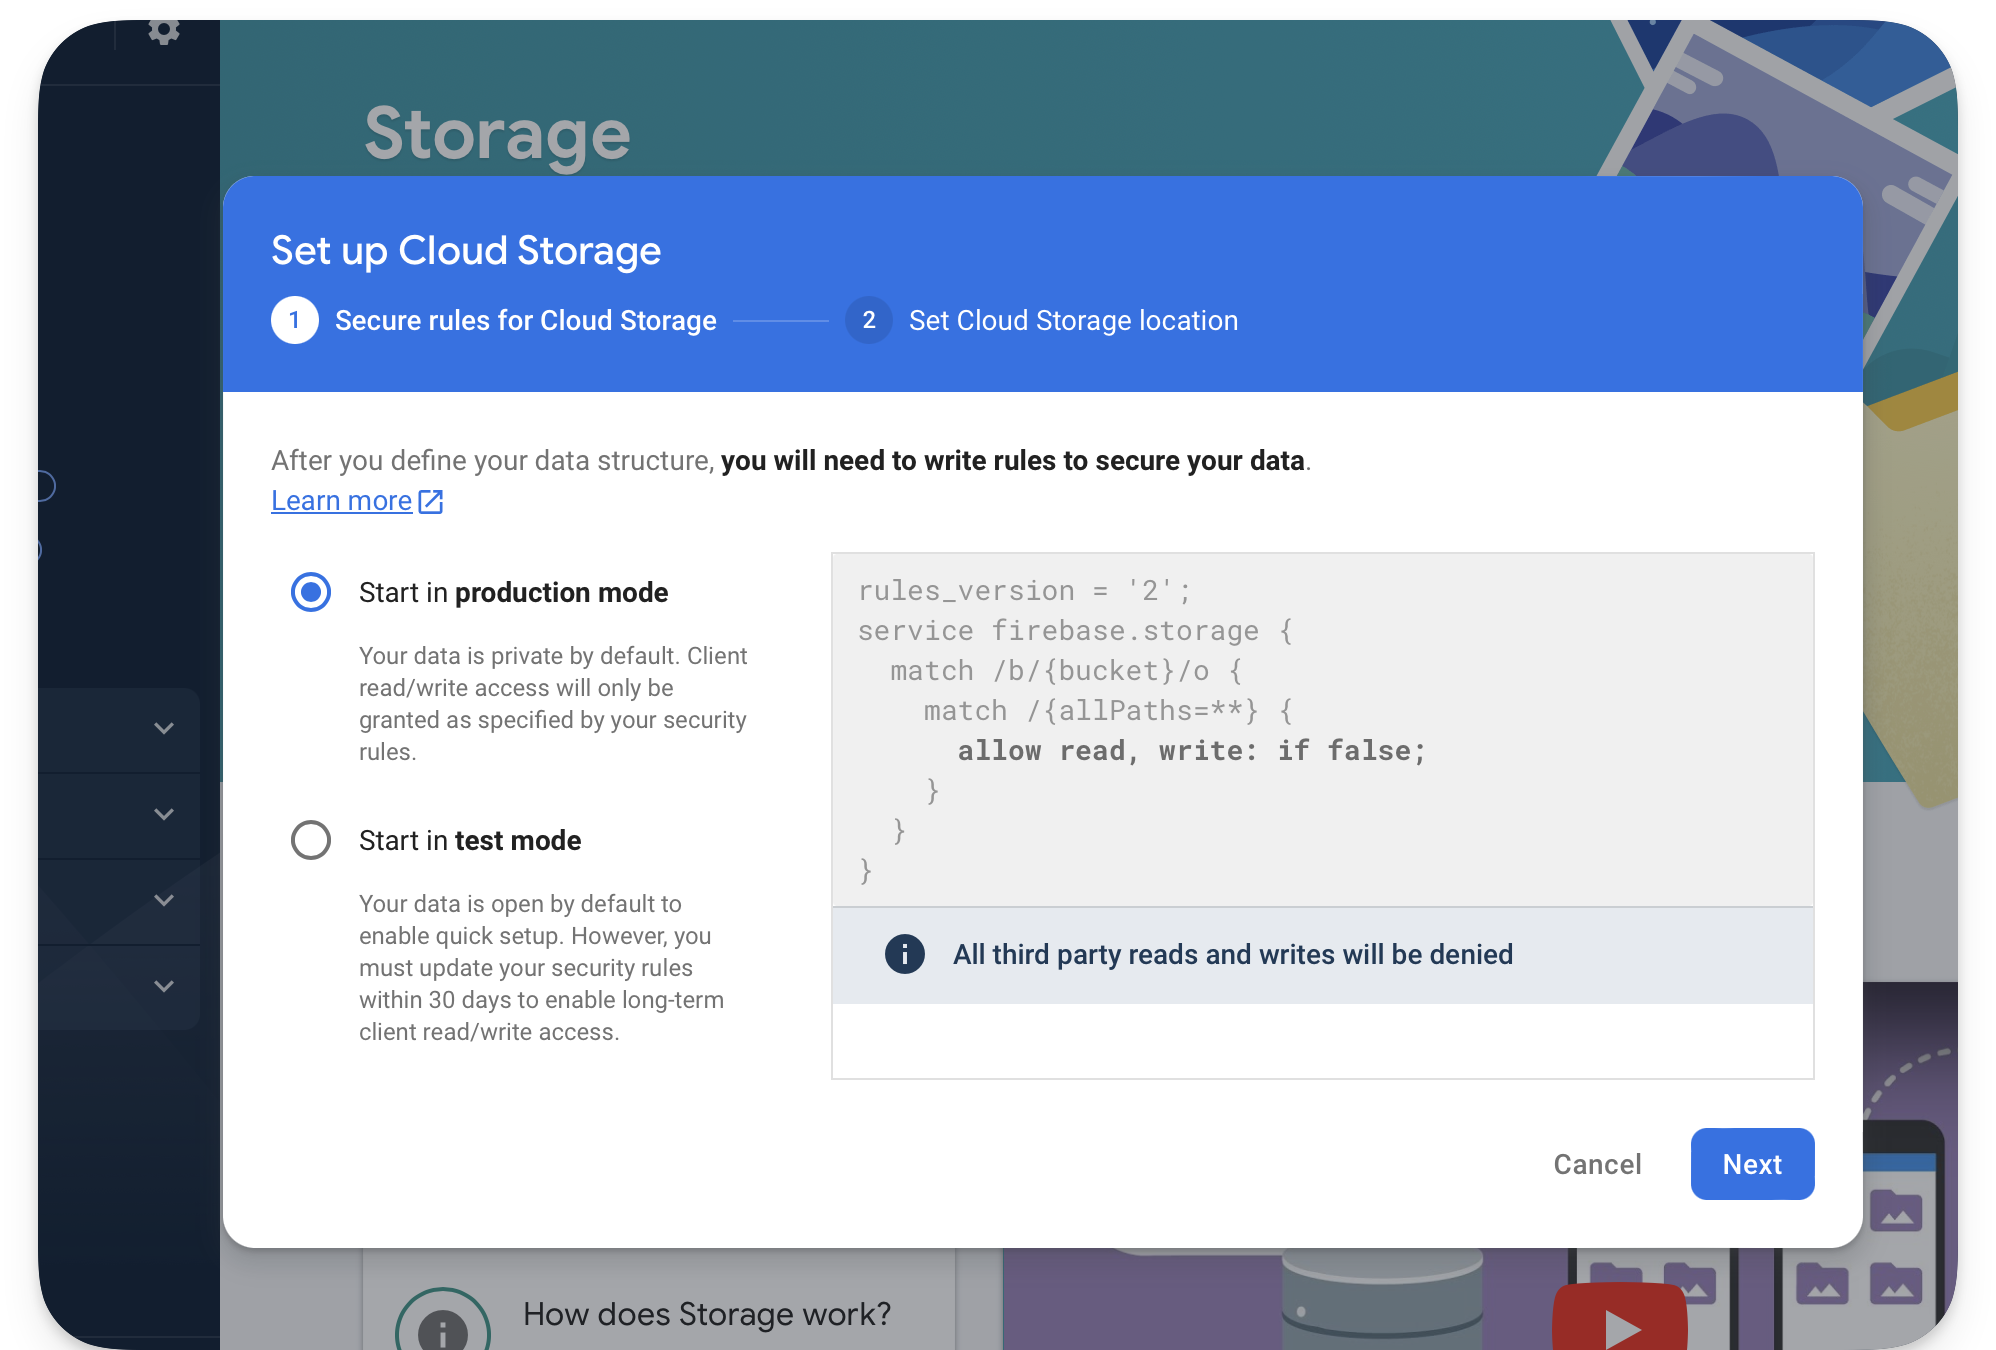
Keep the storage rules as-is:
保持存储规则原样:
The default storage rule.
默认存储规则。
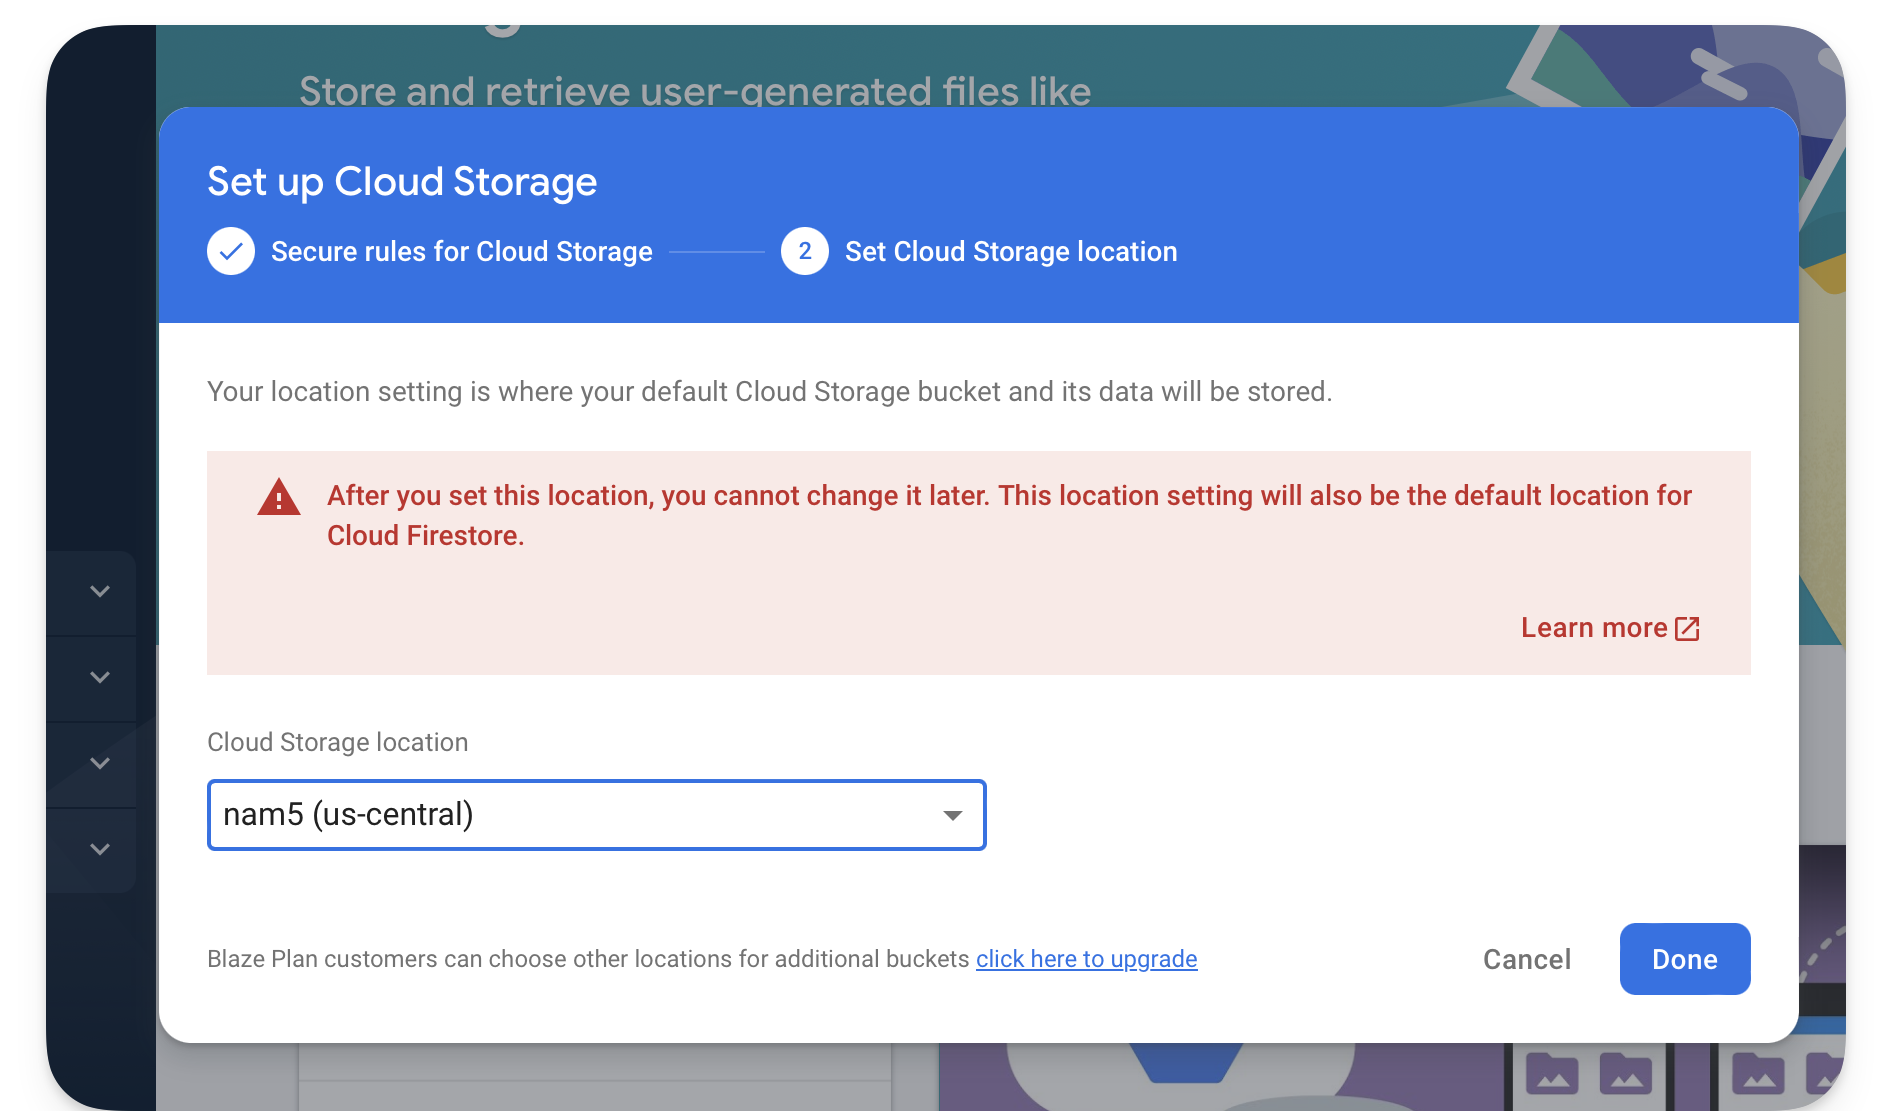
Then select a server location.
然后选择一个服务器位置。
BeAudible is a hypothetical US startup, so I’ll choose a US location here.
BeAudible是一家假设的美国初创公司,所以我将在这里选择一个美国地点。
Selecting a Storage location.
选择存储位置。
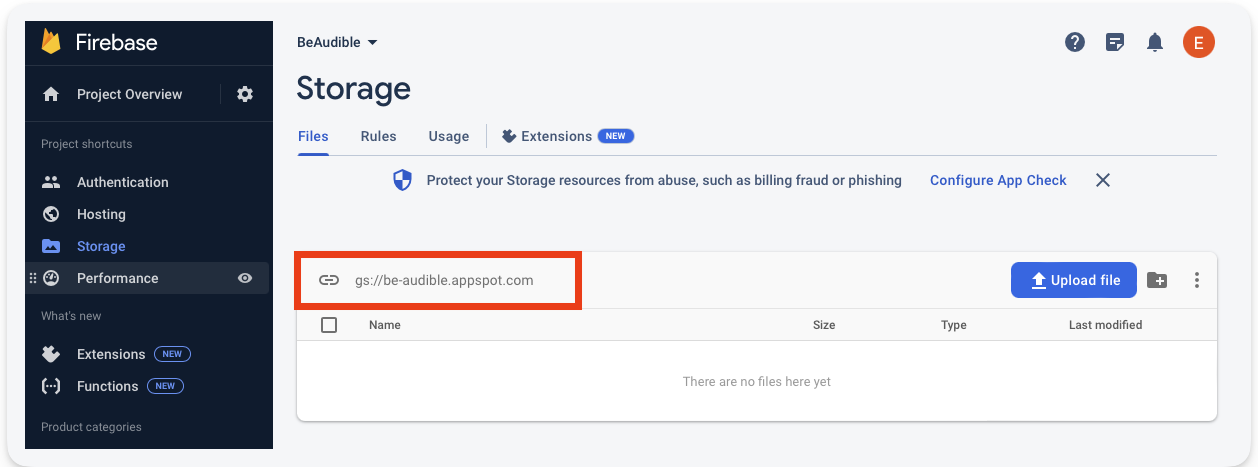
Once the setup is complete, visit the Storage page and copy the bucket name in the form gs://{name-of-project}.appspot.com.
设置完成后,请访问Storage页面并以 gs://{name-of-project}.appspot.com. 格式复制存储桶名称
The Storage bucket name.
存储桶名称。
Excellent! 太棒了!
When we upload and get the user recordings, we’ll need this to connect to the storage servers.
当我们上传并获取用户录音时,我们需要这个来连接到存储服务器。
Uploading audio recordings
上传录音
The recorder user interface is powered by a React Recorder component hydrated via the client:load directive.
记录仪用户界面由通过 client:load 指令水合的React记录仪组件供电。
<Recorder client
>…</Recorder>Open the Recorder component and consider the onAudioDownload callback.
打开 Recorder 组件并考虑 onAudioDownload 回调。
// src/components/AudioRecorder.tsx // … <VoiceRecorder onAudioDownload={(blob: Blob) => { // 👀 upload recording }} />
After a user completes the recording, this callback will be invoked. Our first task is to go ahead and upload the audio blob to the server.
用户完成录制后,将调用此回调。我们的第一个任务是将音频blob上传到服务器。
Sending audio blob to a server endpoint.
将音频blob发送到服务器端点。
Handling uploads via an API route
通过API路由处理上传
Let’s go ahead and create the API endpoint that’ll receive the audio blob from the client.
让我们继续创建API端点,它将从客户端接收音频blob。
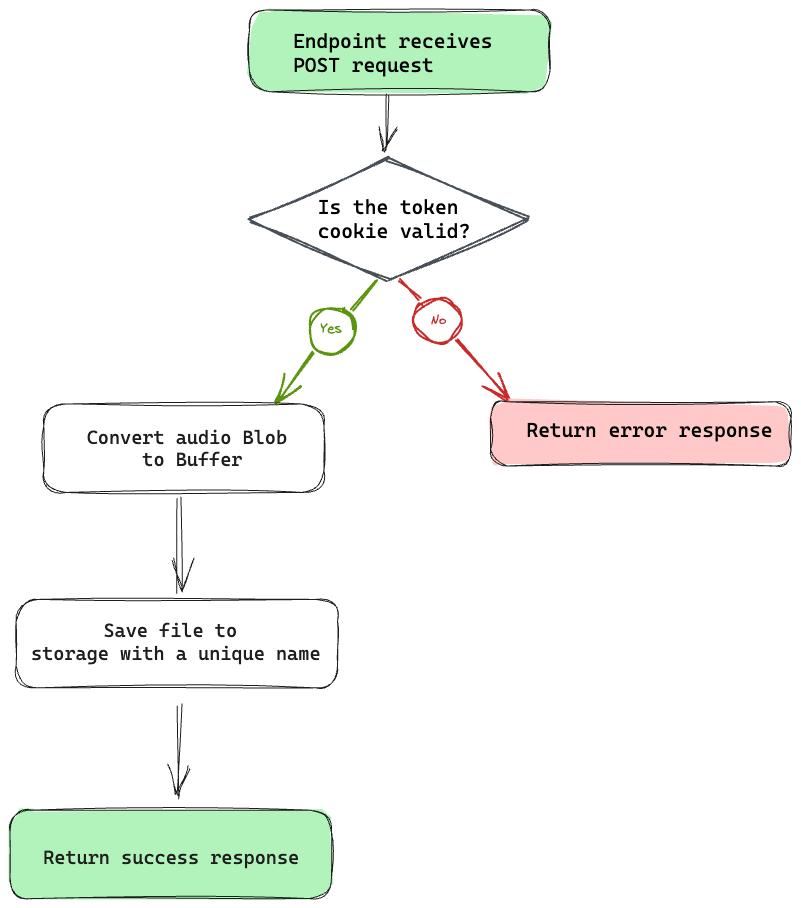
Consider the flow for our solution below:
考虑下面我们解决方案的流程:
The save recording endpoint flow diagram.
保存记录端点流程图。
Now, here’s the annotated code:
下面是带注释的代码:
// 📂 src/pages/api/recording.ts // … import type { APIRoute } from “astro”;
// nanoid will be used to generate unique IDs import { nanoid } from “nanoid”; import { TOKEN } from “@constants/cookies”; import { getAuth } from “firebase-admin/auth”; import { BUCKET_NAME } from “@constants/firebase”; import { getStorage } from “firebase-admin/storage”; import { serverApp } from “@scripts/firebase/initServer”;
// get firebase server auth module const auth = getAuth(serverApp);
export const post: APIRoute = async (ctx) => { // Create an error response const authUserError = new Response(“Unauthenticated user”, { status: 401 });
try { // Get token cookie const authToken = ctx.cookies.get(TOKEN).value;
// not present, return error response
if (!authToken) {
  return authUserError;
}

// verify the user token
await auth.verifyIdToken(authToken);
} catch (error) { /** * Return error response, e.g., * if the token verification fails */ return authUserError; }
try { // Get the audio blob from the client request const blob = await ctx.request.blob();
// Get access to the firebase storage
const storage \= getStorage(serverApp);
const bucket \= storage.bucket(BUCKET\_NAME);

// convert Blob to native Node Buffer for server storage
const buffer \= Buffer.from(await blob.arrayBuffer());
const file \= bucket.file(\`recording-${nanoid()}.wav\`);

// save to firebase storage
await file.save(buffer);

// return a successful response
return {
  body: JSON.stringify({
    message: "Recording uploaded",
  }),
};
} catch (error) { console.error(error); return new Response(“Something went horribly wrong”, { status: 500 }); } }; // …
Uploading recordings from the client
从客户端上传录音
Now that we’ve got the API endpoint ready to receive client requests let’s go ahead and upload the user recordings from the client.
现在我们已经准备好了API端点来接收客户端请求,让我们继续从客户端上传用户录音。
Instead of clogging our user interface components with the upload logic, I find it more maintainable to move such business logic away from the UI components and, in our case, have this collocated with the application state managed via nanastores.
我发现,将这种业务逻辑从UI组件中移出,并将其与通过 nanastores 管理的应用程序状态并置,而不是用上传逻辑阻塞用户界面组件,这样更容易维护。
Remember nanostores? 还记得0#号吗?
We’ll use nanostores for state management. The ~1kb library is simple and efficient for our use case.
我们会用纳米商店来管理国家。 ~1kb 库对于我们的用例来说是简单而高效的。
Create a new audioRecording.ts file to handle our recording state and also be responsible for exposing a uploadRecording method.
创建一个新的 audioRecording.ts 文件来处理我们的记录状态,并负责公开一个 uploadRecording 方法。
Consider the implementation below:
考虑以下实施方式:
// 📂 src/stores/audioRecording.ts import { atom } from “nanostores”;
/** * Deterministic state representation */ type Store = | { blob: null, status: “idle”, } | { blob: Blob, status: “uploading” | “completed” | “failed”, };
/** * Optional naming convention: $[name_of_store] * instead of [name_of_store]Store *, i.e., $audioRecording instead of audioRecordingStore */ export const $audioRecording = atom < Store > { // Initialise the atom with the default state blob: null, status: “idle”, };
/** * upload audio recording action */ export const uploadRecording = async (blob: Blob) => { // Update $audioRecording state to “uploading.” $audioRecording.set({ status: “uploading”, blob, });
try { // POST request to our recording endpoint const response = await fetch(“/api/recording”, { method: “POST”, body: blob, // pass blob as the request body });
if (response.ok) {
  // Successful? Update state to "completed."
  $audioRecording.set({
    status: "completed",
    blob,
  });
} else {
  // Request failed. Update state to "failed."
  $audioRecording.set({
    status: "failed",
    blob,
  });
}
} catch (error) { $audioRecording.set({ status: “failed”, blob, }); } finally { // after ‘t’ revert state to idle again const timeout = 3000; setTimeout(() => { $audioRecording.set({ status: “idle”, blob: null, }); }, timeout); } };
Our UI state is well-represented, and the upload action is defined. However, this will only take effect when used in the UI component.
我们的UI状态被很好地表示,并且上传操作被定义。但是,这只会在UI组件中使用时生效。
Reacting to UI changes in framework components
响应框架组件中的UI更改
We will now update the AudioRecorder UI component to react to the state in the $audioRecording store as shown below:
我们现在将更新 AudioRecorder UI组件,以响应 $audioRecording 存储中的状态,如下所示:
// 📂 src/components/AudioRecorder.tsx
/** * The useStore hook will help with the React * component rerenders. In simple terms, it’ll hook into the * store and react upon any change. */ import { useStore } from “@nanostores/react”; import { VoiceRecorder } from “react-voice-recorder-player”; // Import the store and the upload recording action import { $audioRecording, uploadRecording } from “@stores/audioRecording”;
type Props = { cta?: string, };
export const Recorder = (props: Props) => { // Get the current application state from the store const state = useStore($audioRecording);
// React deterministically based on the status of the store switch (state.status) { case “idle”: return ( <div> <VoiceRecorder // 👀 Invoke uploadRecording after a user completes the recording onAudioDownload={(blob: Blob) => uploadRecording(blob)} />
      {props.cta}
    </div\>
  );
/\*\*
Show relevant UI during the uploading state. **/ case “uploading”: return ( <div className=“flex items-center justify-center w-56 h-56 border border-gray-200 rounded-lg bg-gray-50 dark
dark”> <div className=“px-3 py-1 text-xs font-medium leading-none text-center text-blue-800 bg-blue-200 rounded-full animate-pulse dark dark”> Uploading … </div> </div> ); /** Show relevant UI during the failed state. **/ case “failed”: return ( <div className=“bg-red-400 rounded-md py-6 px-3 text-slate-100 motion-safe”> An error occurred uploading your recording </div> ); /** Show relevant UI during the completed state. **/ case “completed”: return ( <div className=“bg-green-400 rounded-md py-6 px-3 text-slate-100 motion-safe”> Successfully published your recording! </div> ); /** Typescript exhaustive checking @see https://www.typescriptlang.org/docs/handbook/2/narrowing.html#exhaustiveness-checking **/default:
const \_exhaustiveCheck: never \= state;
return \_exhaustiveCheck;} };
Now, a user should be able to record in the browser, and we will go ahead and save the recording on our backend!
现在,用户应该能够在浏览器中记录,我们将继续在后端保存记录!
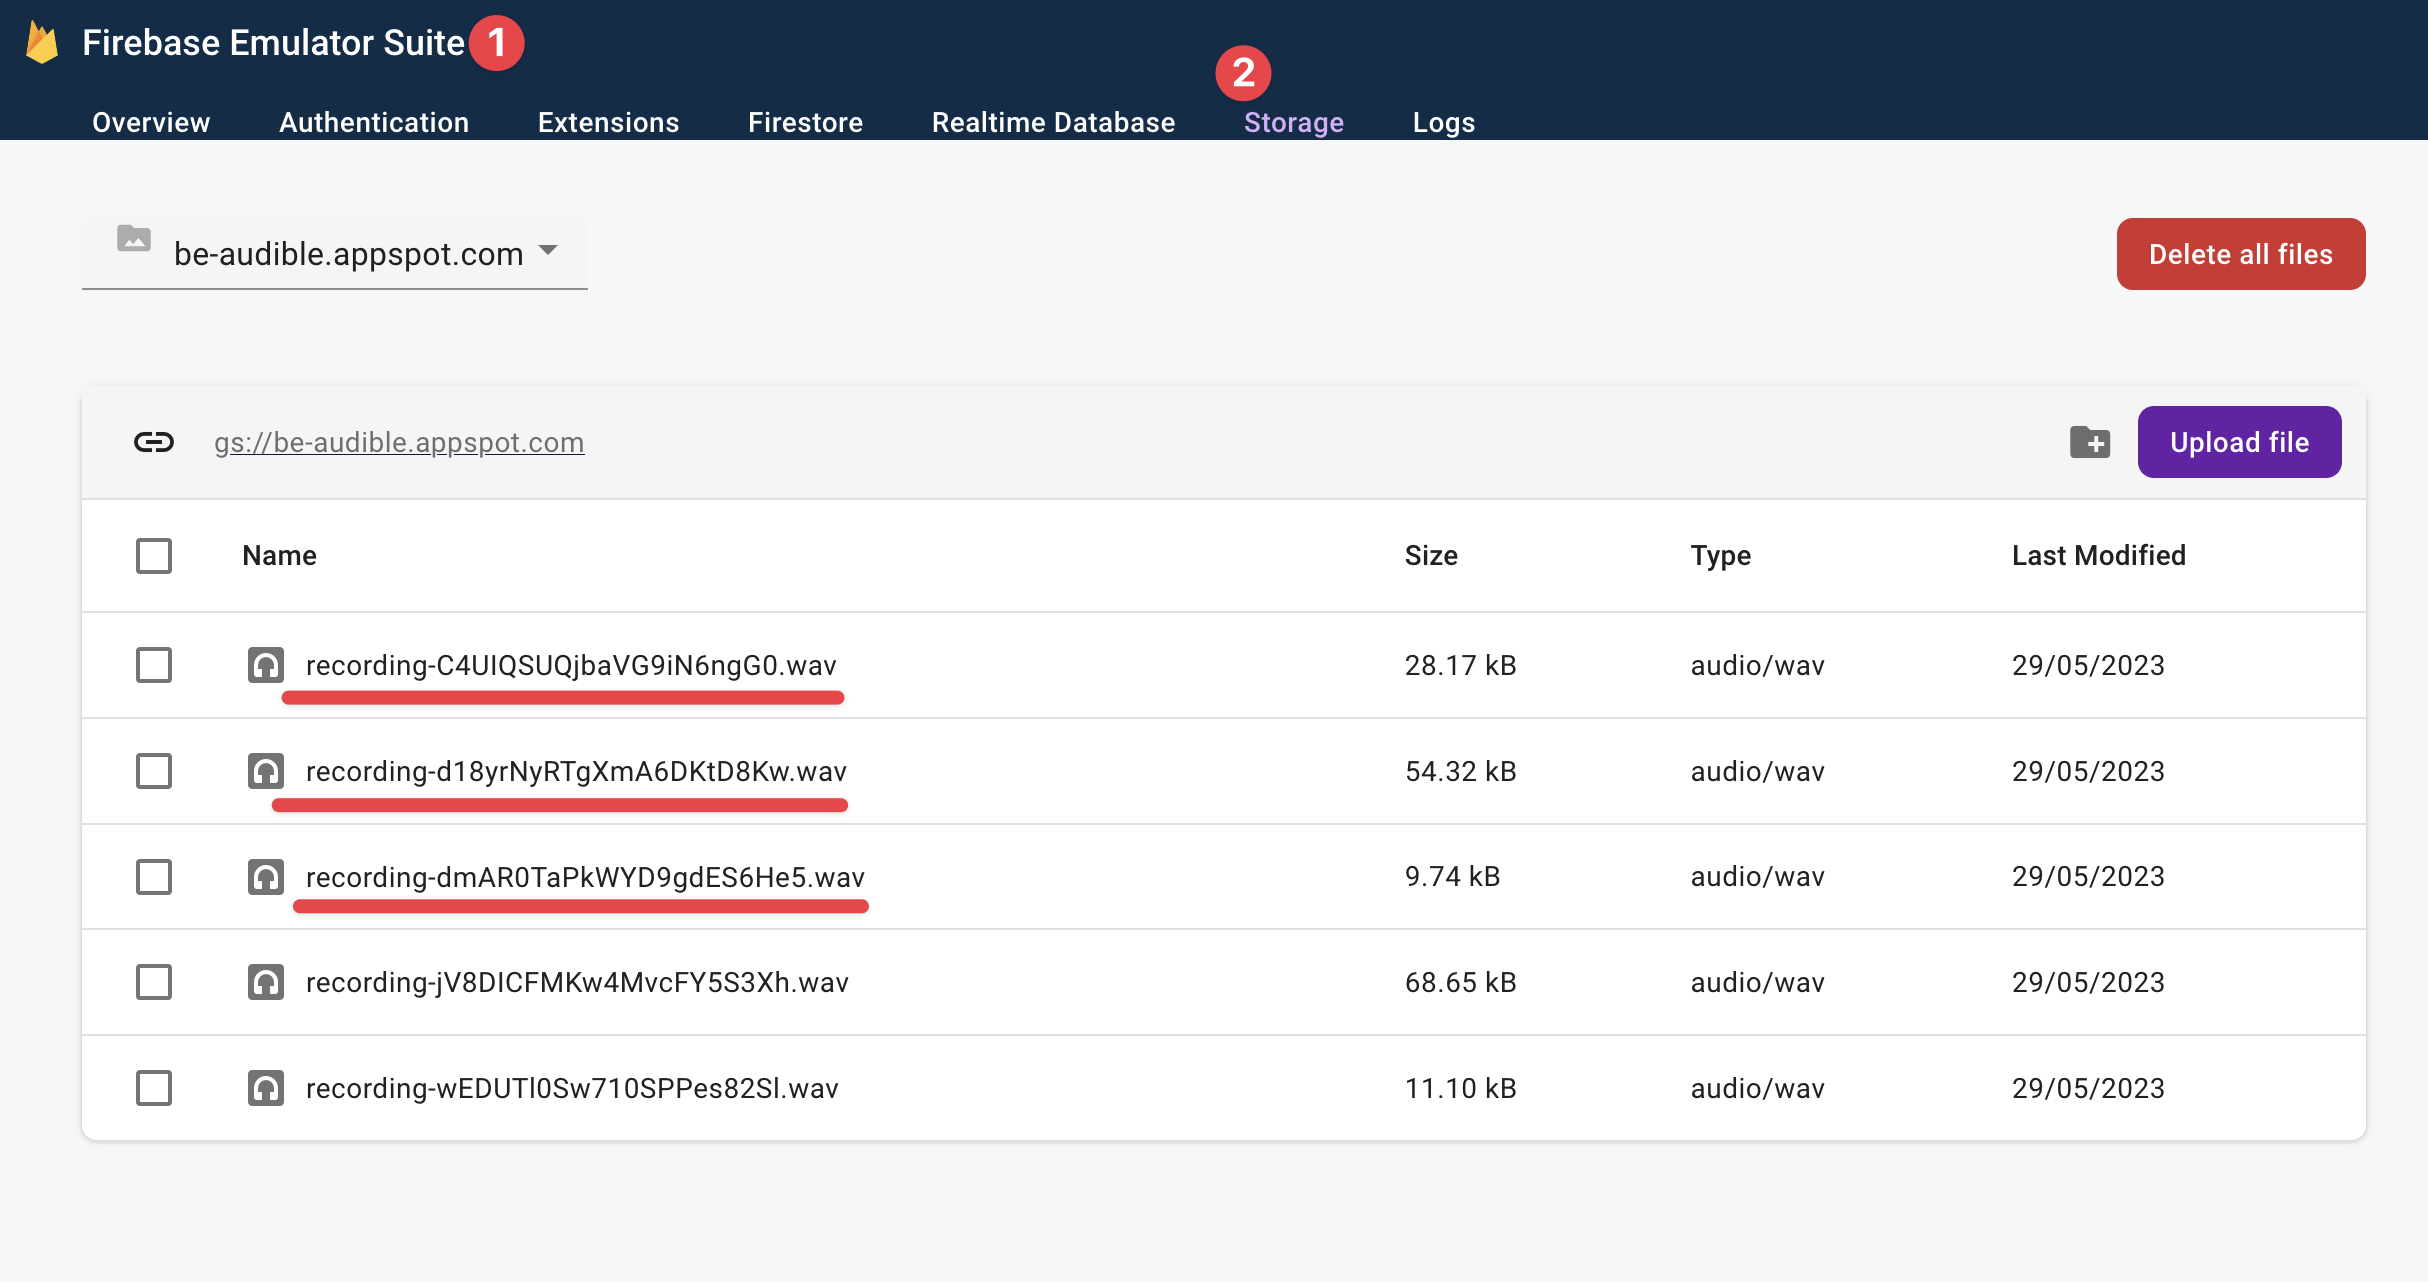
Viewing saved recordings in the Firebase emulator.
在Firebase模拟器中查看保存的录音。
Fetching data from the server
从服务器获取数据
We’re rightly saving user recordings, but at the moment, they can’t be viewed on the homepage.
我们正确地保存了用户录音,但目前,他们不能在主页上查看。
Let’s resolve that. 让我们解决这个问题。
Our solution is to fetch the recordings on the server and send the rendered HTML page to the client.
我们的解决方案是在服务器上获取录音并将呈现的HTML页面发送到客户端。
Here’s the code solution:
下面是代码解决方案:
// 📂 src/pages/index.astro
import { BUCKET_NAME } from “@constants/firebase”; import LinkCTA from “@components/LinkCTA.astro”; import AudioPlayer from “@components/AudioPlayer.astro”; // …
// Represent the recordings with the “Audible” type alias type Audible = { url: string; timeCreated: string };
// audibles will hold the list of “Audibles.” let audibles: Audible[] = []; const storage = getStorage(serverApp);
try { /** * After verifying the user auth token * and setting the token cookie … */ try { // get all recordings in the storage bucket const bucket = storage.bucket(BUCKET_NAME); const [files] = await bucket.getFiles();
audibles \= await Promise.all(
  files.map(async (file) \=> {
    const \[metadata\] \= await file.getMetadata();

    // return the url and timeCreated metadata
    return {
      url: file.publicUrl(),
      timeCreated: metadata.timeCreated,
    };
  })
);
} catch (error) { console.error(error); console.error(“Error fetching audibles”); return Astro.redirect(“/signin”); } }
//…
Now update the component template section to render the “audibles”. We’ll leverage the AudioPlayer component, passing it the audible url and the timeCreated metadata.
现在更新组件模板部分以呈现“音频”。我们将利用 AudioPlayer 组件,向它传递可听的 url 和 timeCreated 元数据。
In the code above, we display an Empty user interface empty if there are no audibles. Otherwise, we render a sorted list of audibles.
在上面的代码中,如果没有声音,我们会显示一个 Empty 用户界面为空。否则,我们呈现一个音频的排序列表。
Rendering the sorted list of audio recordings.
呈现音频录制的排序列表。
Submitting HTML forms 提交HTML表单
The final puzzle in our application is handling the submission of the feedback form.
我们应用程序中的最后一个难题是如何处理反馈表的提交。
I’ve included this feature to show an example of handling a form within the same server-side rendered page, i.e., without creating an API endpoint to handle the form request.
我提供了这个特性,以展示在同一服务器端呈现页面中处理表单的示例,即而不创建API端点来处理表单请求。
Take a look at the form element and notice how its method attribute is set to POST:
看看form元素,注意它的method属性是如何设置为 POST 的:
// 📂 src/layouts/BaseLayout.astro // …


