第八章
🚀 Understanding Astro 了解Astro
By Ohans Emmanuel 作者:Ohans Emmanuel
Chapter 8: Build Your Own Astro Integrations
第8章:构建自己的Astro集成
At the end of this chapter, you’ll join the order of mages who wield great power to bend Astro to their will with new functionality and behaviour.
在本章的最后,你将加入法师的行列,他们拥有强大的力量,以新的功能和行为来弯曲阿斯特罗。
What you’ll learn 您将学到的内容
- The relationship between Astro and the Vite module bundler
Astro和Vite模块捆绑器之间的关系 - The different types of integrations available in Astro
Astro中提供的不同类型的集成 - Build your first Astro integration
构建您的第一个Astro集成 - Understand the Astro hooks lifecycle
了解Astro钩子的生命周期 - Deepen your knowledge of building custom Astro feature integrations
加深您对构建自定义Astro功能集成的了解
Astro and Vite Astro和Vite
Before we dive into the beautiful world of Astro integrations, we need to know who’s powering the Astro build ship - and that’s Vite, the build tool all about speed, efficiency and flexibility. Think of Vite as our trusty co-pilot, helping us bundle our web pages and creating a lightning-fast development environment.
在我们深入了解Astro集成的美丽世界之前,我们需要知道谁在为Astro构建提供动力-那就是Vite,这是一款关于速度,效率和灵活性的构建工具。把Vite看作是我们值得信赖的副驾驶员,帮助我们捆绑我们的网页,并创建一个闪电般的开发环境。
The Astro Vite relationship.
Astro Vite关系
To build the custom integrations we’re dreaming of, we may need to go beyond Astro and venture deep into Vite territory, e.g., customising the build step with Vite plugins.
要构建我们梦寐以求的定制集成,我们可能需要超越Astro,深入Vite领域,例如:使用Vite插件定制构建步骤。
Now, I know this might not be very clear, especially when we start talking about Vite in the upcoming sections of this chapter. But fear not - you now know why Vite is essential to the build process, and I’ll explain with examples in the coming sections of this chapter.
现在,我知道这可能不是很清楚,特别是当我们在本章接下来的章节中开始讨论Vite时。但是不用担心—您现在知道为什么Vite对构建过程至关重要了,我将在本章接下来的章节中通过示例进行解释。
What are Astro integrations
什么是Astro集成
By definition, Astro integrations extend Astro with new functionality and behaviour within your project.
根据定义,Astro集成在您的项目中扩展了Astro的新功能和行为。
We’ll find ourselves building three types of Astro integrations, namely:
我们将发现自己构建三种类型的Astro集成,即:
- Renderers: these integrations enable a framework component’s rendering (typically server-side rendering and client-side hydration). Examples of this include the official React, Preact and Vue Astro integrations.
渲染器:这些集成支持框架组件的渲染(通常是服务器端渲染和客户端渲染)。这方面的例子包括官方的React,Preact和Vue Astro集成。 - Libraries: these integrations enable external library support within Astro. Examples of this include the official Tailwind and Partytown integrations.
库:这些集成支持Astro内部的外部库支持。这方面的例子包括官方Tailwind和Partitown整合。 - Features: these are integrations that extend the behaviour of Astro in a specific way, usually to support a user-defined feature set. Examples include the official sitemap integration that generates a sitemap1 when you build your Astro project.
功能:这些是以特定方式扩展Astro行为的集成,通常支持用户定义的功能集。例如,当您构建Astro项目时,官方的站点地图集成会生成站点地图 1 。
For most people, the majority of integration you build will be to support a particular feature, i.e., feature integrations. This will be the sole focus of this chapter. Once you have sufficient knowledge of building feature integrations, you can transfer the knowledge to library or renderer integrations.
对于大多数人来说,您构建的大部分集成都是为了支持特定的特性,即特征集成这将是本章的唯一重点。一旦您对建筑特征集成有足够的了解,就可以将这些知识转移到库或渲染器集成中。
Let’s get started with a contrived Astro integration.
让我们从一个人为的Astro集成开始。
Hello world. Sorry, Hello, Integration
Hello world.对不起,你好,集成
Let’s get you acquainted with a basic hello world Astro integration. Even though we will be wielding swords and slaying dragons soon, before that, you must get introduced to the tools of the trade.
让我们了解一个基本的hello world Astro集成。虽然我们很快就要剑屠龙了,但在此之前,你必须先了解一下贸易工具。
Project objective 项目目标
The goal for our first Astro integration is arguably straightforward: we will write a custom Astro integration that automatically logs a hello world message to the browser console on every application page.
我们的第一个Astro集成的目标可以说是简单明了的:我们将编写一个自定义的Astro集成,自动记录hello world消息到每个应用程序页面的浏览器控制台。
Have you got it?
你拿到了吗?
I heard a yes!
我听到了是的!
Your first custom integration
您的第一个自定义集成
We will approach this solution by injecting a script on every application page.
我们将通过在每个应用程序页面上注入脚本来实现这个解决方案。
How? 怎么做?
Where? 在哪里?
When? 什么时候?
Hold your horses, mate!
别着急,伙计!
Start by beginning a new Astro project with the familiar command:
首先,使用熟悉的命令开始一个新的Astro项目:
npm create astro@latest hello-astro-integration
Now that you’re a pro at this name the project whatever you like, e.g., hello-astro-integration and use a minimal (empty) template.
既然你是这个项目的专业人士,你可以随便给这个项目起名,例如, hello-astro-integration 并使用最小(空)模板。
Open the application directory in your favourite director and head over to the astro.config.mjs file.
打开您最喜欢的Director中的应用程序目录,然后转到 astro.config.mjs 文件。
The astro.config.mjs file includes configuration options for our Astro project. This is where we define integrations for our project, i.e., this is where the magic happens.
astro.config.mjs 文件包括Astro项目的配置选项。这就是我们定义项目集成的地方,即,这就是奇迹发生的地方
At the moment, our astro.config.mjs file should be in the default empty state, as shown below:
此时,我们的 astro.config.mjs 文件应该是默认的空状态,如下所示:
// 📂 astro.config.mjs import { defineConfig } from “astro/config”;
export default defineConfig({});
Let’s change that by adding an empty integrations list to the configuration:
让我们通过在配置中添加一个空的 integrations 列表来改变这一点:
// 📂 astro.config.mjs import { defineConfig } from “astro/config”;
export default defineConfig({ integrations: [], // 👀 look here });
In a nutshell, an Astro integration is represented by an object with name and hooks properties, as shown below:
简而言之,Astro集成由具有 name 和 hooks 属性的对象表示,如下所示:
// 📂 astro.config.mjs import { defineConfig } from “astro/config”;
// https://astro.build/config export default defineConfig({ // 👀 look here integrations: [ { name: “astro-hello”, hooks: {}, }, ], });
In the code block above, we’ve outlined the object in the integrations array.
在上面的代码块中,我们在 integrations 数组中概述了对象。
The name of the integration is astro-hello. We’ll discuss hooks in the coming section, but it represents extendable “hook” points within the Astro build lifecycle process.
集成的名称为 astro-hello 。我们将在下一节讨论钩子,但它代表了Astro构建生命周期过程中的可扩展“钩子”点。
For example, let’s leverage the first hook in the lifecycle process called astro:config:setup.
例如,让我们利用生命周期过程中名为 astro:config:setup 的第一个钩子。
This hook is the starting point for the entire build lifecycle. It is triggered on initialisation before Astro has resolved the project configuration. It’s the perfect place to inject scripts onto a new page or extend the project configuration before it’s resolved.
这个钩子是整个构建生命周期的起点。它在Astro解决项目配置之前在初始化时触发。它是将脚本注入到新页面或在解决之前扩展项目配置的完美地方。
Let’s take advantage of that by passing it into the hooks object and pointing it to a function invoked when the hook is triggered.
让我们通过将它传递到hooks对象中,并将其指向触发钩子时调用的函数来充分利用这一点。
// 📂 astro.config.mjs import { defineConfig } from “astro/config”;
export default defineConfig({ integrations: [ { name: “astro-hello”, hooks: { // 👀 hook: callbackFn “astro:config
”: (options) => {}, }, }, ], });Note the options parameter in the hook callback. It is an object with the following type definition:
注意钩子回调中的 options 参数。它是一个具有以下类型定义的对象:
{ config: AstroConfig; command: ‘dev’ | ‘build’; isRestart: boolean; updateConfig: (newConfig: Record<string, any>) => void; addRenderer: (renderer: AstroRenderer) => void; addWatchFile: (path: URL | string) => void; injectScript: (stage: InjectedScriptStage, content: string) => void; injectRoute: ({ pattern: string, entryPoint: string }) => void; }
Luckily it contains the injectScript method we’re interested in:
幸运的是,它包含了我们感兴趣的 injectScript 方法:
injectScript: (stage: InjectedScriptStage, content: string) => void;
stage denotes how the script content should be injected into the page, and there are four possible values 2: head-inline, before-hydration, page, and page-ssr.
stage 表示脚本 content 应该如何被注入到页面中,并且有四个可能的值 2 : head-inline 、 before-hydration 、 page 和 page-ssr 。
The page option will bundle and inject the script with other <script> tags defined in any Astro components on the page. The final output will eventually load this with a <script type="module>.
page 选项会将脚本与页面上任何Astro组件中定义的其他 <script> 标签捆绑并注入。最后的输出将最终使用 <script type="module> 加载它。
When I started tinkering with the integrations API, I tried silly things to get injectScript to work. I can confidently tell you these won’t work:
当我开始修补集成API时,我尝试了一些愚蠢的事情来让 injectScript 工作。我可以自信地告诉你,这些都行不通:
// 👀 Error: Failed to parse source for import analysis // because the content contains invalid JS syntax. injectScript(“page”, “console.log(‘Hello World’)”);
const log = () => console.log(“me”); // 👀 Uncaught ReferenceError: log is not defined options.injectScript(“page”, “log()”);
This saves you the futility I experienced until I looked in the Astro source code.
这为您节省了我在查看Astro源代码之前所经历的徒劳。
The content string parameter in injectScript refers to an import path. This is as shown below:
injectScript 中的 content string参数表示导入路径。具体如下所示:
import { defineConfig } from “astro/config”;
// https://astro.build/config export default defineConfig({ integrations: [ { name: “astro-hello”, hooks: { “astro:config
”: (options) => { // 👀 “page” option with an import path options.injectScript( “page”, `import ‘/src/scripts/ globalLog.js’` ); }, }, }, ], });Since we’re passing an import path to the script, let’s ensure the script exists.
由于我们要向脚本传递导入路径,所以确保脚本存在。
Create a new script with the following content in src/scripts/globalLog.js:
在 src/scripts/globalLog.js 中创建一个包含以下内容的新脚本:
// 📂 src/scripts/globalLog.js const logger = () => { const msg = “Hello Integrations”; console.log(`%c ${msg}`, “background: black; color: yellow”); };
logger();
The logger method calls the console.log method with a Hello integrations string while adding some colour3 to the message.
logger 方法用 Hello integrations 字符串调用 console.log 方法,同时给消息添加一些颜色 3 。
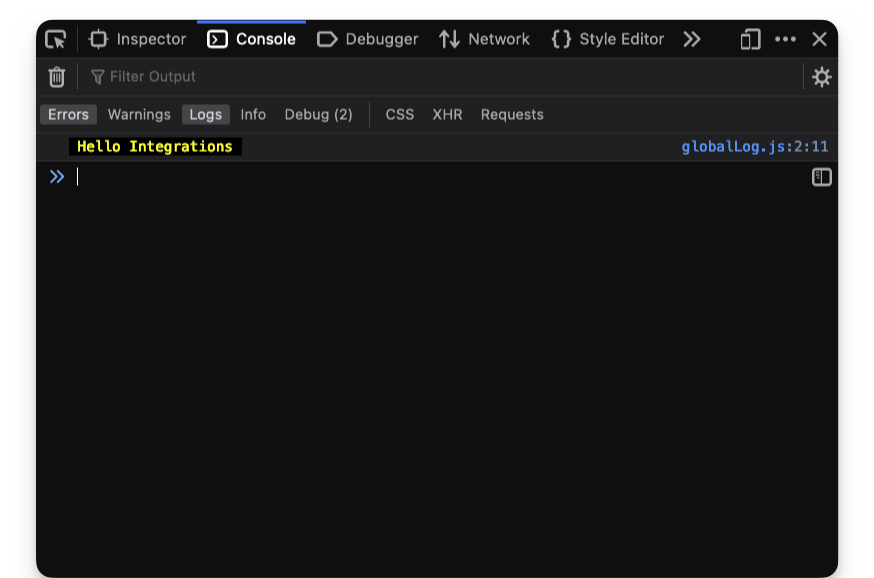
And voila! 瞧!
We have our first integration running as expected.
我们的第一个集成已经按预期运行。
Working integration log printed in the browser console.
在浏览器控制台中打印的工作集成日志。
We may create more pages, and the console message will be logged on every page in the application.
我们可能会创建更多的页面,控制台消息将记录在应用程序的每个页面上。
Printing a message to the server console
将消息打印到服务器控制台
Since we have hook points into the Astro build process, it is also possible to output logs to the server console.
由于我们有Astro构建过程的挂钩点,所以也可以将日志输出到服务器控制台。
This may be useful for usability or ascertaining that our custom integration works as expected.
这对于可用性或确定我们的定制集成是否按预期工作可能是有用的。
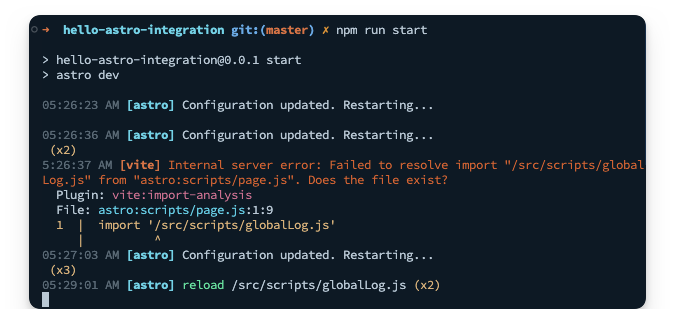
At the moment, here’s the mess my server logs look like:
目前,我的服务器日志看起来一团糟:
The (messy) Astro server logs.
Astro服务器的日志。
Yours should look familiar. This is from the incremental process of building our first integration.
你的应该很眼熟。这是构建我们第一个集成的渐进过程。
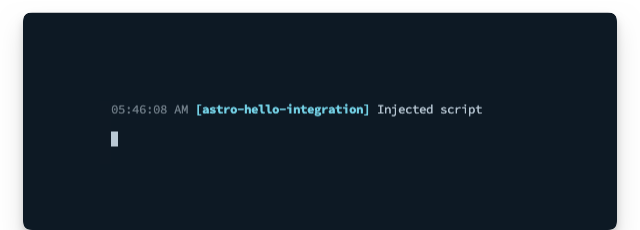
Let’s go ahead and print something to the logs once we’ve successfully injected our script onto the page.
让我们继续,在成功地将脚本注入到页面上后,将一些内容打印到日志中。
// …
hooks: { “astro:config
”: (options) => { options.injectScript(“page”, `import ‘/src/scripts/ globalLog.js’`); // 👀 add a new log
console.log("Injected hello integration script");
},},
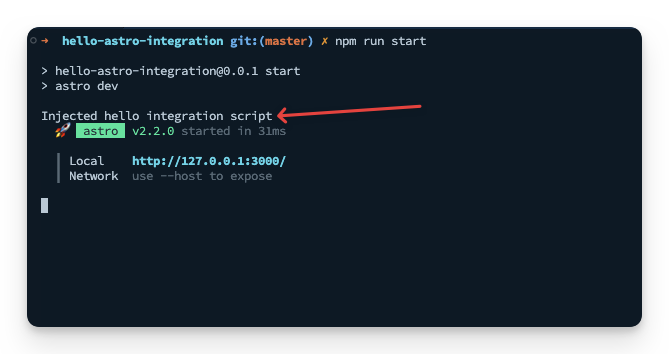
Restart the server for a clean slate, and we should have the log printed as shown below:
重新启动服务器以获得全新的记录,我们应该打印如下所示的日志:
The server log from our hello world integration.
我们的hello world集成的服务器日志。
Since we’re fancy developers who care about usability, let’s go ahead and make the log feel native to other Astro logs by adding some text formatting and colour via kleur.
由于我们是注重可用性的高级开发人员,让我们继续前进,通过添加一些文本格式和颜色,让日志感觉到其他Astro日志原生。
Install the kelur package:
安装 kelur 包:
npm install kleur
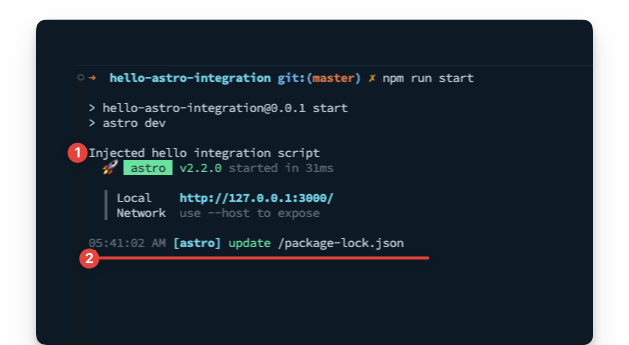
Once the installation is complete, we should now have a new log in the dev server that reads:
一旦安装完成,我们现在应该在dev服务器中有一个新的日志,其中写道:
05:41:02 AM [astro] update /package-lock.json
Example native astro server log.
本机astro服务器日志示例。
05:41:02 represents my current time.
05:41:02 表示我的当前时间。
Please do not ask me why I’m writing this chapter so early in the morning.
请不要问我为什么这么早就写这一章。
Let’s go ahead and make our log look similar. Instead of just using console.log, let’s introduce a logServerMessage that does our beautiful bidding as shown below:
让我们继续,使我们的日志看起来类似。让我们引入一个 logServerMessage ,而不是仅仅使用 console.log ,它执行我们美丽的出价,如下所示:
// 📂 astro.config.mjs
import kleur from “kleur”; import { defineConfig } from “astro/config”;
// 👀 The Intl.DateTimeFormat object enables language-sensitive // date and time formatting. const dateTimeFormat = new Intl.DateTimeFormat([], { hour: “2-digit”, minute: “2-digit”, second: “2-digit”, });
const logServerMessage = (message) => { // 👀 Get a new date string using the dateTimeFormat object const date = dateTimeFormat.format(new Date());
// log to console with kleur colours and formatting console.log(`${kleur.gray(date)} ${kleur .bold() .cyan(“[astro-hello-integration]”)} ${message} `); };
export default defineConfig({ // … same content as before });
Now we should have a beautiful log message that feels native to Astro, i.e., like the other server console logs.
现在我们应该有一个漂亮的日志消息,感觉是Astro原生的,即,与其他服务器控制台日志一样。
The custom integration ‘native feeling’ server log.
自定义集成“原生感觉”服务器日志。
Custom integrations as factory functions
作为工厂功能的自定义集成
Our current implementation is beginning to clog the Astro configuration file.
我们当前的实现开始阻塞Astro配置文件。
In practice, Instead of inlining our custom Astro integration, it’s likely to live in a separate file as a factory function, i.e., a function that creates and returns the Astro integration object.
在实践中,它不是内联我们的定制Astro集成,而是作为工厂函数存在于一个单独的文件中,即,创建并返回Astro集成对象的函数。
Let’s do that, i.e., something of a refactor.
让我们这样做,即,类似于重构。
Move the entire integration content into a new src/integrations/astro-hello.ts file.
将整个集成内容移动到新的 src/integrations/astro-hello.ts 文件中。
// 📂 src/integrations/astro-hello.ts import kleur from “kleur”;
const dateTimeFormat = new Intl.DateTimeFormat([], { hour: “2-digit”, minute: “2-digit”, second: “2-digit”, });
const logServerMessage = (message) => { const date = dateTimeFormat.format(new Date()); console.log(`${kleur.gray(date)} ${kleur .bold() .cyan(“[astro-hello-integration]”)} ${message} `); };
// 👀 Introduce a default export function that returns the Astro // integration object. export default function helloIntegration() { return { name: “astro-hello”, hooks: { “astro:config
”: (options) => { options.injectScript( “page”, `import ‘/src/scripts/ globalLog.js’` ); logServerMessage("Injected script");
},
},}; }
Now, add in Typescript types:
现在,添加Typescript类型:
// 📂 src/integrations/astro-hello.ts
import type { AstroIntegration } from “astro”;
const logServerMessage = (message: string) => { // … };
export default function helloIntegration(): AstroIntegration { // … }
Oh yeah! 哦耶!
Our implementation is coming around nicely.
我们的实施进展顺利。
Now, let’s clean up astro.config.mjs by importing our integration as shown below:
现在,让我们通过导入我们的集成来清理 astro.config.mjs ,如下所示:
// 📂 astro.config.mjs import { defineConfig } from “astro/config”; import astroHello from “./src/integrations/astro-hello”;
export default defineConfig({ // 👀 invoke the imported astroHello function in the list integrations: [astroHello()], });
And there we have it! A sparkly clean, custom Astro integration.
我们有了!一个闪闪发光的清洁,定制的天文集成。
The Astro hooks lifecycle
Astro钩生命周期
By definition, lifecycle refers to the series of changes in the life of an organism. For example, a butterfly starts as an egg, larva, pupa and then a full-blown adult.
根据定义,生命周期是指生物体生命中的一系列变化。例如,蝴蝶从卵、幼虫、蛹开始,然后是成熟的成虫。
Until human cloning becomes available, there’s a decent chance you also started as an infant, toddler, puberty then adulthood. At least, I hope so!
在克隆人类之前,有一个相当大的机会,你也开始从婴儿,蹒跚学步,青春期然后成年。至少,我希望如此!
In software, the term lifecycle represents a process’s different stages.
在软件中,术语生命周期表示过程的不同阶段。
With Astro hooks, we explicitly refer to the stages Astro goes through while building your application pages. This is the process from resolving the Astro configuration setup to spinning up a local server to bundling your pages statically or server-side rendered in production.
通过Astro钩子,我们明确地提到了Astro在构建应用程序页面时所经历的阶段。这是从解析Astro配置设置到启动本地服务器再到静态绑定页面或在生产环境中呈现服务器端的过程。
The entire process is what I call the Astro hooks lifecycle.
整个过程就是我所说的Astro钩子生命周期。
To get productive in developing custom integrations, we’ll need to know where in the lifecycle we need to effect a change or react to.
为了在开发自定义集成时获得生产力,我们需要知道在生命周期中的什么地方需要进行更改或做出反应。
Hooks are functions which are called at various stages of the build, and to interact with the build process, we leverage the following ten hooks:
Hooks是在构建的不同阶段调用的函数,为了与构建过程交互,我们使用了以下十个Hooks:
astro:config:setupastro:config:doneastro:server:setupastro:server:startastro:server:doneastro:build:startastro:build:setupastro:build:generatedastro:build:ssrastro:build:done
Ten seems like a lot to remember. Good thing it isn’t a dozen hooks (twelve). And you don’t have to memorise these. Instead, understand how they work; you can always refer to the official reference4 when needed.
十个似乎是很多要记住。还好不是一打钩子(十二)。你不用背这些。相反,了解它们是如何工作的;您可以随时参考官方参考 4 。
The when and why of hooks
hooks的时间和原因
One of the first questions I asked myself when I started tinkering with astro integrations was when exactly are these triggered, and is there some order of execution to them?
当我开始修修补补Astro集成时,我首先问自己的问题之一是这些集成到底是什么时候触发的,它们是否有某种执行顺序?
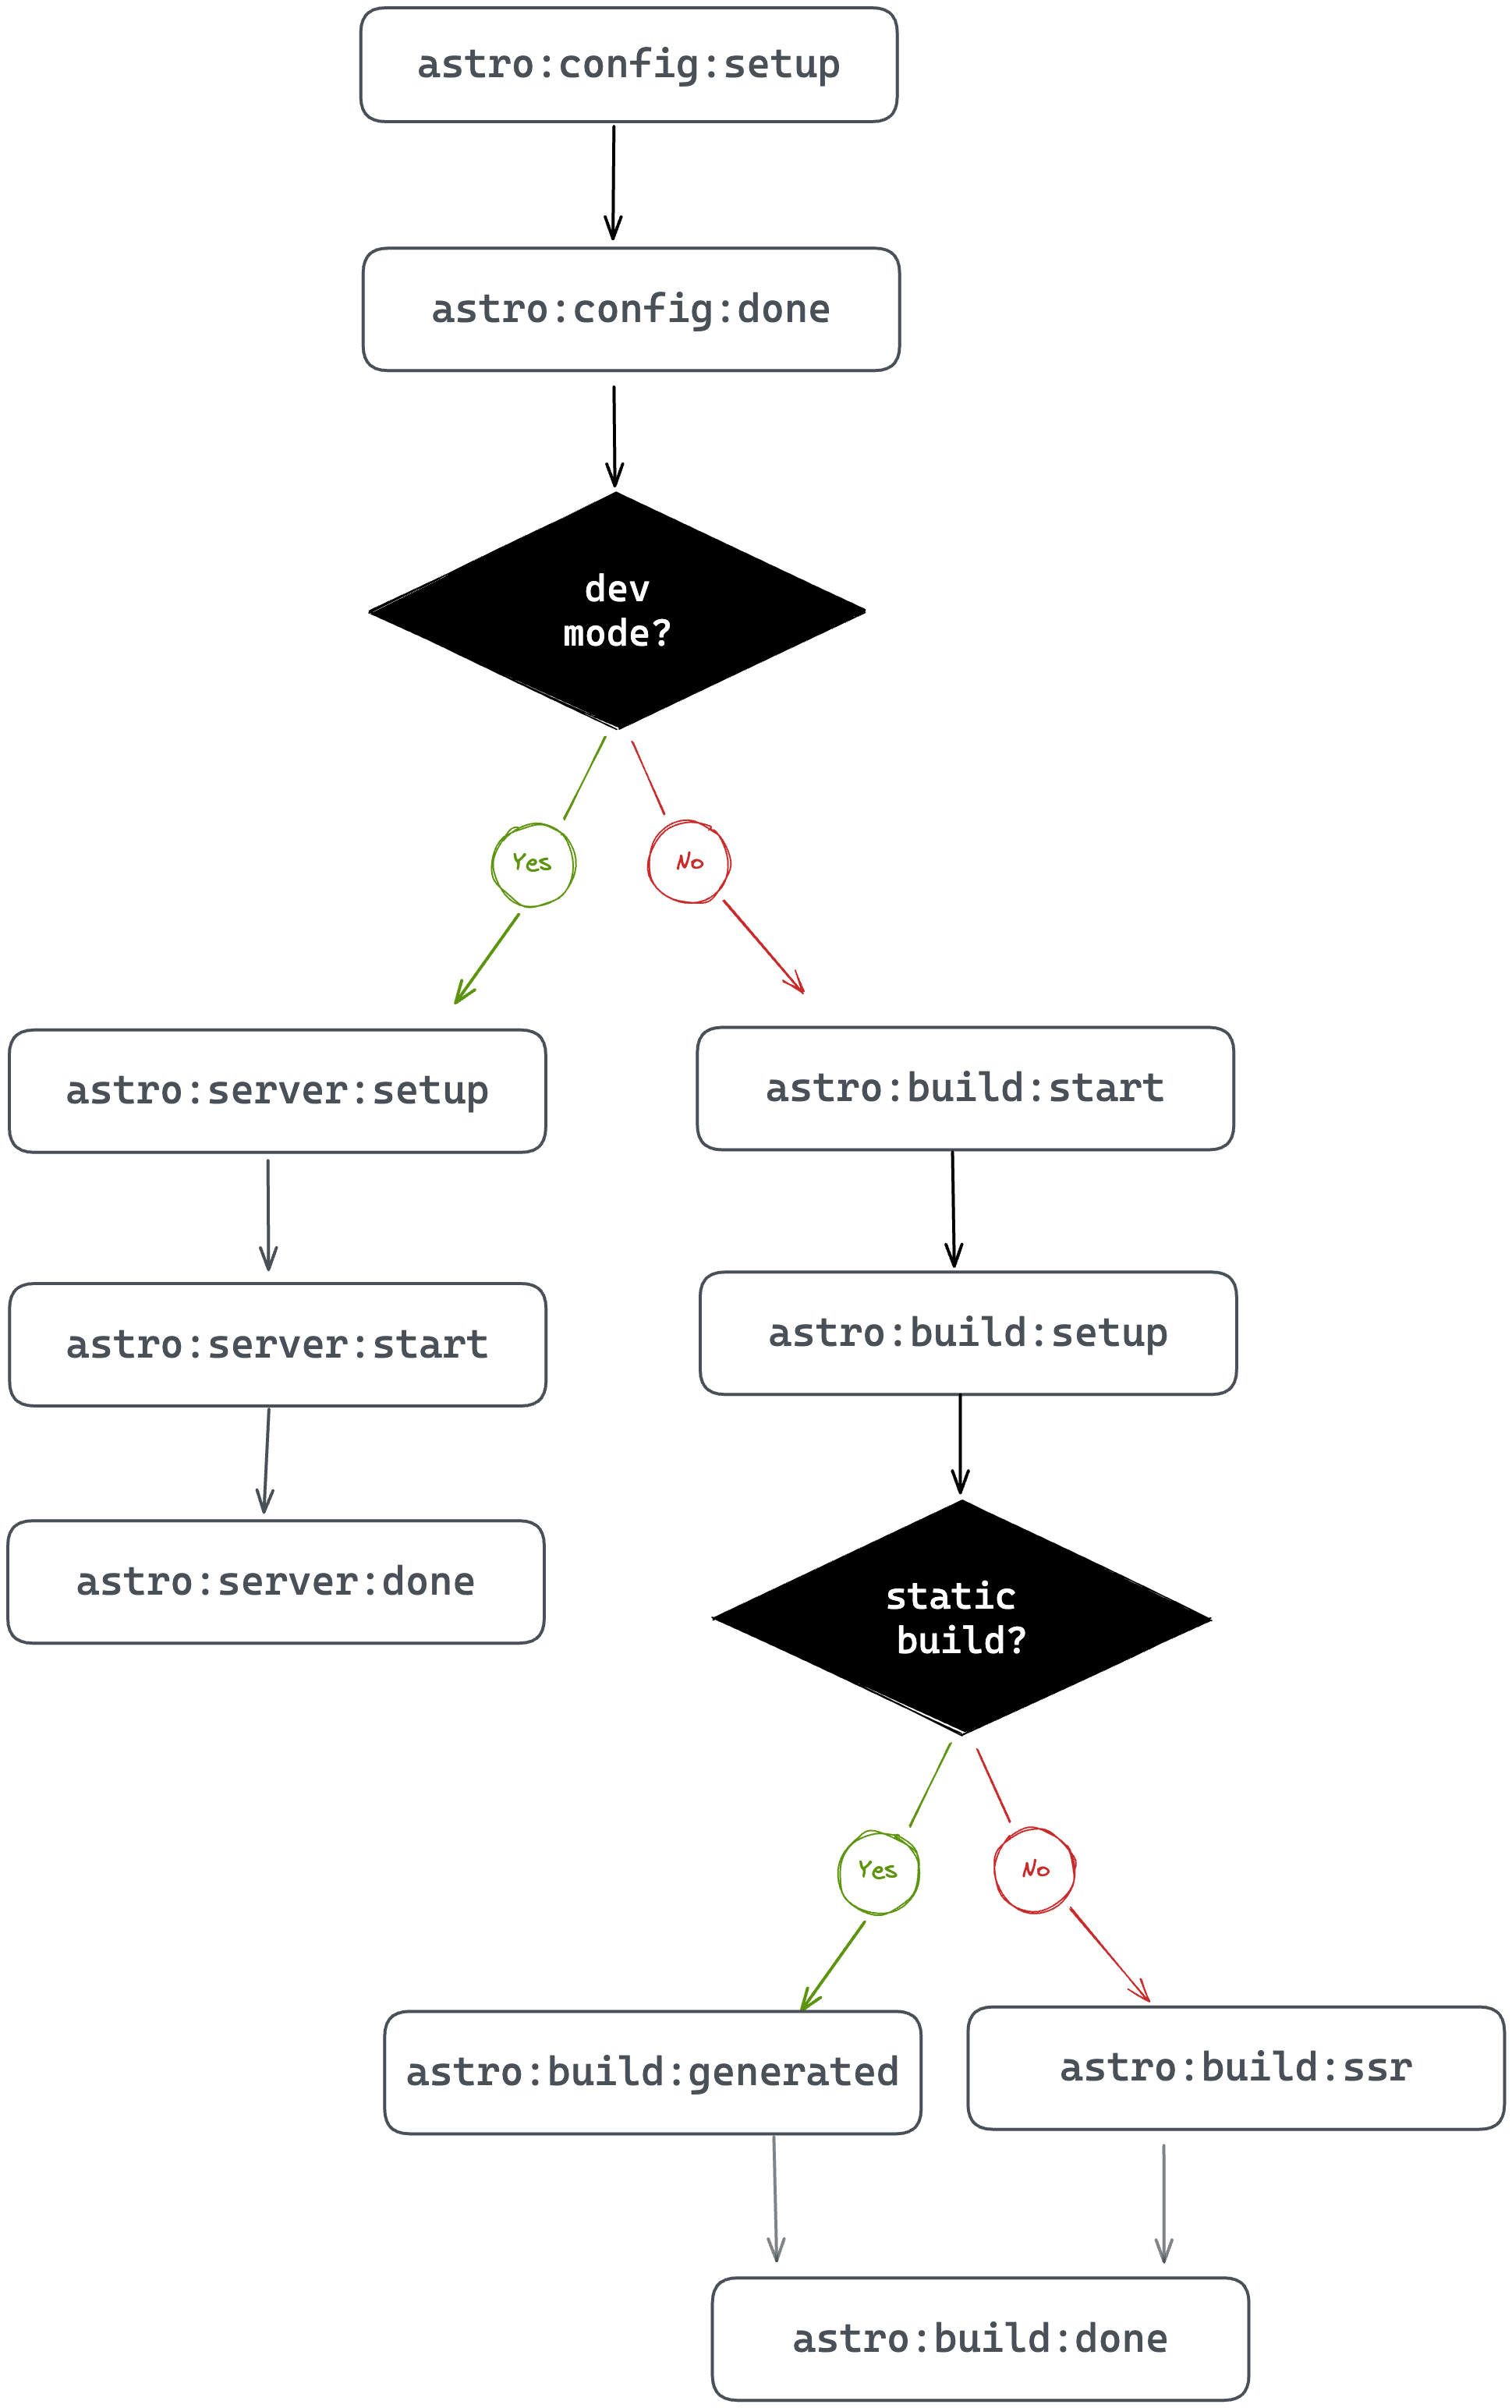
Well, the answer to these lies below, but first, consider the following diagram that depicts the order in which the hooks are executed:
好吧,这些问题的答案如下,但首先,考虑下图描述了钩子的执行顺序:
Execution order of Astro hooks .
Astro钩的执行顺序。
Kicking off the process are two hooks:
启动这个过程有两个钩子:
astro:config:setupastro:config:done
These hooks are always executed regardless of the Astro build process.
无论Astro构建过程如何,这些钩子总是被执行。
Here’s a breakdown of when these are executed and how we could leverage these in our custom integrations:
以下是执行这些功能的时间以及我们如何在定制集成中利用这些功能的细分:
Hook 钩
Executed when … 被处决的时候。。
Why use this …
为什么要用这个。。
astro:config: setup
Astro is initialised. This happens before the Astro project configuration (or Vite config) are resolved.
Astro已初始化。这发生在Astro项目配置(或Vite配置)解决之前。
Consider being the first one at the pub before it opens. You can cause a ruckus before anyone else even shows up! Similarly, this is where you swoop in to extend the project configuration e.g., updating the Astro config, applying Vite plugins, adding component renderers and injecting scripts before Astro knows what hit it.
在酒吧开门前,考虑成为第一个到达酒吧的人。你可以在其他人出现之前引起骚动!类似地,这也是您扩展项目配置的地方,例如,更新Astro配置,应用Vite插件,添加组件渲染器和注入脚本之前Astro知道是什么击中了它。
astro:config:done
The Astro config has been resolved. At this point, every astro:config:setup hook has been invoked for every integration in the project.
Astro配置已解决。此时,项目中的每个集成都调用了每个 astro:config:setup 钩子。
Like a perfect pint of beer, we patiently wait to grab the glass only after it’s been poured. Similarly, after the Astro config has finally got its act together and all the other integrations have done their thing, this is where we retrieve the final config for use in our integration.
就像一品脱啤酒一样,我们耐心地等待着,只有在倒完杯子之后才能拿起杯子。类似地,在Astro配置最终完成其动作并且所有其他集成完成其任务之后,这就是我们检索最终配置以用于集成的地方。
Once astro:config:done is fired, there are two branches to consider: development and production mode.
一旦 astro:config:done 被激发,有两个分支需要考虑:发展和生产模式。
When developing your apps locally, without initiating a production build typically via npm run build or astro build, the left side of the chart depicts the order of hooks execution in developer mode, i.e., the following hooks are invoked:
在本地开发应用时,通常不通过 npm run build 或 astro build 启动生产构建,图表的左侧描述了开发者模式下钩子执行的顺序,即:调用以下钩子:
astro:server:setupastro:server:startastro:server:done
These hooks are executed when building your app for local development.
这些钩子是在为本地开发构建应用时执行的。
Here’s a breakdown of when these are executed and how we could leverage these in our custom integrations:
以下是执行这些功能的时间以及我们如何在定制集成中利用这些功能的细分:
Hook 钩
Executed when … 被处决的时候。。
Why use this …
为什么要用这个。。
astro:server: setup
The Vite server has just been created in development mode. This is before the listen()server event is fired i.e., before starting the server.
Vite服务器刚刚在开发模式下创建。这是在触发 listen() 服务器事件之前,即,在启动服务器之前。
This is where we may update the Vite server options and middleware. The Vite dev server object is passed as an argument to our hook.
这是我们可能更新Vite服务器选项和中间件的地方。Vite dev服务器对象作为参数传递给我们的钩子。
astro:server:start
The Vite listen()method has just been fired i.e., the server is running.
Vite listen() 方法刚刚启动,即,服务器正在运行。
Like tech-savvy superheroes, we can jump in here to save the day at the last minute - well, if that involves intercepting network requests. This is where we may jump in to intercept network requests at the specified dev server address (passed as an argument to our hook)
就像精通技术的超级英雄一样,我们可以在最后一刻跳到这里保存世界—如果这涉及拦截网络请求的话。这就是我们可以跳到指定的dev服务器地址拦截网络请求的地方(作为参数传递给我们的钩子)
astro:server:done
The dev server has just been closed.
开发服务器刚刚关闭。
Like cleaners coming in after the party to sweep up the mess, this is where we run cleanups. If you wish to clean up any side effects triggered during astro:server:setup or astro:server:start, here’s where you do so!
就像清洁工在派对结束后进来打扫垃圾一样,这里是我们清理的地方。如果你想清除在 astro:server:setup 或 astro:server:start 期间触发的任何副作用,这里是你这样做的地方!
When we run a production build, two hooks will always be triggered. These are
当我们运行生产构建时,总是会触发两个钩子。这些是
astro:build:startastro:build:setup
And here’s a breakdown of when these are executed and how we could leverage these in our custom integrations:
下面是执行这些功能的时间以及我们如何在定制集成中利用这些功能的细分:
Hook 钩
Executed when … 被处决的时候。。
Why use this …
为什么要用这个。。
astro:build: start
The Astro config is completely resolved but before the production build begins.
Astro配置已完全解决,但在生产构建开始之前。
The production build is about to start but perhaps you want to set up some global objects or clients needed during the build? Here’s where we do so.
生产构建即将开始,但您可能想要设置构建过程中所需的一些全局对象或客户端?这就是我们要做的地方。
astro:build:setup
The build is just about to get started. At this point, the build config is fully constructed.
建设即将开始。此时,构建配置已完全构建。
To steal the perfect phrase from the official Astro documentation: this is our final chance to modify the build. It’s like getting ready for a night out - we’ve put on our best outfit and look sharp, but we just need to add that one last accessory to complete the look. This is our chance to do just that - to overwrite some defaults and make sure everything is looking top-notch. I must mention that if you’re not sure whether to use this hook or astro:build:start, go for astro:build:start instead.
从Astro官方文档中窃取完美的短语:这是我们最后一次机会来修改模型这就像是准备一个晚上外出-我们已经穿上了我们最好的衣服,看起来很犀利,但我们只需要添加最后一个配件来完成外观。这是我们做到这一点的机会-覆盖一些默认值并确保一切看起来都是一流的。我必须提到,如果你不确定是否使用这个钩子或 astro:build:start ,请使用 astro:build:start 。
Now, depending on whether the page being built is statically generated or to be server-side rendered, either astro:build:generated or astro:build:ssr will be invoked, and finally, astro:build:done.
现在,取决于正在构建的页面是静态生成的还是服务器端呈现的,将调用 astro:build:generated 或 astro:build:ssr ,最后调用 astro:build:done 。
Yes, you guessed it. Here’s the final breakdown of when these are executed and how we could leverage these in our custom integrations:
是的,你猜对了。以下是这些执行时间以及我们如何在自定义集成中利用它们的最终细分:
Hook 钩
Executed when … 被处决的时候。。
Why use this …
为什么要用这个。。
astro:build: generated
The static production build has completely generated routes and assets.
静态生产构建已经完全生成了路由和资产。
Access generated routes and assets before build artefacts are cleaned up. As per the official docs, this is an uncommon case and we might be better off using astro:build:done in many cases., except we really need to access these files before cleanup.
在清理构建工件之前访问生成的路线和资产。根据官方文档,这是一种不常见的情况,在许多情况下,我们最好使用 astro:build:done 。但我们真的需要在清理之前访问这些文件。
astro:build:ssr
A production SSR build is completed.
已完成生产SSR构建。
To get access to the SSR manifest. This is helpful when creating custom SSR builds.
才能拿到战略行动系统的名单。这在创建自定义SSR版本时很有帮助。
astro:build:done
The production build is complete!
生产构建完成!
This is where we may access the generated routes and assets e.g., to be copied somewhere. For transforming generated assets, consider using a Vite plugin and configuring astro:config:setup.
这是我们可以访问生成的路线和资产的地方,例如,复制到某个地方。为了转换生成的资产,请考虑使用Vite插件并配置 astro:config:setup 。
Examining the hooks evaluation order
检查挂钩评估顺序
Even though we’ve taken time to explore when the Astro hooks are invoked, there’s no better teacher than practice.
尽管我们花了时间探索Astro钩子何时被调用,但没有比练习更好的老师了。
Let’s go ahead and write out a simple integration that spits out a log to the server console when invoked. Then, you can tinker with building several pages for production and inspect the logs.
让我们继续编写一个简单的集成,在调用时向服务器控制台输出日志。然后,您可以修修补补构建几个用于生产的页面并检查日志。
Our eventual goal is to have a custom integration that looks something like this:
我们的最终目标是有一个自定义集成,看起来像这样:
{ name: “some-identifier”, hooks: { “hook-name”: () => { // log hook name so we know it’s been invoked } } }
Makes sense? 有道理吗
Let’s go ahead and build this out.
让我们继续把它建出来。
If building along, extend the hello world application or create a new Astro application with the following custom integration:
如果沿着请扩展hello world应用程序或创建一个新的Astro应用程序,并使用以下自定义集成:
// 📂 src/integrations/lifecycle-logs.ts
import kleur from “kleur”; import type { AstroIntegration } from “astro”;
//Create a new dateTimeFormat object const dateTimeFormat = new Intl.DateTimeFormat([], { hour: “2-digit”, minute: “2-digit”, second: “2-digit”, });
export const lifecycleLogs = () => { const hooks = [ `astro:config
`, `astro:config`, `astro:server`, `astro:server`, `astro:server`, `astro:build`, `astro:build`, `astro:build`, `astro:build`, `astro:build`, ] as const;// base integration structure. “hooks” will be updated let integration: AstroIntegration = { name: “astro-lifecycle-logs”, hooks: {}, };
// loop over the hooks list and add the name and log for (const hook of hooks) { integration.hooks[hook] = () => { // 👀 Get a new date string const date = dateTimeFormat.format(new Date());
  // log with kleur colours and formatting
  console.log(\`${kleur.gray(date)} ${kleur
    .bold()
    .yellow("\[lifecycle-log\]")} ${kleur.green(hook)}
    \`);
};
}
return integration; };
export default lifecycleLogs;
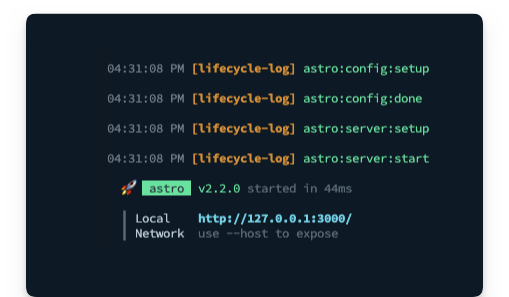
Import lifecycleLogs and add it to your project’s integration list, then (re)start your application to see the logs in the console as shown below:
导入 lifecycleLogs 并将其添加到项目的集成列表中,然后(重新)启动您的应用程序以查看控制台中的日志,如下所示:
The dev lifecycle hooks.
dev生命周期挂钩。
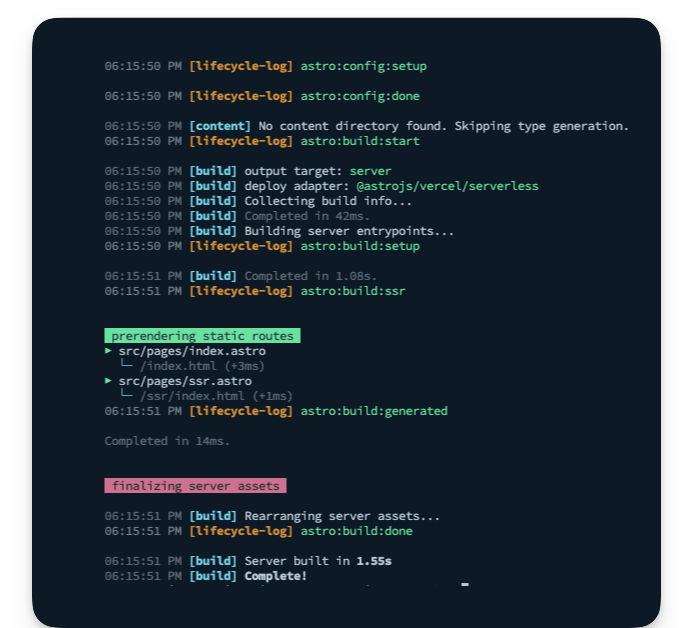
As an exercise, I suggest you add a new SSR page and run a production build to see the order of hooks execution logged.
作为练习,我建议您添加一个新的SSR页面并运行一个生产构建,以查看记录的钩子执行顺序。
Here’s an example with two pages:
下面是一个有两页的示例:
- a static
index.astropage
静态index.astro页面 - a server-side rendered
ssr.astropage
服务器端渲染ssr.astro页面
The entire hook lifecycle logged.
记录整个钩子生命周期。
Build a default prerender integration
构建默认预渲染集成
When we enable SSR in our project, we can also opt-in to prerendering, i.e., to statically render some files at build time.
当我们在项目中启用SSR时,我们还可以选择加入预渲染,即,在构建时静态渲染一些文件。
The way to do this is to add an export const prerender = true to the desired static page(s).
实现此目的的方法是将 export const prerender = true 添加到所需的静态页面。
There was a time Astro didn’t support hybrid rendering, so this is an excellent feature.
有一段时间Astro不支持混合渲染,所以这是一个很好的特性。
However, in practice, we may have multiple static pages and just a few server-side rendered ones; adding export const prerender = true to all the static pages gets painfully annoying.
然而,在实践中,我们可能有多个静态页面,而只有少数服务器端呈现的页面;在所有静态页面中添加 export const prerender = true 会让人非常讨厌。
The other day I started building an Astro application predominantly statically rendered, and then I realised I needed one server-side rendered route. At this point, I change my astro.config.mjs file to include output: server. Consequently, I had to go to all the existing static pages to add export const prerender = true. This wasn’t pleasant.
前几天,我开始构建一个主要是静态渲染的Astro应用程序,然后我意识到我需要一个服务器端渲染路由。此时,我将 astro.config.mjs 文件更改为包含 output: server 。因此,我不得不去所有现有的静态页面添加 export const prerender = true 。这并不愉快。
Project objective 项目目标
The goal of our custom integration is to flip the default hybrid rendering behaviour of Astro.
我们自定义集成的目标是翻转Astro默认的混合渲染行为。
By default, with an output: server in our configuration, all pages are assumed to be server-rendered, and we must explicitly add export const prerender = true to our static pages.
默认情况下,在我们的配置中使用 output: server ,所有页面都被假定为服务器渲染,我们必须显式地将 export const prerender = true 添加到静态页面中。
We want to achieve a different behaviour for cases when we have more static pages, i.e.,
当我们有更多静态页面时,我们希望实现不同的行为,即,
- By default, with
output: serverin our configuration, render all pages statically at build time, i.e., prerender by default.
默认情况下,在我们的配置中使用output: server,在构建时静态呈现所有页面,即,默认情况下预渲染。 - Add
export const prerender = falseto render a page server-side explicitly.
添加export const prerender = false显式呈现页面服务器端。
See what we’ve done there?
看到我们做了什么吗?
Now, please give it a think. How do we achieve this?
现在,请给予一下。我们如何做到这一点?
At the time of writing, there’s a public roadmap for Astro to support default pre-rendering internally. Until then, let’s bend Astro to our will.
在撰写本文时,有一个公开的Astro路线图,以支持默认的内部预渲染。在那之前让阿斯特罗服从我们的意志
Integration API 集成API
We will design our integration as a factory function named prerenderByDefault.
我们将把集成设计为一个名为 prerenderByDefault 的工厂函数。
Our users will go ahead and invoke this function within their integrations list, as shown below:
我们的用户将继续在他们的 integrations 列表中调用这个函数,如下所示:
export default defineConfig({ integrations: [prerenderByDefault()], });
By default, we will log messages to the server console but expose a silent parameter to prevent server console logs.
默认情况下,我们会将消息记录到服务器控制台,但公开一个 silent 参数以防止服务器控制台日志。
Astro integrations usually support configurations by passing arguments to the factory function. Below’s our proposed API:
Astro集成通常通过向工厂函数传递参数来支持配置。下面是我们建议的API:
export default defineConfig({ integrations: [ prerenderByDefault({ silent: true, // or false (boolean) }), ], });
Finally, we will add some basic validation within our integration. If the user doesn’t have an output: server or adapter option in their configuration, we will skip pre-rendering by default. This is because we only want our integration to take effect during hybrid rendering, which is only activated with output: server in the user’s project configuration.
最后,我们将在集成中添加一些基本的验证。如果用户的配置中没有 output: server 或 adapter 选项,我们将默认跳过预渲染。这是因为我们只希望我们的集成在混合渲染期间生效,混合渲染仅在用户项目配置中使用 output: server 激活。
Technical solution overview
技术解决方案概述
At its core, our integration will take advantage of two lifecycle hooks: astro:config:setup and astro:config:done as shown below:
在其核心,我们的集成将利用两个生命周期挂钩: astro:config:setup 和 astro:config:done 如下所示:
export default function prerenderByDefault() { return { name: “astro-prerender-by-default”, hooks: { “astro:config
”() {}, “astro:config“(options) {}, }, }; }In astro:config:done, we will retrieve the project’s resolved configuration and perform our validation.
在 astro:config:done 中,我们将检索项目的解析配置并执行验证。
“astro:config
“(options) {// 1. Get resolved config from options.config // 2. Validate that the config object has the right // output and adapter values
}
In astro:config:setup, we will swoop in and extend the user’s Astro project configuration by applying a custom Vite plugin.
在 astro:config:setup 中,我们将通过应用自定义Vite插件来扩展用户的Astro项目配置。
“astro:config
“(options) { // Apply a custom Vite plugin here }When Astro builds our project, it does so using Vite. Integrations are to Astro what plugins are to Vite. To extend Vite, we use plugins.
当Astro构建我们的项目时,它使用Vite。集成对于Astro就像插件对于Vite一样。为了扩展Vite,我们使用插件。
We can tap into the Vite build lifecycle to access the user’s Astro code (particularly their pages) during the build process.
我们可以进入Vite构建生命周期,在构建过程中访问用户的Astro代码(特别是他们的 pages )。
Now, here comes the fun part.
有趣的部分来了。
First, we will parse the Astro code into Abstract Syntax Trees (ASTs).
首先,我们将Astro代码解析成抽象语法树(ASTs)。
Essentially, an AST serves as a means of representing the code’s structure in a programming language. Just as a sentence can be broken down into nouns, verbs, and adjectives, an AST dissects code into its essential components - variables, functions, and operations - and reflects their relationships in a tree-like structure.
从本质上讲,AST作为一种在编程语言中表示代码结构的手段。就像句子可以分解成名词、动词和形容词一样,AST将代码分解成基本组成部分—变量、函数和操作,并以树形结构反映它们之间的关系。
A valid Astro component may take different forms; however, the frontmatter must always be the first child node of the root node.
有效的Astro组件可以采取不同的形式;但是, frontmatter 必须始终是根节点的第一个子节点。
For example, the following is correct:
例如,以下是正确的:
// frontmatter
// markup goes here <h1> Hello world </h1>
The following is invalid:
以下内容无效:
<h1> Hello world </h1>
// frontmatter
With this heuristic, we will grab the first child node in the root of our parsed AST and make some decisions:
通过这个启发式,我们将获取解析的AST根中的第一个子节点并做出一些决定:
- If the file already has a
prerenderexport, do nothing, i.e., leave the file as is.
如果文件已经有prerender导出,则不执行任何操作,即保持文件原样。 - Otherwise, update the code to include
export const prerender = true, i.e., we will update the code within our integration. It’s important to note that this only transforms the page’s code to be built. It does not update the local file.
否则,更新代码以包括export const prerender = true,即,我们将在集成中更新代码。需要注意的是,这只会转换要构建的页面代码。它不更新本地文件。 - Finally, if a page has no frontmatter, we will create one and include the
export const prerender = truecode snippet.
最后,如果一个页面没有frontmatter,我们将创建一个并包含export const prerender = true代码片段。
Initialising projects via CLI flags
通过CLI标志初始化项目
The create astro command is robust. However, sometimes you don’t have the patience to select every option via prompts.
create astro 命令是健壮的。然而,有时你没有耐心通过提示选择每个选项。
In such cases, use the CLI flags as shown below.
在这种情况下,请使用如下所示的CLI标志。
Initialise a new project with the following command:
使用以下命令初始化新项目:
npm create astro@latest — —template=minimal —typescript=strictest —git —install astro-integration-prerender-by-default
This will set up a new Astro project in the prerenderbyDefaultdirectory with CLI flags passed instead of via prompts, i.e., --template=minimal will use the minimal template, --template=strictest will use the strictest typescript config, --git will initialise a git repo and --install will install the dependencies.
这将在 prerenderbyDefault 目录中设置一个新的Astro项目,并传递CLI标志,而不是通过提示符,即, --template=minimal 将使用最小模板, --template=strictest 将使用 strictest typescript config, --git 将初始化git repo, --install 将安装依赖项。
Here’s a quick table of the available CLI flags:
以下是可用CLI标志的快速表格:
Name 姓名、名称
Description 项目名称
--template <name>
Specify the template. Where name could be any of the directories in https://github.com/withastro/astro/tree/main/examples/.
指定模板。其中 name 可以是https://github.com/withastro/astro/tree/main/examples/中的任何目录。
--install / --no-install
Install dependencies (or not).
安装依赖项(或不安装)。
--git / --no-git
Initialize git repo (or not).
初始化git repo(或不初始化)。
--yes (-y)
Skip all prompts and accept the defaults.
跳过所有提示并接受默认值。
--no (-n)
Skip all prompts and decline the defaults.
跳过所有提示并拒绝默认值。
--dry-run
Walk through the project creation steps without any actual execution. Useful for a “dry run”
在不执行任何实际执行的情况下,遍历项目创建步骤。用于“试运行”
--skip-houston
Skip the Houston animation. If in a hurry, this saves some time and starts the prompt directly.
跳过休斯顿动画。如果很匆忙,这可以节省一些时间,并直接启动提示。
--typescript <option>
Where option is strict , strictest orrelaxed
其中 option 为 strict 、 strictest 或 relaxed
Now, change the directory and run the new Astro application:
现在,更改目录并运行新的Astro应用程序:
cd ./astro-integration-prerender-by-default && npm run start
By default, this should start the application on an available port, e.g., localhost:3000.
默认情况下,这应该在可用端口上启动应用程序,例如,#0号。
Setting up the integration
设置集成
Create a new index file in integrations/prerenderByDefault and create the integration factory function as shown below:
在 integrations/prerenderByDefault 新建一个 index 文件,创建集成工厂函数,如下所示:
export default function prerenderByDefault() { return { name: “astro-prerender-by-default”, hooks: { “astro:config
”() {}, “astro:config”() {}, }, }; }Let’s add support for configuring the integration by accepting a configuration object.
让我们通过接受配置对象来添加对配置集成的支持。
Go ahead and create a types.ts file in integrations/prerenderByDefault as shown below:
继续在 integrations/prerenderByDefault 中创建一个 types.ts 文件,如下所示:
export type Config = | { silent?: boolean, } | undefined;
Now, let’s add a config parameter to the prerenderByDefault factory function and type its return value as shown below:
现在,让我们在 prerenderByDefault factory函数中添加一个 config 参数,并键入其返回值,如下所示:
import type { AstroIntegration } from “astro”; import type { Config } from “./types”;
export default function prerenderByDefault(config: Config): AstroIntegration { // … }
Now go ahead and add the integration in the project’s config file:
现在继续在项目的配置文件中添加集成:
import { defineConfig } from “astro/config”; import prerenderByDefault from “./integrations/prerenderByDefault”;
export default defineConfig({ integrations: [prerenderByDefault()], });
Validating a resolved Astro configuration
验证已解析的Astro配置
Let’s go ahead to handle our integration validation. First, we will create an isValidAstroConfig method to receive an Astro configuration and a validation result.
让我们继续处理我们的集成验证。首先,我们将创建一个 isValidAstroConfig 方法来接收Astro配置和验证结果。
Here’s the implementation below:
下面是实现:
// 📂 prerenderByDefault/isValidAstroConfig.ts
import type { AstroConfig } from “astro”;
/** * @param config: the fully resolved astro project config * @returns validation result */ export const isValidAstroConfig = (config: AstroConfig) => { if (config.output !== “server”) { return { type: “invalid_output_config”, value: false } as const; }
if (!config.adapter) { return { type: “invalid_adapter_config”, value: false } as const; }
/** * configuration is valid */ return { type: “success”, value: true } as const; };
I’ve decided to return an object instead of simple boolean values to utilise typescript’s exhaustiveness checking.
我决定返回一个对象,而不是简单的布尔值,以利用typescript的穷举检查。
Now, let’s leverage isValidAstroConfig in the astro:config:done hook by doing the following:
现在,让我们通过执行以下操作在 astro:config:done 钩子中利用 isValidAstroConfig :
- Retrieve the final Astro project configuration
检索最终Astro项目配置 - Validate the configuration
验证配置 - Log messages to the server console based on the validation result
根据验证结果将消息记录到服务器控制台
Here’s how: 以下是方法:
export default function prerenderByDefault(config: Config): AstroIntegration { return { name: “astro-prerender-by-default”, hooks: { “astro:config
”() {}, // 👀 look below “astro:config“(options) { // get the ‘silent’ integration config property, default to false. const silent = config?.silent ?? false; // validate the resolved project configuration
const validationResult \= isValidAstroConfig(options.config);
/\*\*
\* Leverage Typescript exhaustive check to handle all
\* validation types and log messages where appropriate
\*/
switch (validationResult.type) {
case "invalid\_adapter\_config":
log({
silent,
message: \`Adapter not set for hybrid rendering. Skipping\`,
});
return;
case "invalid\_output\_config":
log({
silent,
message: \`Config output not set to "server". Skipping\`,
});
return;
case "success":
return;
default:
const \_exhaustiveCheck: never \= validationResult;
return \_exhaustiveCheck;
}
},
},}; }
We’re calling a log function to write messages to the server console depending on the validation result, but this function does not exist.
我们正在调用一个 log 函数,根据验证结果将消息写入服务器控制台,但是这个函数不存在。
We’ve written similar log functions, so here’s the code for this one:
我们已经编写了类似的日志函数,下面是这个函数的代码:
// 📂 prerenderByDefault/log.ts
import kleur from “kleur”;
type LogOptions = { silent: boolean, message: string, };
const dateTimeFormat = new Intl.DateTimeFormat([], { hour: “2-digit”, minute: “2-digit”, second: “2-digit”, });
export const log = (options: LogOptions) => { // do not log if the “silent” argument is passed if (options.silent) { return; }
// get new date const date = dateTimeFormat.format(new Date());
// log to the console with colours and text formatting console.log(`${kleur.gray(date)} ${kleur .bold() .magenta(“[astro-prerender-by-default]”)} ${options.message} `); };
Now make sure to import the log function in prerenderByDefault/index.ts:
现在确保在 prerenderByDefault/index.ts 中导入 log 函数:
import { log } from “./log”; …
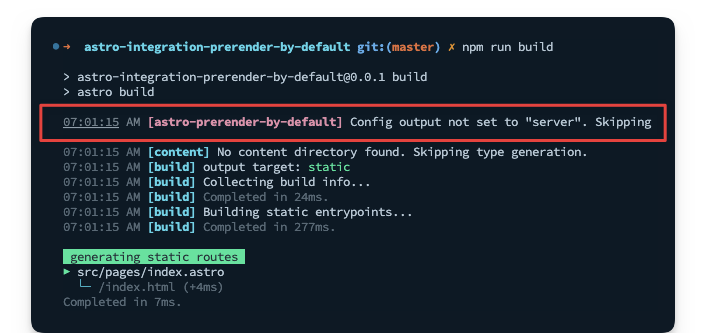
Now if we go ahead and build the project with npm run build, we should have our integration validation log displayed as shown below:
现在,如果我们继续使用 npm run build 构建项目,我们应该会显示集成验证日志,如下所示:
Validation server log. 验证服务器日志。
This is expected because the project does not have a server output configured. In this case, hybrid rendering cannot be utilised.
这是预期的,因为项目没有配置 server 输出。在这种情况下,不能使用混合渲染。
Applying Vite plugins in custom integrations
在自定义集成中应用Vite插件
Astro uses Vite under the hood; as such, it’s possible to pass additional configurations5 to Vite in the astro.config.mjs file, e.g.,
Astro在引擎盖下使用Vite;因此,可以在 astro.config.mjs 文件中将附加配置 5 传递给Vite,例如,
{ vite: { //This adds a custom plugin directly to the Astro config plugins: [myPlugin()]; } }
Consequently, we can take advantage of this in our integration.
因此,我们可以在集成中利用这一点。
Remember from the lifecycle hooks section that astro:config:setup is where we may swoop in to extend the project configuration. Let’s do so now:
请记住,在生命周期钩子部分, astro:config:setup 是我们可能会突然进入以扩展项目配置的地方。让我们现在这样做:
import { injectVitePlugin } from “./injectVitePlugin”; // …
return { name: “astro-prerender-by-default”, hooks: { // 👀 look here “astro:config
“(options) { options.updateConfig({ vite: { plugins: [injectVitePlugin()], }, }); }, } // …In the plugins array, we’re invoking injectVitePlugin(), which should return a valid Vite plugin.
在plugins数组中,我们调用 injectVitePlugin() ,它应该返回一个有效的Vite插件。
Oh, but what’s a valid Vite plugin, you might ask?
哦,但是什么是一个有效的Vite插件,你可能会问?
Similar to Astro integrations, a Vite plugin is represented by an object with a name property and specific hooks, which are methods on the object, e.g.,
与Astro集成类似,Vite插件由具有name属性和特定钩子的对象表示,钩子是对象上的方法,例如
{ name: “vite-plugin-${name}, configResolved() { // Called after the Vite config is resolved } }
Let’s go ahead and write out a basic version of injectVitePlugin:
让我们继续写一个基本版本的 injectVitePlugin :
import type { Plugin } from “vite”;
export const injectVitePlugin = (): Plugin => { //Our prerender plugin to be fleshed out const prerenderByDefaultPlugin = { name: "" };
return { // name follows the pattern vite-plugin-${framework}-${feature} name: “vite-plugin-astro-inject-default-prerender”, configResolved: (options) => { //Grab the Vite plugins in the resolved config // and add our plugin as the first in the list (options.plugins as Plugin[]).unshift(prerenderByDefaultPlugin); }, }; };
We will flesh out this basic structure, but first consider that in the astro hooks lifecycle, astro:config:setup runs before astro:config:done.
我们将充实这个基本结构,但首先考虑在astro hooks的生命周期中, astro:config:setup 在 astro:config:done 之前运行。
We’re updating the Vite plugins in astro:config:setup. However, we’re validating the project config in astro:config:done.
我们正在更新 astro:config:setup 中的Vite插件。但是,我们正在验证 astro:config:done 中的项目配置。
We’ll likely run into a race condition here, i.e., updating the Vite plugin list in astro:config:setup before astro:config:done has wholly validated the project’s config.
我们很可能会遇到一个竞争条件,即,在 astro:config:done 之前更新 astro:config:setup 中的Vite插件列表已经完全验证了项目的配置。
How may we resolve this?
我们该如何解决这个问题?
Let’s leverage a promise.
让我们兑现承诺吧。
We will initialise a promise that’s only resolved after validation is complete, and we will await the promise resolution in injectVitePlugin. Luckily, astro:config:setup can take in async functions. Particularly in the vite plugin function(s).
我们将初始化一个只有在验证完成后才能解决的promise,我们将在 injectVitePlugin 中等待promise的解决。幸运的是, astro:config:setup 可以接受异步函数。特别是vite插件函数。
Let’s walk through the changes required to achieve this.
让我们看看实现这一点所需的更改。
First, let’s introduce a ValidationResult type in our types.ts file:
首先,让我们在 types.ts 文件中引入一个 ValidationResult 类型:
// 📂 prerenderByDefault/types.ts
import type { isValidAstroConfig } from “./isValidAstroConfig”;
export type ValidationResult = ReturnType<typeof isValidAstroConfig>;
// …
Now, create a new promise in the main index file:
现在,在主文件 index 中创建一个新的promise:
// … import type { Config, ValidationResult } from “./types”;
let resolveValidationResult: (value: ValidationResult) => void;
let validationResultPromise = new Promise() < ValidationResult > ((resolve) => { resolveValidationResult = resolve; });
// …
Right after validation is done inastro:config:done, let’s go ahead and resolve the promise with the result of the validation:
在 astro:config:done 中完成验证之后,让我们继续使用验证的结果来解决promise:
// … “astro:config
“(options) { const silent = config?.silent ?? false; const validationResult = isValidAstroConfig(options.config);// resolve the validation promise resolveValidationResult(validationResult);
// … }
Then pass both the integration configuration and validation result promise to injectVitePlugin:
然后将集成配置和验证结果promise都传递给 injectVitePlugin :
// … plugins: [injectVitePlugin(config, validationResultPromise)],
We must now update injectVitePlugin to await the validation result promise as shown below:
我们现在必须更新 injectVitePlugin 以等待验证结果承诺,如下所示:
import type { Plugin } from “vite”; import type { Config, ValidationResult } from “./types”;
export const injectVitePlugin = async ( config: Config, validationResultPromise: Promise<ValidationResult> ): Promise<Plugin | null> => {
// await the validation result promise before continuing const validationResult = await validationResultPromise;
// exit if the validation result value is false if (!validationResult.value) { return null; }
// TBD .. const prerenderByDefaultPlugin = { name: "" };
return { name: “vite-plugin-astro-inject-default-prerender”, configResolved: (options) => { (options.plugins as Plugin[]).unshift(prerenderByDefaultPlugin); }, }; };
Phew! We’ve eradicated the pesky race condition. So our solution is shaping up nicely, eh?
呼!我们已经根除了讨厌的种族条件。所以我们的解决方案进展顺利,嗯?
Writing Vite plugins for Astro
为Astro编写Vite插件
We know what a Vite plugin looks like now. However, the core functionality of our integration hasn’t been written yet. This is currently represented by the prerenderByDefaultPlugin variable, i.e.,
我们现在知道Vite插件是什么样子的了。然而,我们集成的核心功能还没有编写出来。这当前由 prerenderByDefaultPlugin 变量表示,即
// TBD… const prerenderByDefaultPlugin = { name: "" };
Let’s change this to be returned from a separate getVitePlugin function:
让我们将其更改为从单独的 getVitePlugin 函数返回:
// … import { getVitePlugin } from “./getVitePlugin”;
export const injectVitePlugin = async ( config: Config, validationResultPromise: Promise<ValidationResult> ): Promise<Plugin | null> => { // …
const prerenderByDefaultPlugin = getVitePlugin(config);
// … };
Where getVitePlugin is the following:
其中 getVitePlugin 为以下内容:
import type { Config } from “./types”;
export const getVitePlugin = (config: Config) => ({ name: “vite-plugin-astro-prerender-by-default”, });
Parsing and transforming ASTs
解析和转换AST
We want to transform a user’s Astro code and make updates before it is eventually built.
我们希望转换用户的Astro代码并在最终构建之前进行更新。
Luckily Vite has a transform 6 hook we can leverage just for this. Let’s play around with this a bit in our getVitePlugin function:
幸运的是,Vite有一个 transform 6 钩子,我们可以利用它。让我们在 getVitePlugin 函数中尝试一下这一点:
import type { Plugin } from “vite”; import type { Config } from “./types”; import { log } from “./log”;
export const getVitePlugin = (config: Config): Plugin => { const silent = config?.silent ?? false;
return { name: “vite-plugin-astro-prerender-by-default”, async transform(code, id) { // 👀 log the value of the id log({ silent, message: id, }); }, }; };
The transform hook is ideal for transforming individual modules in the build process, and we receive the code in the file as a string and an id representing the string path to the file name.
transform 钩子非常适合在构建过程中转换单个模块,我们在文件中接收到 code 作为 string 和 id ,表示文件名的 string 路径。
To test how this works, update the Astro project config to include a server output.
为了测试这是如何工作的,更新Astro项目配置以包含 server 输出。
export default defineConfig({ output: “server”, integrations: [prerenderByDefault()], });
Then add an adapter to handle server-side rendering with:
然后添加一个适配器来处理服务器端渲染:
npx astro add netlify
We may now explore the log fromgetVitePlugin by running npm run build from the terminal.
我们现在可以通过从终端运行 npm run build 来探索 getVitePlugin 的日志。
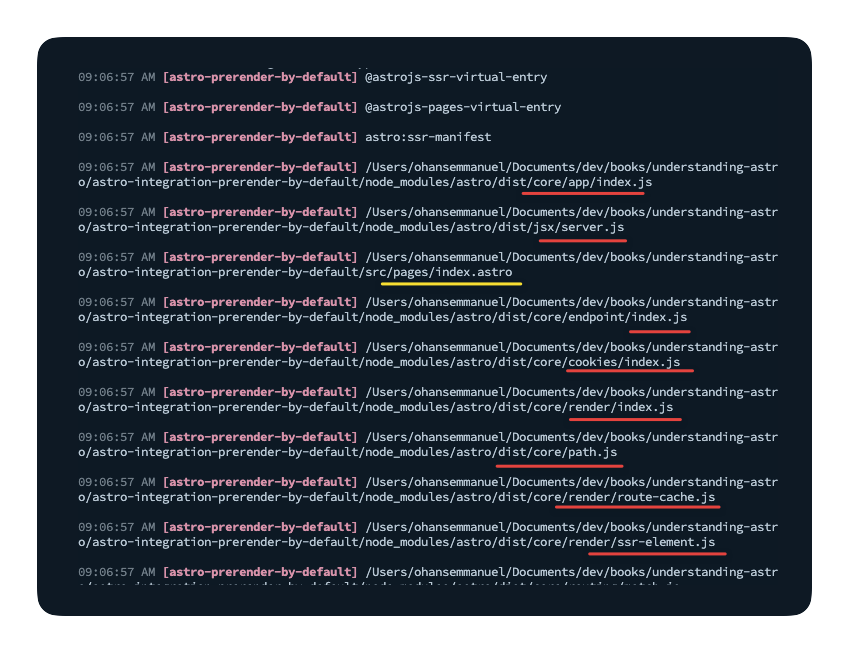
Notice how many more files are transformed than just the user’s .astro pages.
请注意,除了用户的 .astro 页面之外,还有多少文件被转换。
Exploring the list of transformed files.
浏览已转换文件的列表。
Most of the files here are related to Astro internals. Therefore, we must only concern ourselves with the user’s .astro pages. We want to transform those files while leaving everything else as is.
这里的大部分文件都与Astro内部有关。因此,我们必须只关注用户的 .astro 页面。我们希望转换这些文件,同时保留其他所有内容。
Let’s add a simple conditional:
让我们添加一个简单的条件:
// … return { name: “vite-plugin-astro-prerender-by-default”, async transform(code, id) { // 👀 filter out other file types if (!id.endsWith(“.astro”)) { return; }
// log the value of the id
log({
  silent,
  message: id,
});
}, };
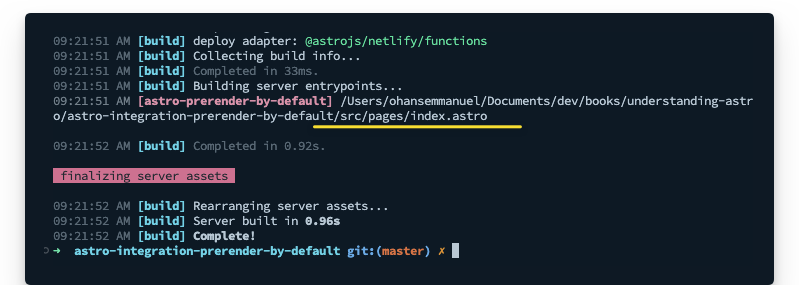
Now, rerun the build, and we should have just the user’s .astro page files.
现在,重新运行构建,我们应该只有用户的 .astro 页文件。
Logging the project page files.
记录项目页文件。
This is excellent. 太棒了
Just after the conditional, we can get on with parsing the code. To do this, we will leverage the parse utility exported from Astro’s compiler as shown below:
在条件之后,我们可以继续解析代码。为此,我们将利用从Astro编译器导出的 parse 实用程序,如下所示:
// ...
async transform(code, id) {
  if (!id.endsWith(".astro")) {
    return;
  }

  // 👀
  const { ast } \= await parse(code);

  // 👀 logs for debugging
  log({
    silent,
    message: "Parsed AST",
  });

  console.log(ast);
}
This project only has a single page in src/index.astro. So, essentially, only that page will be transformed.
此项目在 src/index.astro 中只有一个页面。因此,本质上,只有该页面将被转换。
Here’s the content of the page:
下面是页面的内容:
Here’s the corresponding AST logged to the console:
下面是记录到控制台的相应AST:
{ type: ‘root’, children: [ { type: ‘frontmatter’, value: ‘\n’, position: [Object] }, { type: ‘element’, name: ‘html’, attributes: [Array], children: [Array] }, { type: ‘text’, value: ‘\n’, position: [Object] } ] }
Every parsed AST will have a root element. An empty file will have the shape:
每个解析的AST都有一个 root 元素。空文件的形状如下:
{ type: “root”; }
Knowing this, we can build out our parsing logic. However, we need a way to walk the entire AST. We could write a sophisticated function to loop over every element in the tree. However, we can leverage the walk utility from the Astro compiler, which will traverse every node in the tree, and we could perform any actions on a specified node via a callback.
知道了这一点,我们就可以构建解析逻辑了。然而,我们需要一种方法来行走整个AST。我们可以编写一个复杂的函数来遍历树中的每个元素。然而,我们可以利用Astro编译器中的 walk 实用程序,它将遍历树中的每个节点,并且我们可以通过回调在指定节点上执行任何操作。
Let’s take that for a spin by adding the following:
让我们通过添加以下内容来进行旋转:
const { ast } = await parse(code);
// 👀 walk(ast, (node) => { console.log(”=========== \n”, node); });
Inspect the logs, and we should have the different nodes logged to the console, for example:
检查日志,我们应该将不同的节点记录到控制台,例如:
=========== { type: ‘root’, children: [ { type: ‘frontmatter’, value: ‘\n’, position: [Object] }, { type: ‘element’, name: ‘html’, attributes: [Array], children: [Array] }, { type: ‘text’, value: ‘\n’, position: [Object] } ] } =========== { type: ‘frontmatter’, value: ‘\n’, position: { start: { line: 1, column: 1, offset: 0 }, end: { line: 2, column: 4, offset: 7 } } } =========== // … see logs
It’s game time. Let’s go ahead and write out the complete code, which involves
游戏时间到了让我们继续写出完整的代码,其中包括
- Walking the AST 行走在东方
- Checking if the file has a frontmatter
检查文件是否有前置文件 - Checking if the file already has a
prerenderexport in its frontmatter. For this, we will use es-module-lexer , which outputs the list of exports of import specifiers
检查文件在其前端中是否已经有prerender导出。为此,我们将使用es-module-lexer,它输出导入说明符的导出列表 - Adding
export const prerender = trueto the code where required
在需要的地方向代码添加export const prerender = true - After transforming the AST, i.e., adding
export const prerender = truewhere needed, we will return the AST to code via theserializeutility from the Astro compiler.
在转化AST之后,即,在需要的地方添加export const prerender = true,我们将通过Astro编译器的serialize实用程序将AST返回到代码。
Here we go: 开始吧
import type { Plugin } from “vite”; import type { Config } from “./types”; import { parse } from “@astrojs/compiler”; import { walk, is, serialize } from “@astrojs/compiler/utils”; import { parse as parseESModuleLexer } from “es-module-lexer”;
import { log } from “./log”;
export const getVitePlugin = (config: Config): Plugin => { const silent = config?.silent ?? false;
return { name: “vite-plugin-astro-prerender-by-default”, async transform(code, id) { if (!id.endsWith(“.astro”)) { return; }
  const { ast } \= await parse(code);

  walk(ast, (node) \=> {
    if (is.root(node)) {
      const firstChildNode \= node.children?.\[0\];

      //Check that a frontmatter exists as the first child node
      if (firstChildNode?.type \=== "frontmatter") {
        //Using es-module-lexer, get the list of exports
        const \[, exports\] \= parseESModuleLexer(firstChildNode.value);

        //Check if any export is named "prerender". "n" stands for "name."
        if (exports.some((e) \=> e.n \=== "prerender")) {
          log({
            silent,
            message: "'prerender' export found. Skipping",
          });

          // exit - let whatever prerender value is exported take effect
          return;
        }

        // add prerender export for the static build, i.e., "export const prerender = true."
        // note that we concatenate this to whatever the current string value of the node is
        firstChildNode.value \= \`\\nexport const prerender = true; \\n ${firstChildNode.value}\`;

        log({
          silent,
          message: "Added 'prerender' export to frontmatter",
        });
      } else {
        // No frontmatter in this astro component. Add frontmatter node and default export
        log({
          silent,
          message: "No frontmatter, going ahead to add one",
        });

        // "unshift" to add this to the start of the list, i.e., the first child
        node.children.unshift({
          type: "frontmatter",
          value: "\\nexport const prerender = true\\n",
        });
      }
    }
  });

  //serialise the AST and return the result
  const result \= serialize(ast);

  // added for the reader's debugging
  console.log(result);
  return result;
},
}; };
The code block above is annotated. Please take a close look at it. If something is unclear, add some console.log. Together with the annotation, I’m sure you’ll understand the explanations even better!
上面的代码块被注释了。请仔细看看。如果有什么不清楚的地方,添加一些 console.log 。再加上注释,我相信你会更好地理解这些解释!
Manual testing 手动测试
We have our solution complete. Now, let’s test it. First, build the project with npm run build, and even though we have a server output in the Astro config, we now have the index.astro page statically built by default!
我们已经完成了解决方案。现在我们来测试一下首先,使用 npm run build 构建项目,即使我们在Astro配置中有 server 输出,我们现在默认静态构建 index.astro 页面!
Pre-rendering the index.astro static route.
预渲染index.astro静态路由。
To render a server-side page, we need to manually add export const prerender = false.
为了呈现服务器端页面,我们需要手动添加 export const prerender = false 。
Create a new page with identical content as index.astro and have the prerender export.
创建一个与 index.astro 内容相同的新页面,并导出 prerender 。
export const prerender = false;
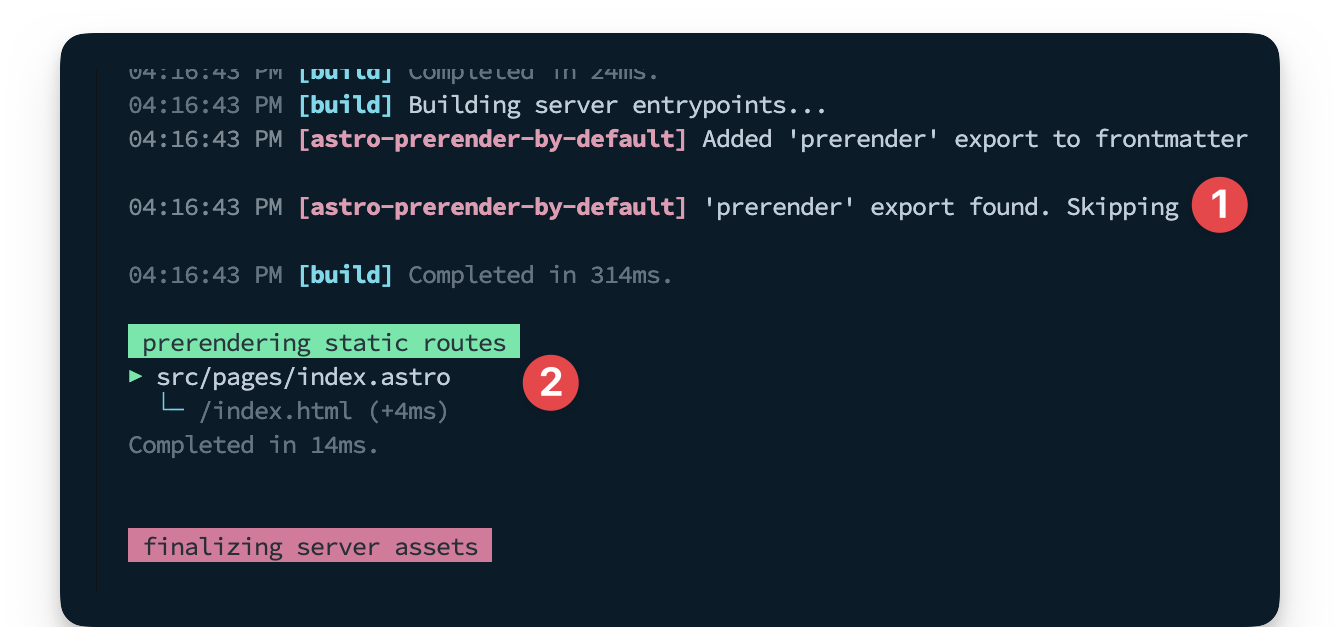
Now rerun the build and notice how only the index.astro page is pre-rendered.
现在重新运行构建并注意到只有 index.astro 页面是如何预呈现的。
Skipping prerender when export is found.
找到导出时跳过预渲染。
Building renderers and library Integrations
构建渲染器和库集成
As stated earlier in the chapter, the focus here is feature integrations. For building renderers and library integrations, I strongly recommend taking a look at the source code for popular integrations such as:
正如本章前面所述,这里的重点是功能集成。对于构建渲染器和库集成,我强烈建议查看流行集成的源代码,例如:
- The React , Preactor Vue renderer integrations.
React,Preactor Vue渲染器集成。 - The tailwind or partytown library integrations.
顺风或partytown图书馆集成。
Most of these integrations are barely 100 lines of code at the core. Dig into them!
这些集成中的大多数在核心只有不到100行代码。挖进去!
Conclusion 结论
Building custom integrations isn’t a practice we should leave to the “smart” ones among us. Heck! Writing compilers isn’t a prerequisite! Building upon the explanations and examples discussed here, we’ve seen how mere mortals like us can reach down into the internals of Astro and bend it to our will. Now, put this knowledge to practice.
构建自定义集成不是一个我们应该留给我们中的“聪明”的实践。见鬼!编写编译器不是先决条件!基于这里讨论的解释和例子,我们已经看到像我们这样的凡人是如何深入到Astro的内部,并使其服从我们的意志。现在,把这些知识付诸实践。
Footnotes 页签
-
What is a sitemap? https://developers.google.com/search/docs/crawling-indexing/sitemaps/overview ↩
什么是网站地图?https://developers.google.com/search/docs/crawling-indexing/sitemaps/overview example -
The injectSctipt option: https://docs.astro.build/en/reference/integrations-reference/#injectscript-option ↩
injectSctipt选项:https://docs.astro.build/en/reference/integrations-reference/#injectscript-option第0#页 -
Colours in Javascript console (SO) https://stackoverflow.com/questions/7505623/colors-in-javascript-console ↩
颜色在JavaScript控制台(SO)https://stackoverflow.com/questions/7505623/colors-in-javascript-console ↩ -
Astro integration API: https://docs.astro.build/en/reference/integrations-reference/ ↩
Astro集成API:https://docs.astro.build/en/reference/integrations-reference/第0#页 -
The Vite configuration options https://vitejs.dev/config/ ↩
Vite配置选项https://vitejs.dev/config/ -
Transforming custom file types in Vite : https://vitejs.dev/guide/api-plugin.html#transforming-custom-file-types
在Vite中转换自定义文件类型:https://vitejs.dev/guide/api-plugin.html#transforming-custom-file-typesThe transform hook: https://rollupjs.org/plugin-development/#transform ↩
transform hook:https://rollupjs.org/plugin-development/#transform第0#页
